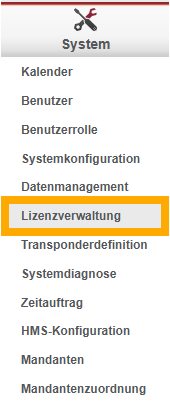
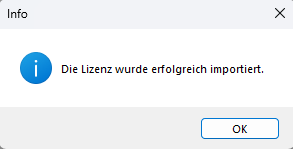
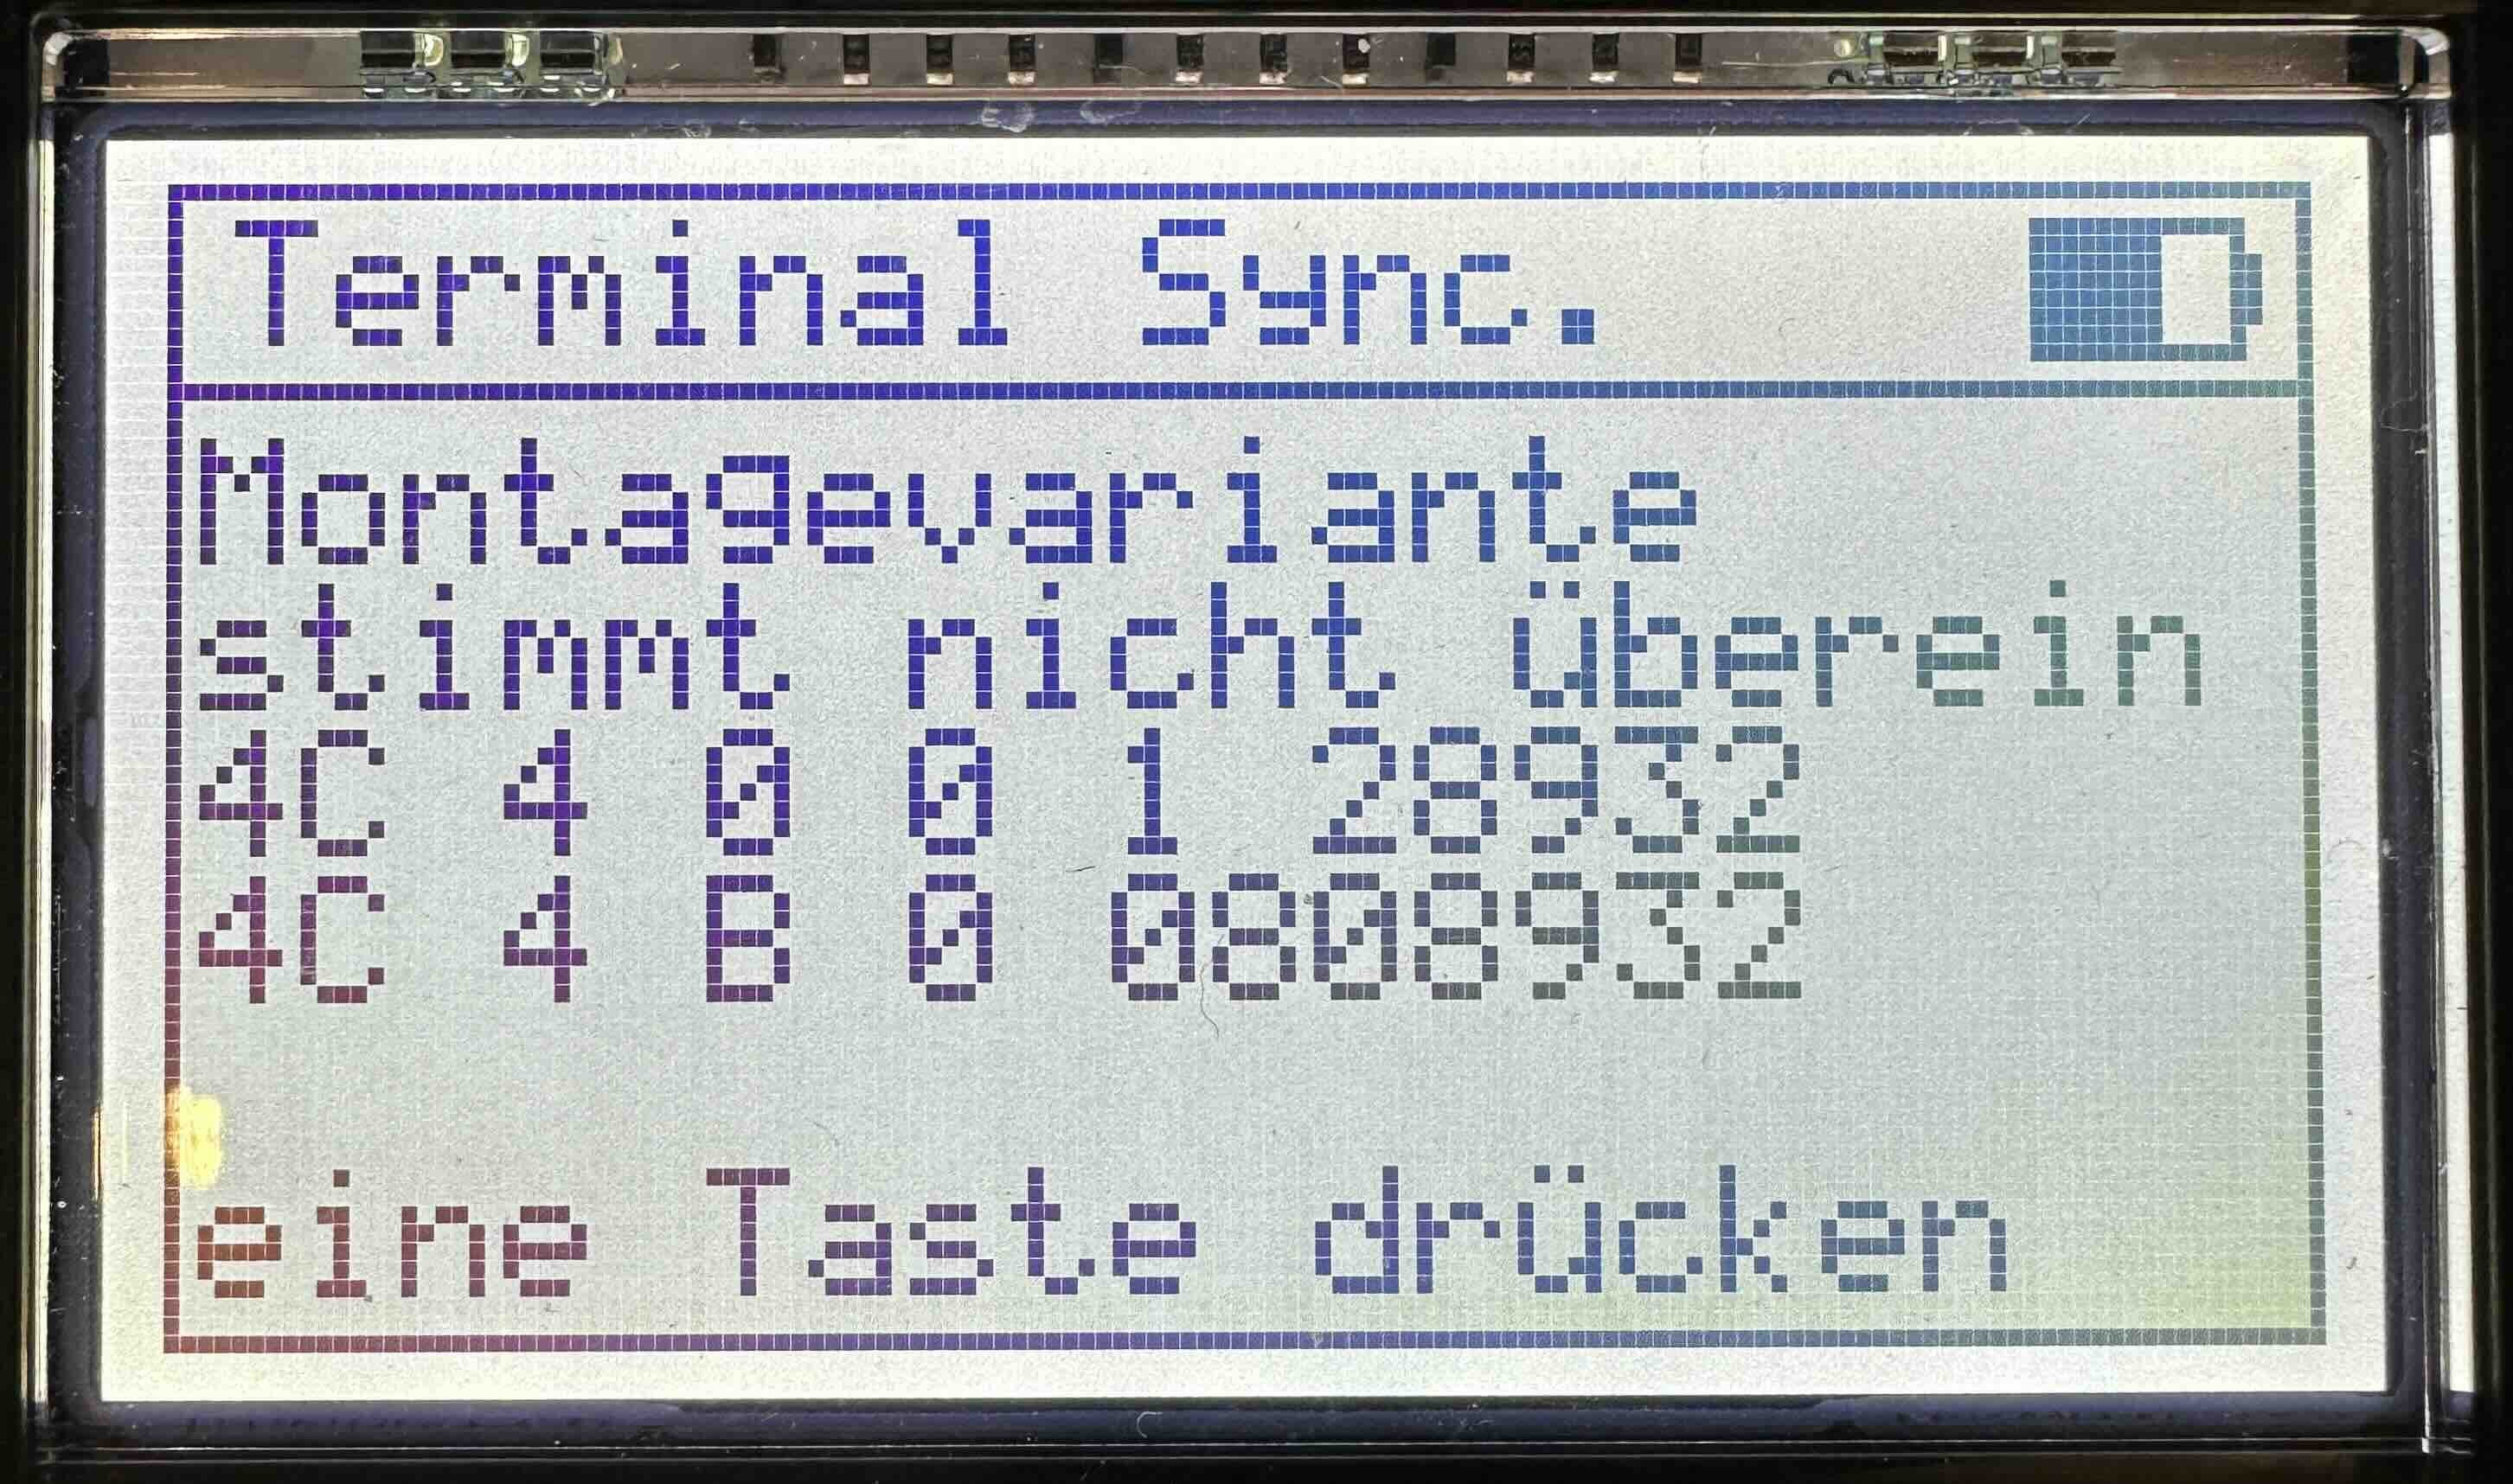
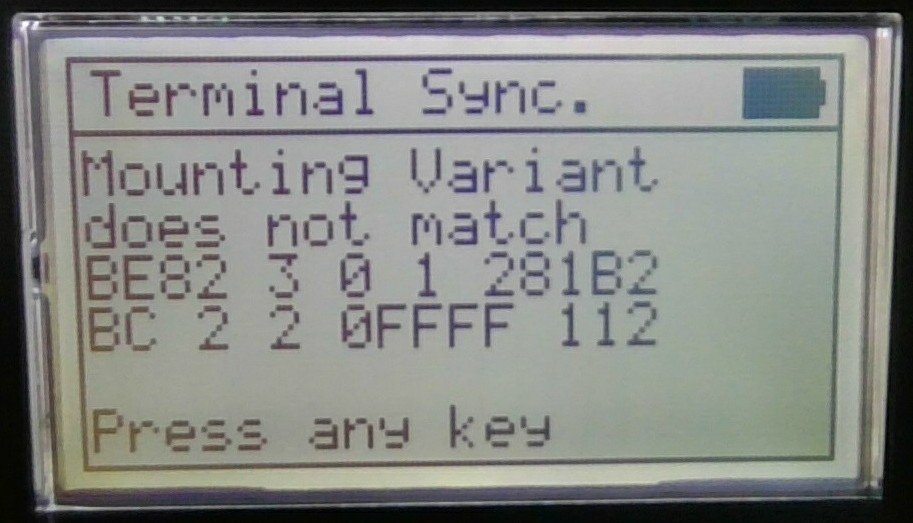
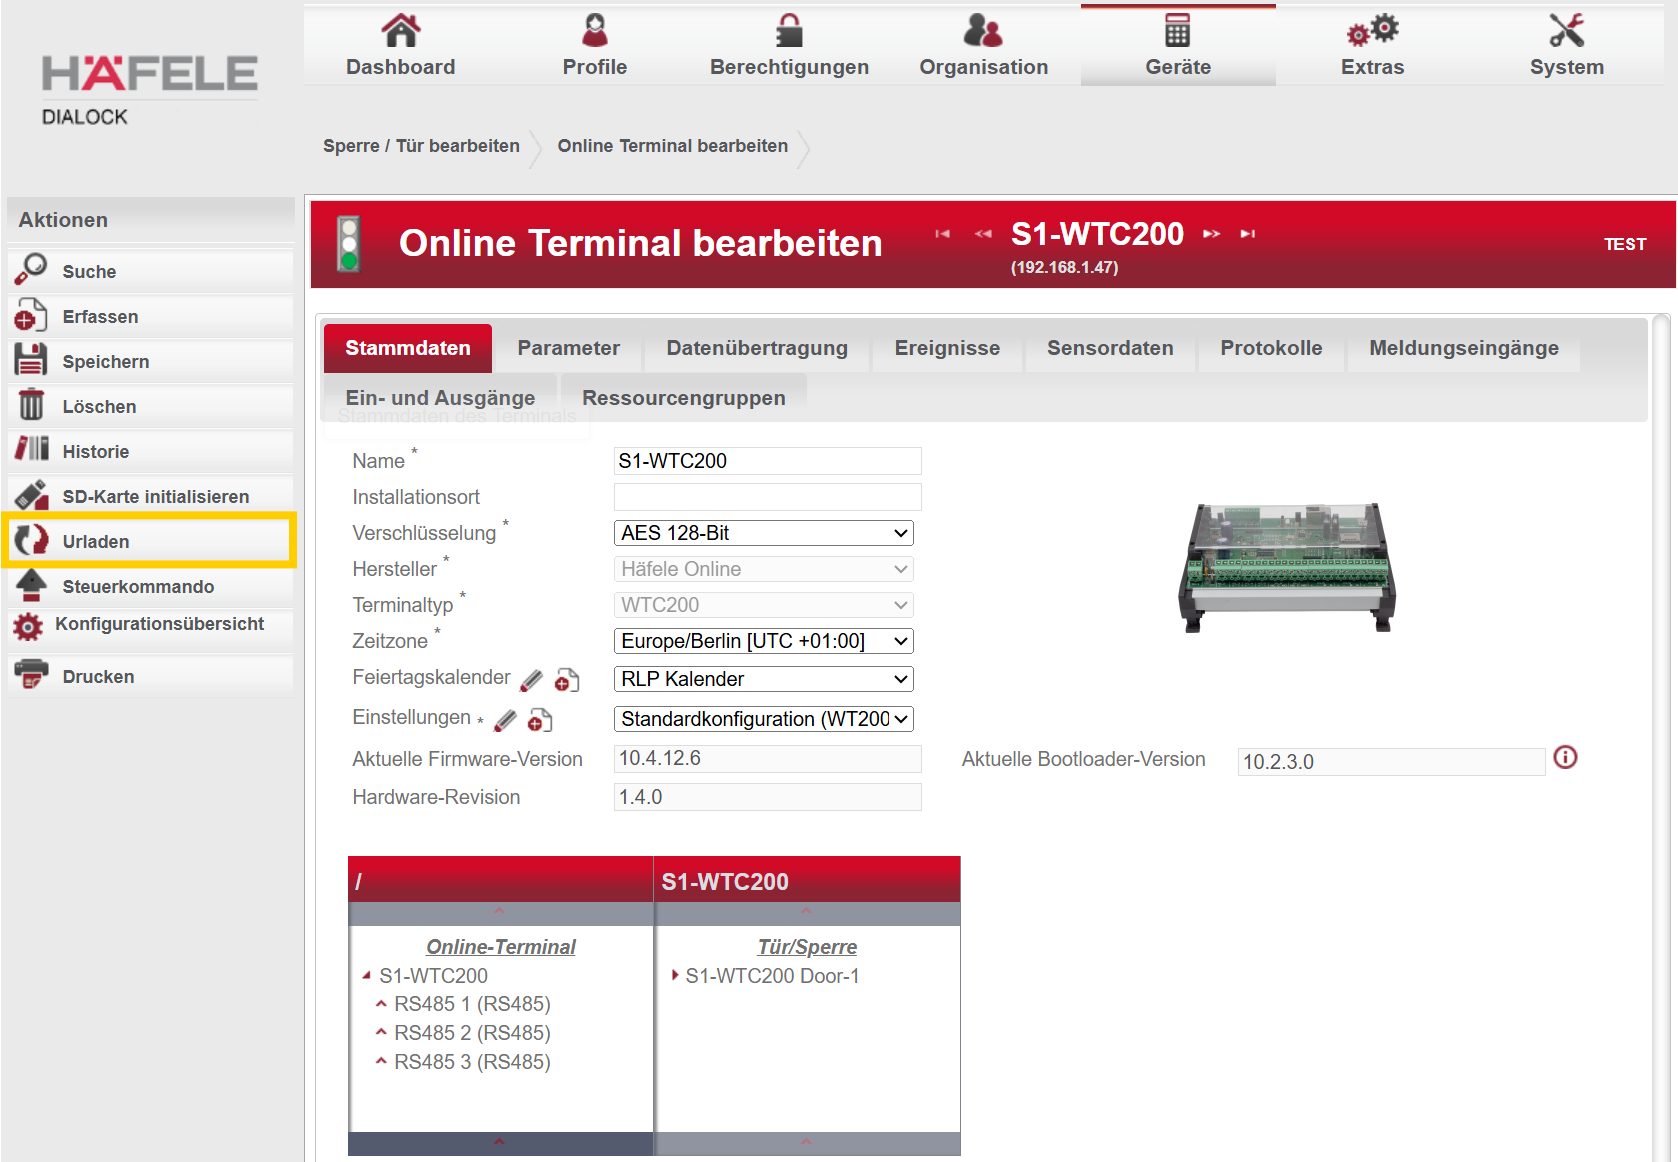
Was ist der Autorisierungsfehler #1000?
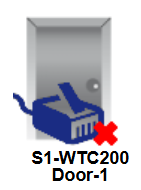
Der Autorisierungsfehler #1000 wird auf der MDU angezeigt, wenn eine Handlung mit der MDU nicht berechtigt wurde.
Was sind mögliche Ursachen?
- Die MDU-Aktion wurde nicht innerhalb eines bestimmten Zeitfensters mit einem privilegierten Key am Terminal bestätigt.
- Der für die Autorisierung verwendete Key ist nicht für die Bedienung der MDU berechtigt.
- Der für die Autorisierung verwendete Key hat keine Schließberechtigung für die Tür oder ist nicht mehr gültig.
- Die Konfiguration des Terminals ist fehlerhaft, sodass gültige Keys nicht mehr erkannt werden.
- Der Leser des Terminals ist beeinträchtigt und kann keine Keys mehr lesen.
Wie kann ich den Fehler beheben?
Korrekte Handhabung mit der MDU beachten
Achten Sie darauf, dass Sie die korrekte Schrittreihenfolge beim Ausführen von MDU-Aktionen einhalten. Fast alle Aktionen mit der MDU erfordern eine Autorisierung durch einen privilegierten Key (4-Augen-Prinzip). Dadurch soll vermieden werden, dass Unbefugte mithilfe der MDU die Terminals manipulieren.
Halten Sie diese Schritte ein:
- Wählen Sie die gewünschte Aktion auf der MDU aus und nähern Sie die MDU dem Terminal an.
- Das Terminal beginnt zu blinken und erwartet die Autorisierung - Auf der MDU erscheint "Autorisieren am Terminal"
- Entfernen Sie die MDU vom Terminal
- Halten Sie den privilegierten Key an das Terminal - Dieses blinkt einmal positiv (weiß, grün oder blau) und piepst einmal auf.
- Entfernen Sie den Key vom Terminal
- Halten Sie erneut die MDU ans Terminal - Die Datenübertragung fährt nun fort.
- (Je nach ausgewählter Aktion) - Warten Sie bis die Übertragung beendet ist oder auf weitere Aufforderungen auf der MDU.
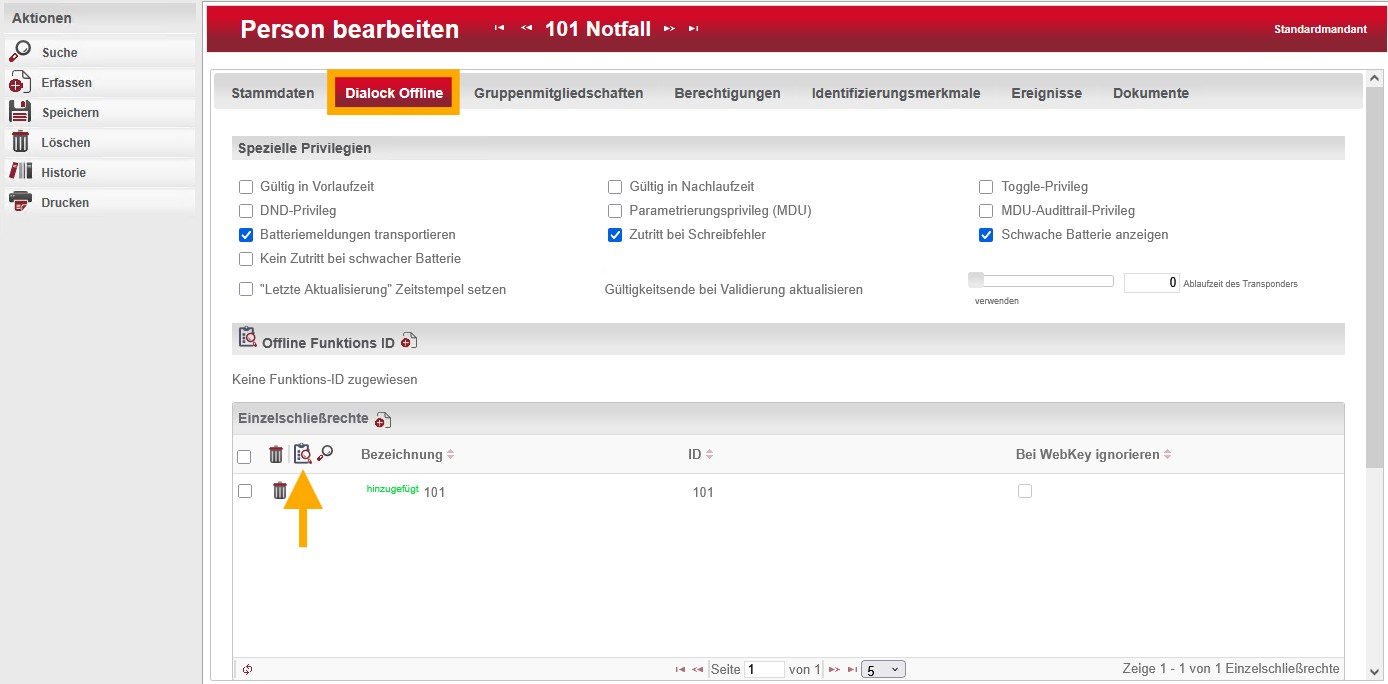
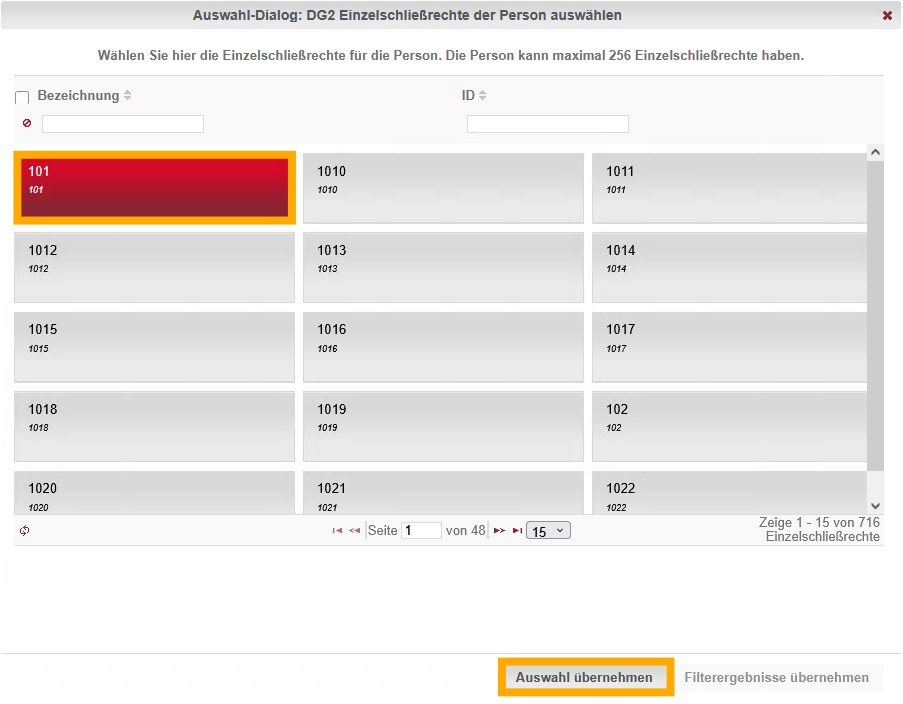
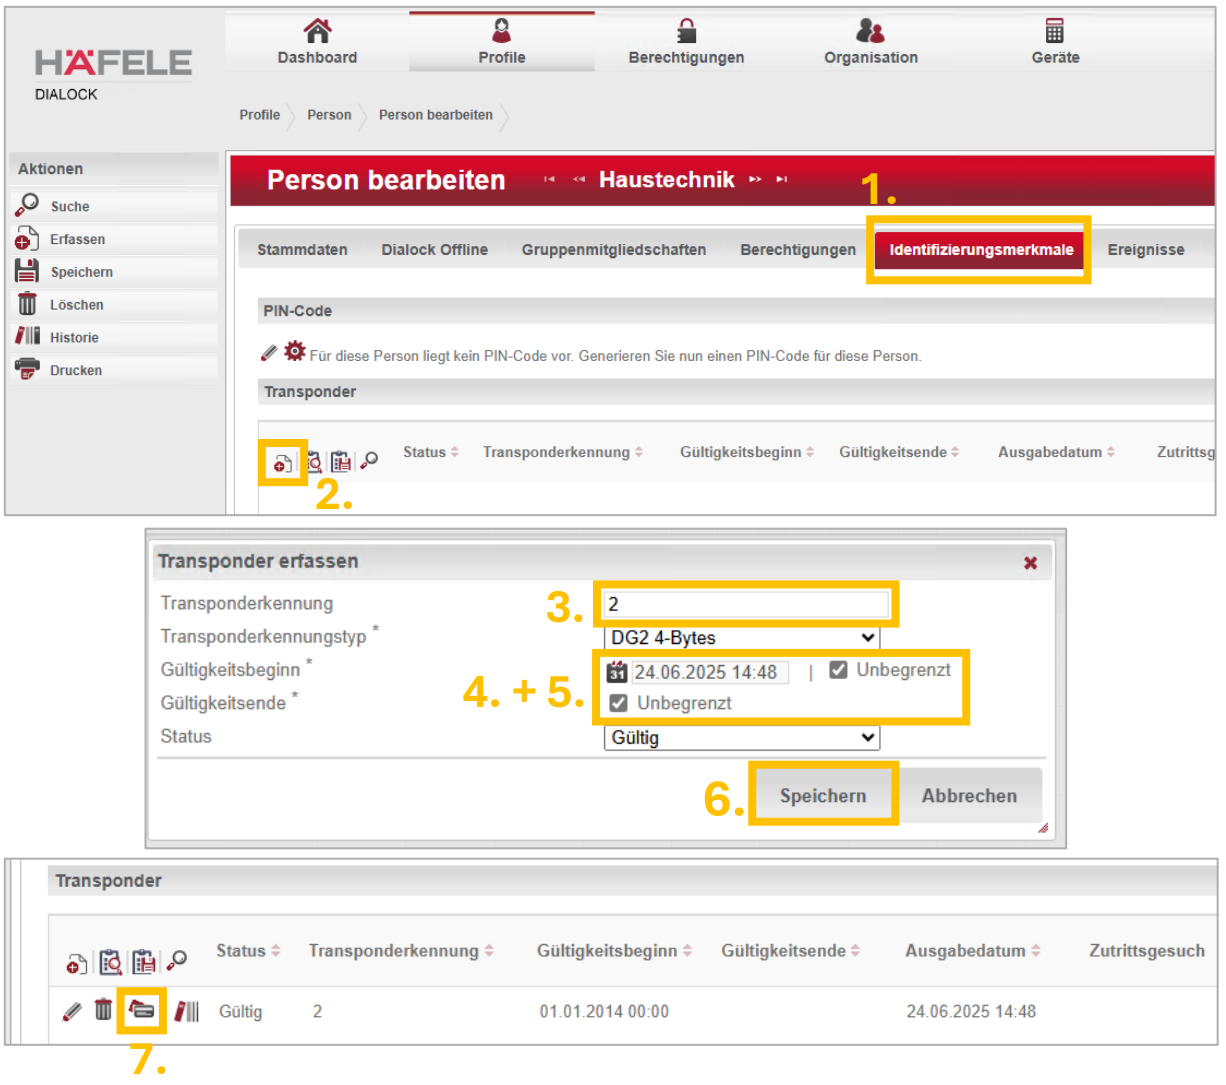
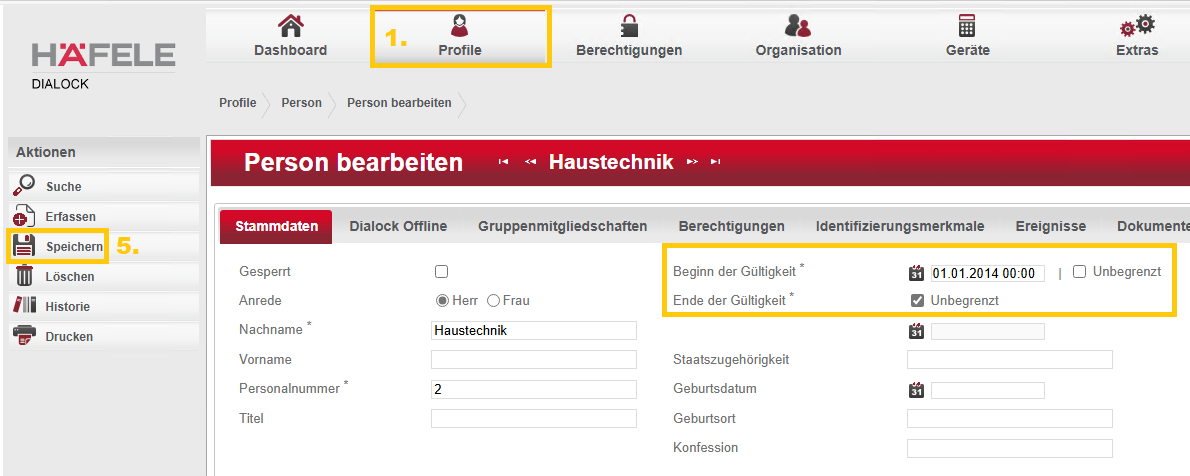
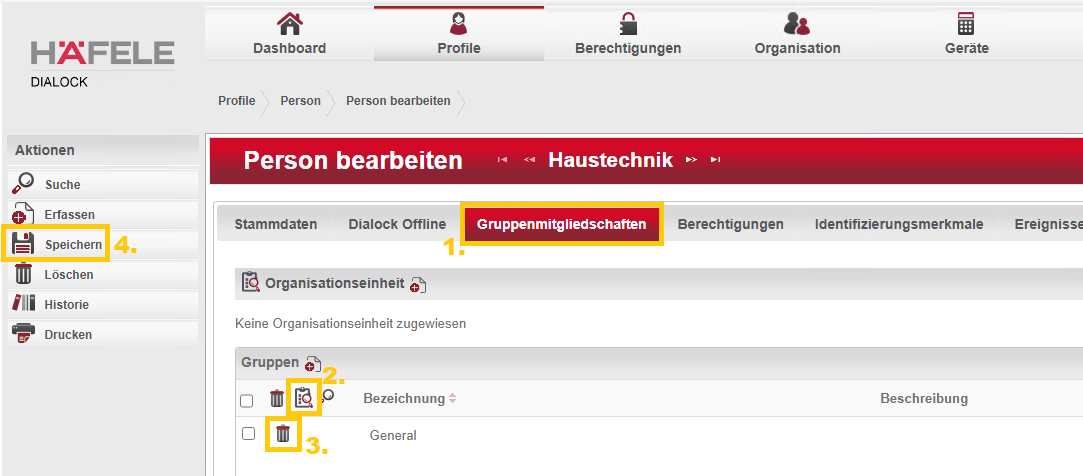
Berechtigungen des Keys überprüfen
Der privilegierte Key muss folgende Kriterien erfüllen:
- Er benötigt eine Schließberechtigung für den betroffenen Zutrittspunkt. (sinnvoll ist es Keys mit Generalschließrecht als privilegierte Keys zu wählen)
- Der Key muss gültig sein (Start und Ende der Gültigkeit beachten - idealerweise unbegrenzt)
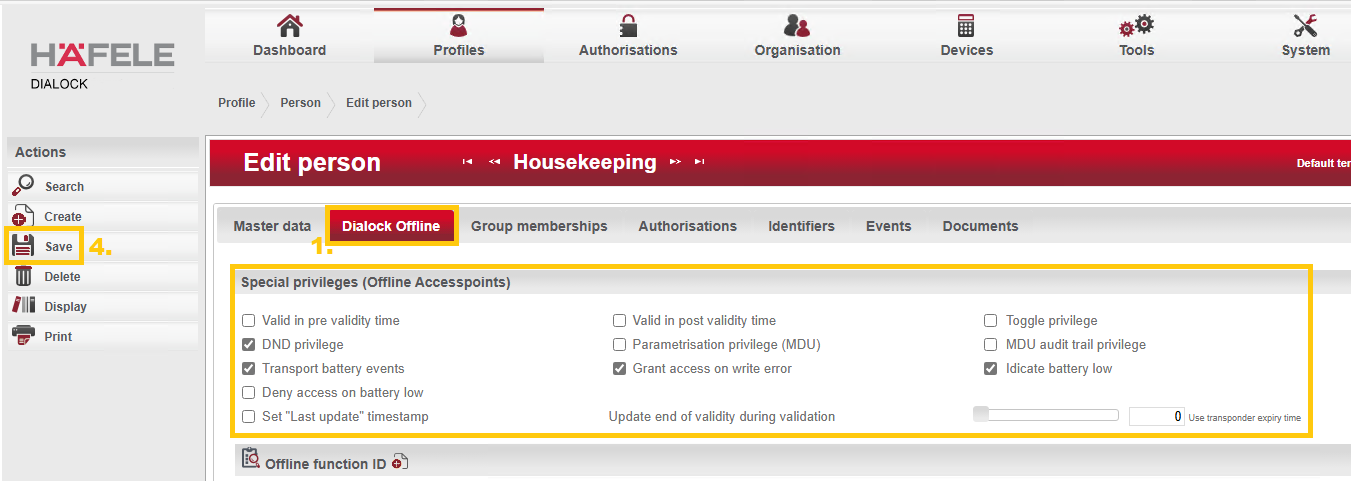
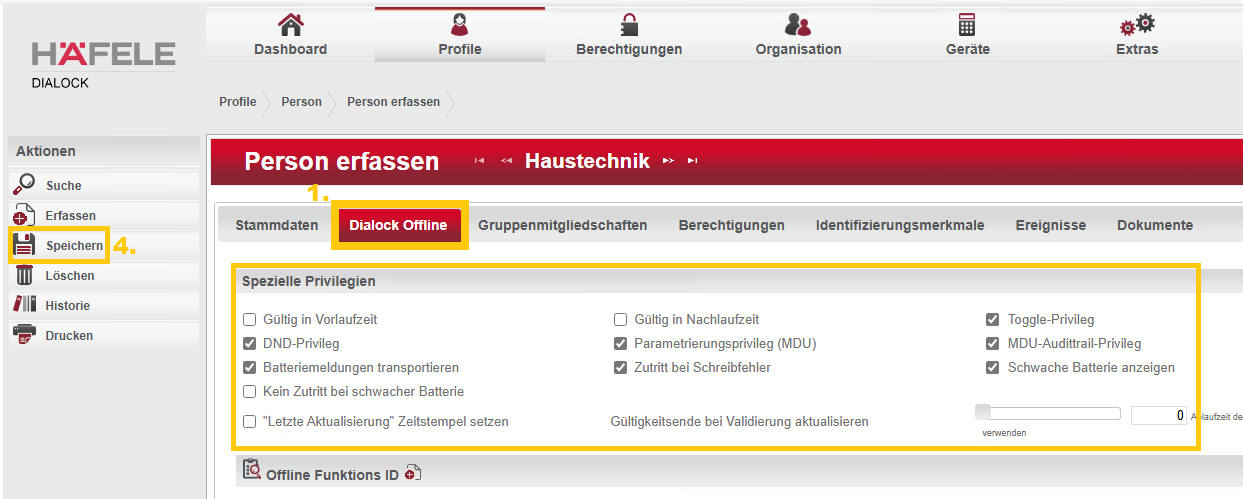
- Der Key benötigt die beiden speziellen Privilegien "Parametrierungs Privileg (MDU)" und "MDU-Audittrail-Privileg"
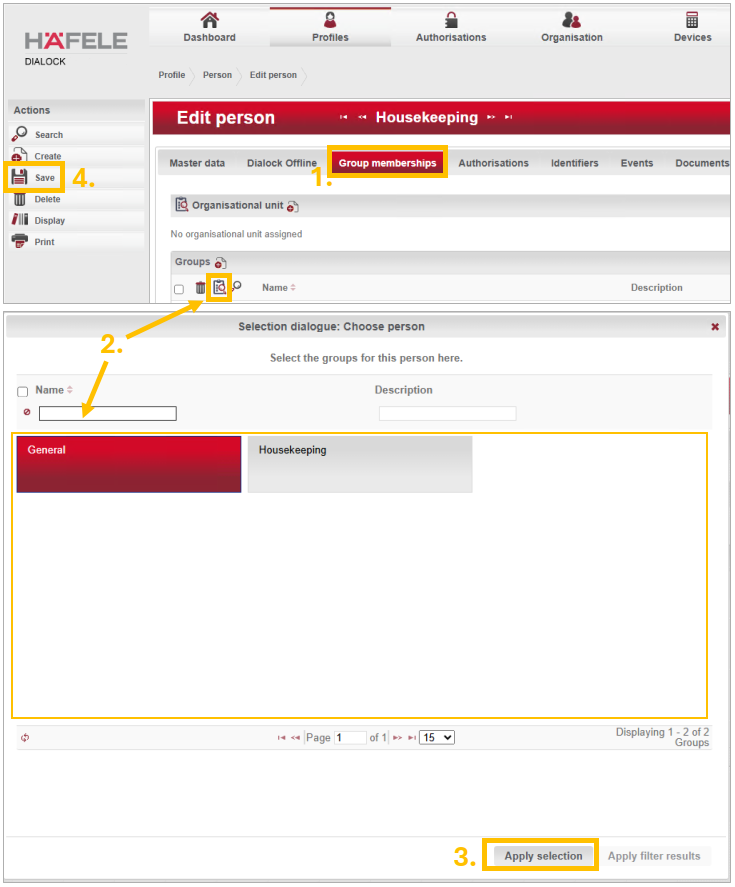
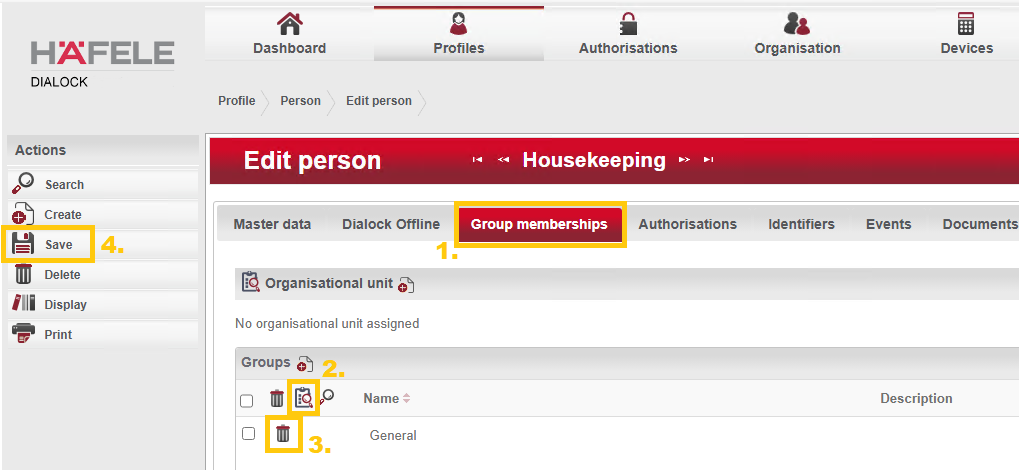
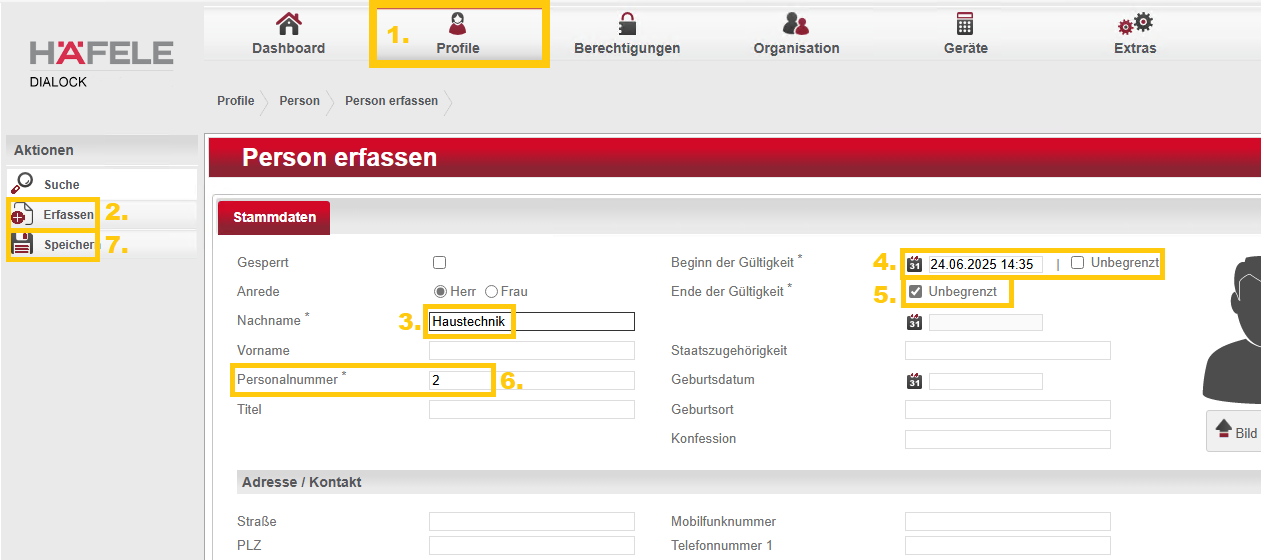
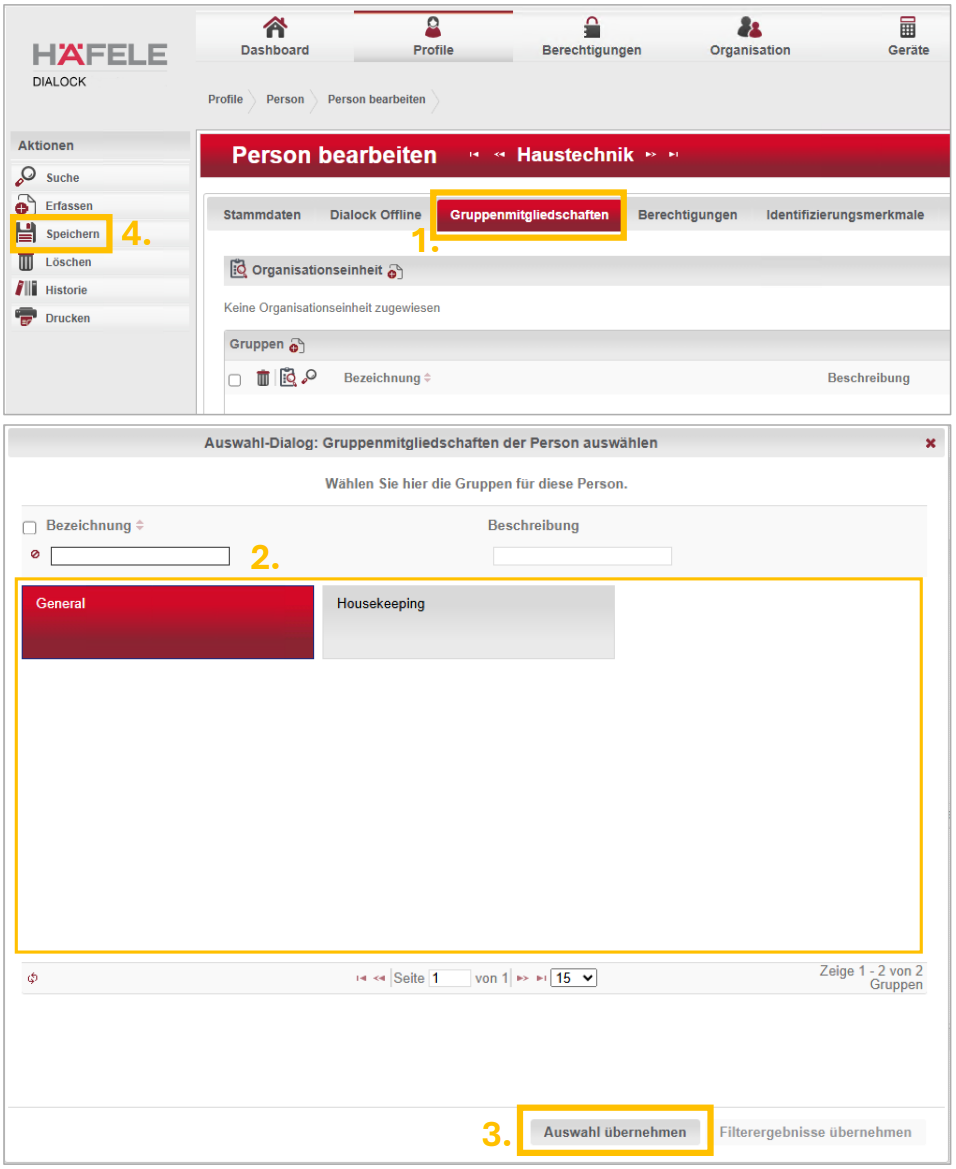
Diese Eigenschaften können Sie in der DG2 Software unter "Profile" > "Personen" prüfen. Suchen Sie dazu aus der Liste die entsprechende Person heraus. Sollten eines oder mehrere der Kriterien nicht erfüllt sein, ändern Sie die entsprechenden Einstellungen und speichern Sie diese ab. Stellen Sie dann den Key erneut aus. Nun sollte dieser als privilegierter Key akzeptiert werden.
Terminal auf fehlerhafte Konfiguration prüfen
Lesen Sie mithilfe der MDU die Terminal Info aus und überprüfen Sie, ob der Name des Terminals sowie die Uhrzeit korrekt sind. Sollten diese abweichen, könnte das die Ursache für den Autorisierungsfehler #1000 sein.
Hier hilft meistens ein Reset des Terminals oder ein Zugriff per Code. Im Anschluss kann das Terminal dann neu programmiert werden.
Terminal Montage prüfen
Sofern alle anderen Ursachen ausgeschlossen wurden, sollte die Montage des Terminals überprüft werden.
Eine Terminalkomponente könnte beschädigt oder nicht richtig angeschlossen sein. Prüfen Sie daher, ob alles korrekt verbunden ist und keine äußerlichen Schäden zu erkennen sind.
Sollte der Fehler auch nach Überprüfung der Montage bestehen bleiben, ist möglicherweise der Leser oder das Logikmodul defekt und sollte ausgetauscht werden.
Change terminal template
Preparations (optional)
If you do not know which template is required, we advise you to gather the following information in advance.
How do I check my HMS license?
How do I assign a template?
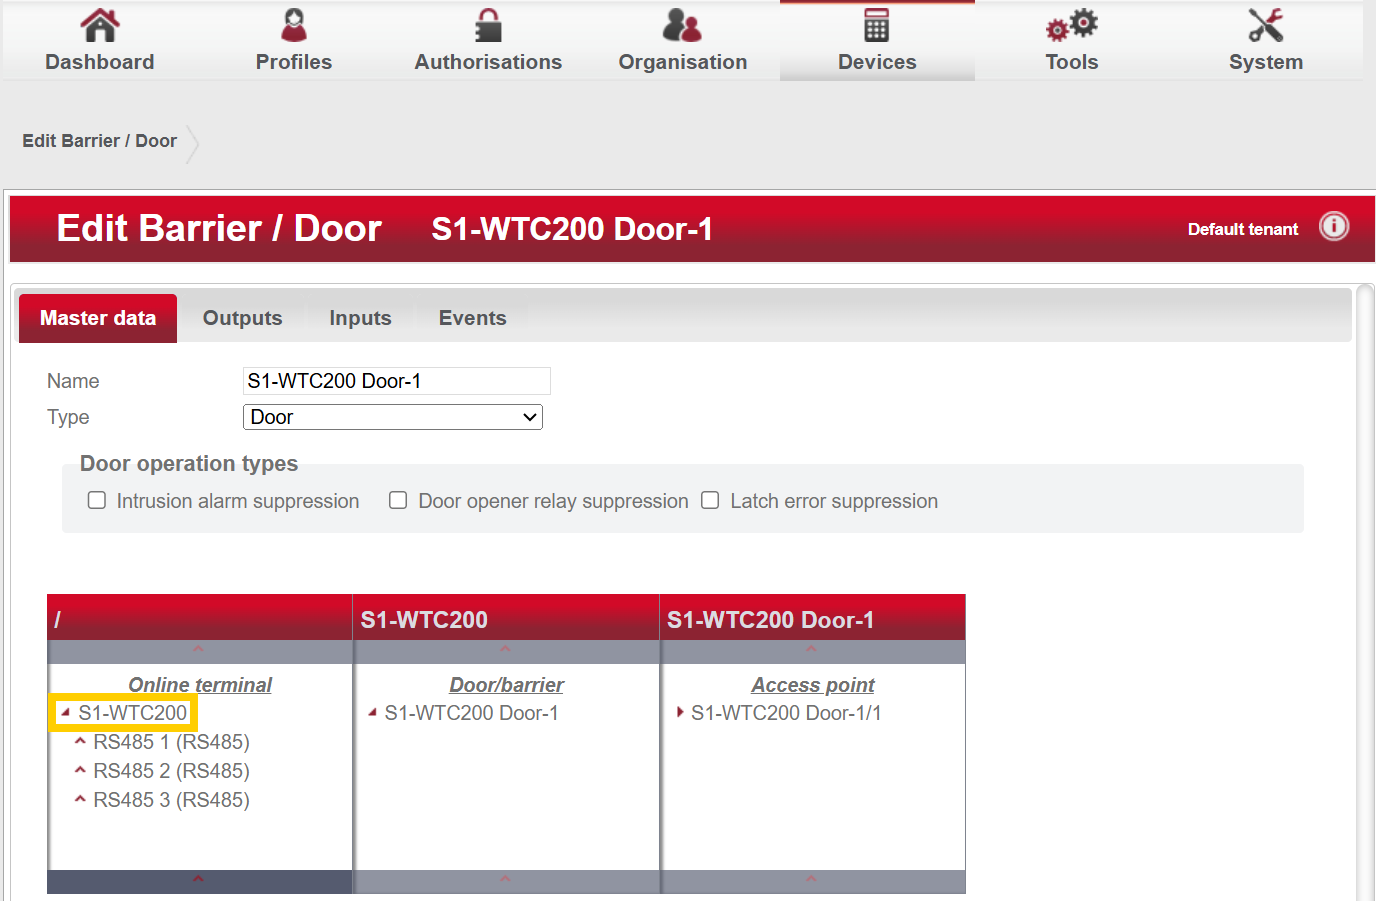
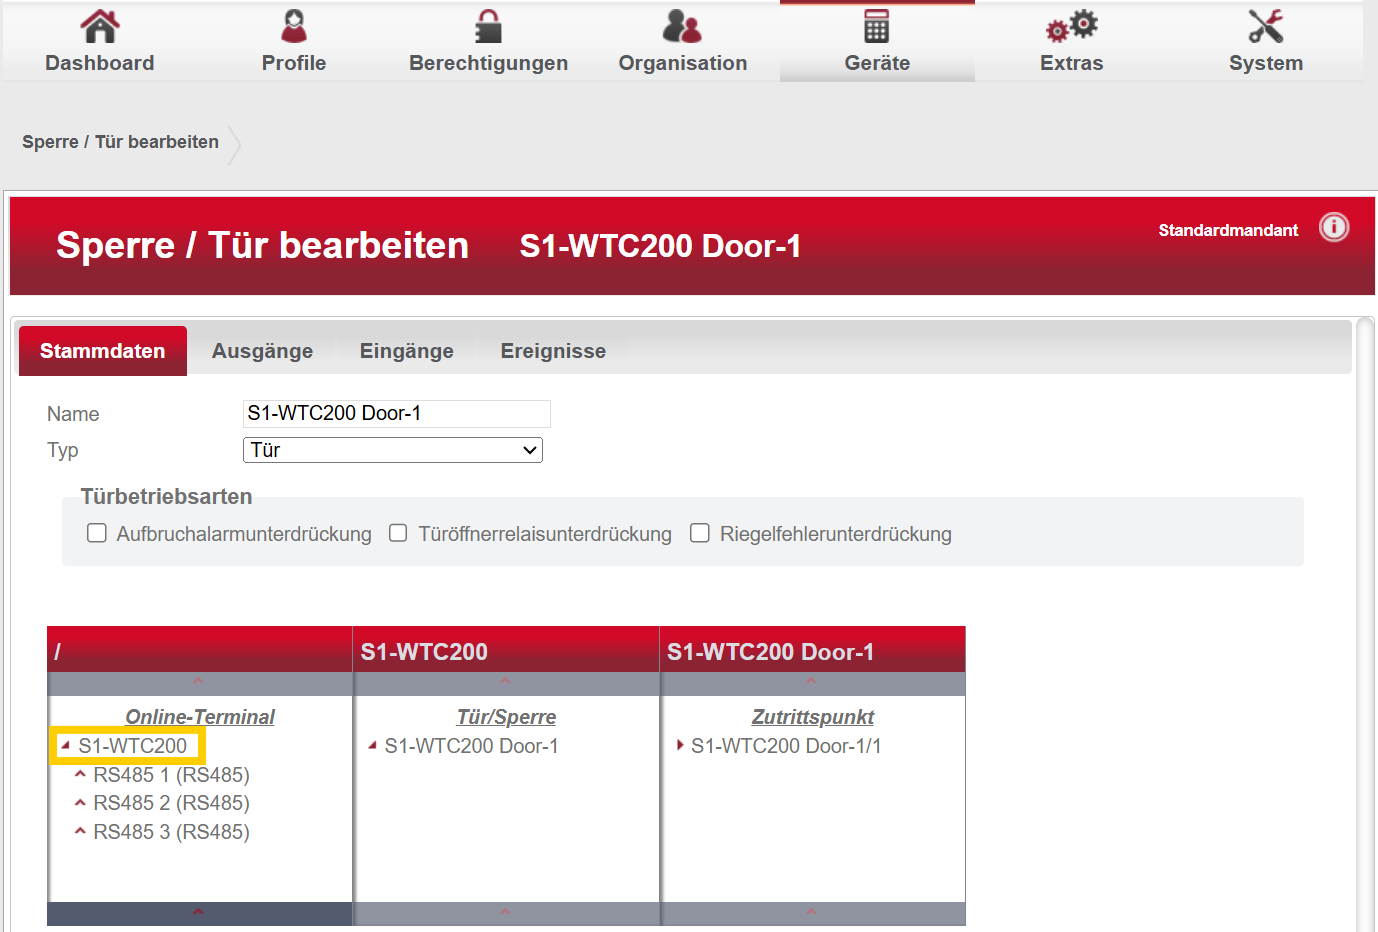
- Log in to the Dialock 2 software.
- Navigate to “Devices” > “Terminal”.
- Select the desired terminal from the list.
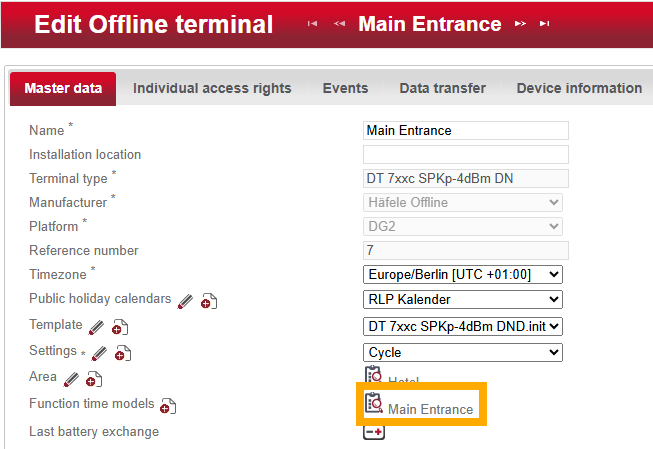
- Under Master data you will find the item “Template”.
- Select the appropriate template from the drop-down menu.
- Save the change via the left-hand actions menu.
- Transfer the changed data to the MDU.
- Program the terminal.
With or without “c”?
The abbreviation “c” refers to a special RFID chipset that is used in some terminals. For example, the DT7xx/DT7xxc and the DT600/DT600c are available in both variants.
What do the various abbreviations mean?
Functions
Important!Some of those functions listed below are only useful or feasible under certain conditions. Therefore, please check which firmware your terminal has by reading out the “Terminal Info”. Also check which HMS version you use and whether you have an SPK license.
| DND |
do not disturb |
Activates the “Do not disturb” bar on the inner module of the terminal, if available. |
| EIA |
encoding in advance |
Supported from firmware 9.1.0.0 and HMS version 1.1.34.8 with an SPK license. Adjusts the configuration of the terminal so that keys created in the present and keys pre-programmed for the future do not invalidate each other. Enables the parallel coding of guest keys that are valid in the present with keys that are pre-programmed for the future. |
| SPK |
Smartphone Key |
Supported from firmware 9.1.x.x. Activates the smartphone key function on the terminal. To open, the terminal must first be “woken up” by holding the smartphone in front of the reader.
An HMS with SPK license is also required to activate the smartphone key function.
It is also important to point out the naming of the access points! Room doors should only be recorded as room numbers, option doors require the prefix “S[option number]-”. |
| SPKp |
SPK permanent advertising |
Supported from firmware 9.1.x.x. Activates the smartphone key function on the terminal. The terminal is permanently ready to receive, which is why it does not need to be “woken up”. |
| FCOL 1 |
free choice of locker 1 |
All keys - even unprogrammed ones - can select an open locker to lock it and open it again after use. Keys authorized to open can open independently of the currently programmed key. |
| FCOL 2 |
free choice of locker 2 |
Only keys with opening authorization can select a locker to lock it and open it again after use. Privileged keys can open independently of the key currently assigned. |
Additions
| -4dBm / -8dBm |
SPK Power level |
Only occurs in combination with SPK/SPKp. The terminal is permanently ready to receive and transmits at the reduced power level of -4dBm or -8dBm. |
| PB |
push button |
Only available for wall terminals. Activates the contacts of Input1 to connect an external device - such as a pushbutton. |
| (Guest) No Gen |
no generation |
Deactivates the generation control for guest keys. Lost guest keys can no longer be invalidated by encoding a key with a newer issue date. This means that an older, possibly lost key remains valid.
This setting is only intended for special applications and may pose a security risk. Please contact our support team before activating it. |
| Sabo(Block) |
Sabotage-Block |
Activates the option for tamper protection and alarm on the terminal. Additional hardware components are required to set up tamper protection. Please contact our support team to set this up. |
DG2 - Error 4098 / Error 4099
-
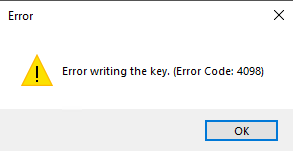
Error 4098 is a write error. It can occur if cards are not written correctly by the encoding station or if the encoding station does not recognize the transponder pattern.
-
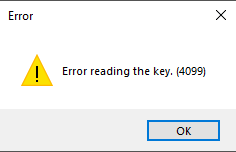
Error 4099 is a read error. It can occur if cards are not read correctly by the encoding station or if the encoding station does not recognize the transponder pattern.
Solution (summary)
- Make sure that the card is correctly positioned on the encoding station.
- Check whether the error occurs with several cards. If only one card is affected, the card may also be defective.
- Ensure that the encoding station is not placed on metal or in the immediate vicinity of other RFID-enabled devices (e.g. EC card readers).
- Restart the HMS services (and Haefele Dialock 2.0 services if necessary).
Solution (detailed)
1. Make sure that the card is correctly positioned on the coding station.
Sometimes the error occurs if the card is removed from the encoding station too quickly while the encoding process is still running or if the card is not positioned correctly. Therefore, make sure that the card lies flat on the encoding station during the whole encoding process.
2. Check whether the error only occurs with individual cards.
If the error only occurs with one card, test the encoding with other cards and set the non-functioning card aside for the time being. Test the card again in step 4. If the error continues to occur, the card may be defective.
If several or even all cards are affected, a simultaneous defect in the cards cannot be ruled out, but is unlikely.
In case it is not a newly delivered batch of cards, first put the affected cards to one side and test the card coding again in step 4.
Should it be a newly delivered batch, it is possible that the transponder standards of the delivered cards do not match the standard stored in the software. If available, compare the trailing section of the imprint on the newly delivered keys with the imprint on the existing ones.
When the endings are different, they are not compatible.
3. Rule out external interference factors.
Encoding stations write to transponders using RFID technology - a wireless transmission method. These signals can easily be influenced by external factors. Therefore, make sure that the encoding station is not placed on metal or any other conductive material and ensure that sufficient distance is maintained from other RFID-enabled devices. These include, for example, EC card readers.
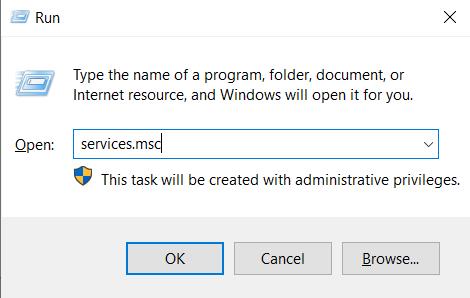
4. Check whether the Häfele and Dialock HMS services are running
IMPORTANT! The following steps must be carried out from the server!
- Open the Windows services and search for the “Häfele” services.
- Check whether the services are generally running and, if necessary, start any that are not running.
- Restart the “Communication Server” and wait approximately 5 minutes until it has fully started.
- Search for the “Dialock HMS” services.
- At the very least, start the “Administration”, “Key Management” and “Service Monitor” services in this order one after the other.
- (Optional when using a PMS:) Start the other HMS services that are required for communication with the PMS. Please refer to the detailed instructions for the start sequence.
Finally, restart the software you are using to encode the cards and test the key creation with the cards previously set aside.
To the detailed instructions on how to restart the services
DG2 - Fehler 4098 / Fehler 4099
-

Der Fehler 4098 ist ein Schreibfehler. Es kann auftreten, wenn Karten von der Kodierstation nicht korrekt beschrieben werden, oder wenn die Kodierstation das Pattern der Transponder nicht erkennt.
-
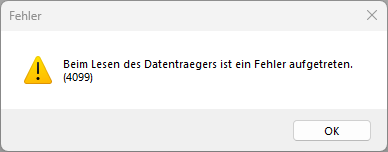
Der Fehler 4099 ist ein Lesefehler. Er kann auftreten, wenn Karten von der Kodierstation nicht korrekt gelesen werden, oder wenn die Kodierstation das Pattern der Transponder nicht erkennt.
Lösungsweg (Zusammenfassung)
- Stellen Sie sicher, dass die Karte korrekt auf der Kodierstation liegt.
- Überprüfen Sie, ob der Fehler bei mehreren Karten auftritt. Sollte nur eine Karte betroffen sein, kann die Karte auch defekt sein.
- Stellen Sie sicher, dass die Kodierstation nicht auf Metall oder in unmittelbarer Nähe von anderen RFID-fähigen Geräten (bspw. EC-Kartenlesern) steht.
- Starten Sie die HMS Dienste (und ggf. Haefele Dialock 2.0 Dienste) neu.
Lösungsweg (detailliert)
1. Stellen Sie sicher, dass die Karte korrekt auf der Kodierstation liegt.
Manchmal tritt der Fehler auf, wenn man die Karte während des Kodiervorgangs zu schnell von der Kodierstation entfernt, oder die Karte nicht korrekt aufliegt. Stellen Sie also sicher, dass die Karte während des gesamten Kodiervorgangs plan auf der Kodierstation liegt.
2. Überprüfen Sie, ob der Fehler nur bei einzelnen Karten auftritt.
Tritt der Fehler nur bei einer Karte auf, dann testen Sie die die Kodierung mit anderen Karten und legen die nicht funktionierende Karte zunächst beiseite. Testen Sie die Karte in Schritt 4 erneut. Sollte der Fehler weiterhin auftreten, kann es sein, dass die Karte einen Defekt hat.
Sind mehrere oder gar alle Karten betroffen, ist ein gleichzeitiger Defekt der Karten nicht auszuschließen, aber unwahrscheinlich.
Sollte es sich nicht um eine neu gelieferte Charge handeln, legen Sie die betroffenen Karten zunächst zur Seite und testen Sie die Kartenkodierung in Schritt 4 erneut.
Wenn es sich um eine neu gelieferte Charge handelt, ist es möglich, dass die Transponderstandards der gelieferten Karten nicht mit dem in der Software hinterlegten Standard übereinstimmen. Vergleichen Sie, sofern vorhanden, den hintersten Abschnitt des Aufdrucks der neu gelieferten Keys mit dem Aufdruck der vorhandenen.
Falls sich die Endungen unterscheiden, sind diese nicht kompatibel.
3. Schließen Sie externe Störfaktoren aus.
Kodierstationen beschreiben Transponder mithilfe der RFID-Technologie - einer drahtlosen Übertragungsmethode. Diese Signale können leicht durch externe Faktoren beeinflusst werden. Stellen Sie daher sicher, dass die Kodierstation nicht auf Metall oder einem anderen leitenden Material platziert ist und achten Sie darauf, dass genügend Abstand zu anderen RFID-fähigen Geräten eingehalten wird. Hierzu zählen bspw. EC-Kartenleser.
4. Überprüfen Sie, ob die Häfele und Dialock HMS Dienste laufen
WICHTIG! Die folgenden Schritte müssen vom Server aus durchgeführt werden!
- Öffnen Sie die Windows Dienste und suchen Sie nach den "Häfele" Diensten.
- Überprüfen Sie, ob diese alle generell ausgeführt werden und starten Sie bei Bedarf nicht ausgeführte Dienste.
- Starten Sie den "Communication Server" neu und warten etwa 5 Minuten, bis dieser vollständig gestartet ist.
- Suchen Sie nach den "Dialock HMS" Diensten.
- Starten Sie hier mindestens die Dienste "Administration", "Key Management", und "Service Monitor" in dieser Reihenfolge nacheinander.
- (Optional bei Verwendung eines PMS:) Starten Sie die weiteren HMS-Dienste, die für die Komunikation mit des PMS benötigt werden. Für die Startreihenfolge beachten Sie die ausführliche Anleitung.
Starten Sie anschließend Ihre Software, mit der Sie die Karten kodieren, neu und testen Sie die Keyerstellung mit den vorher zur Seite gelegten Karten.
Hier finden Sie die ausführliche Anleitung zum Dienstneustart
MDU issues at parametrising
Issues with detecting the MDU
Issues with data transmission
IMPORTANT! Apart from the hyphen, no special characters (especially / \ .) should be used in terminal names, otherwise the following problems may occur:
- The protocol cannot be assigned to a terminal during protocol import.
- The folder structure on the MDU may be created incorrectly during parameterization.
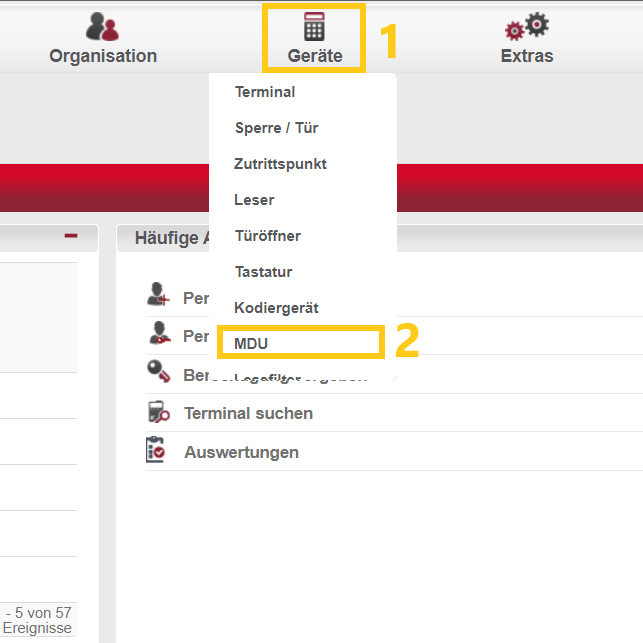
The menu item “Devices” > “MDU” is missing
Step 1 - Adjust configuration
- Open the Dialock 2 web interface and log in with your user.
- Navigate to “System” > “System configuration” > ‘Offline’ > “Häfele-DG2”.
- Check the “Dialock offline system” box.
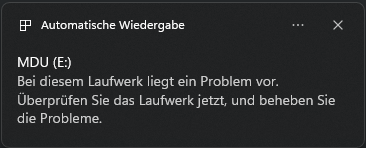
Success message, but the data on the MDU is not up to date
Only the generation process is carried out during parameterization - the delete and write processes are skipped. The reason for this is that different drive letters are used in the DG2 and the MDU.
NOTE: If the MDU is to be used on several different PCs, solution variant 2 is to be preferred, as this variant aligns the drive letters of the DG2 and the PCs involved.
If the MDU is only deleted instead, it adopts the drive letter of the current PC. When connecting to another PC, this can lead to a conflict as the assignment is no longer correct.
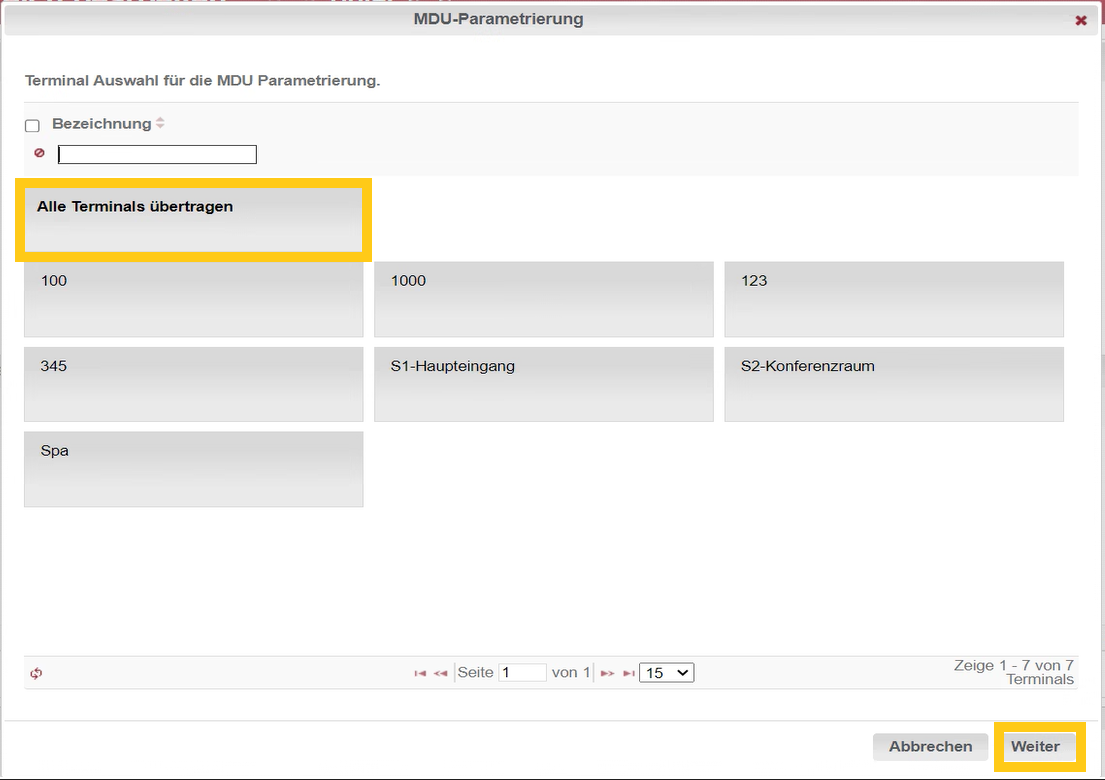
Variant 1 - Reapply MDU
-
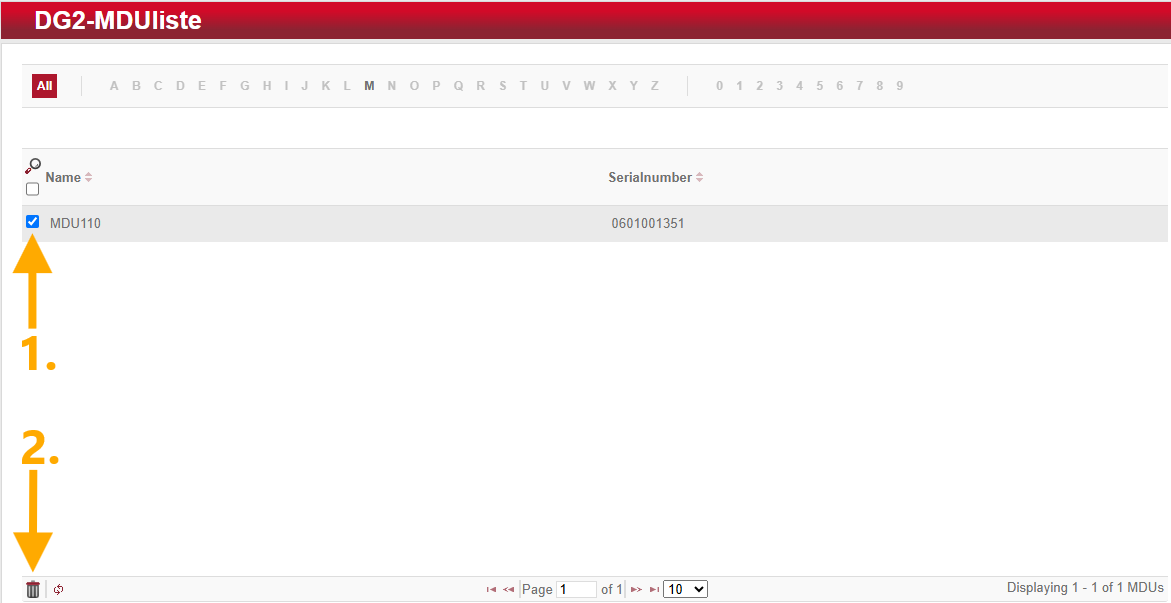
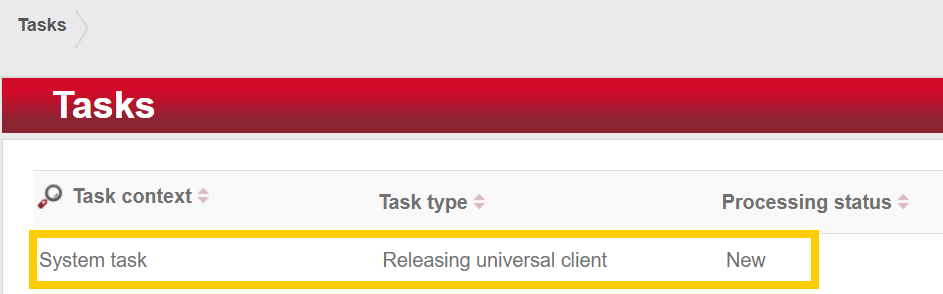
Step 1 - Delete MDU
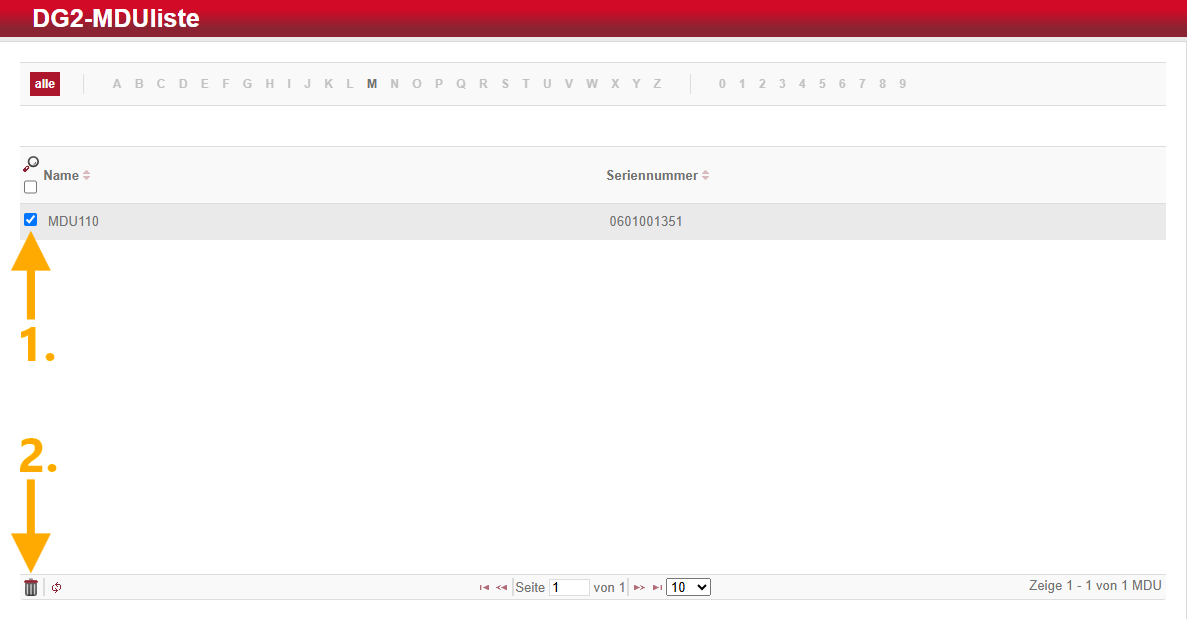
- Navigate to “Devices” > “MDU”.
- Check the box next to your MDU (1. in illus.).
- Delete the MDU using the dustbin symbol (2nd in illus.) and confirm all dialog windows.
-
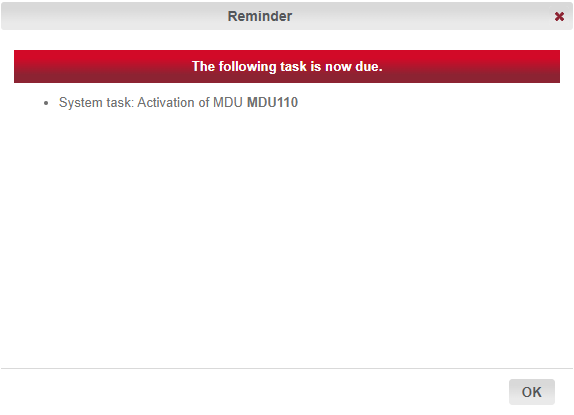
Step 2 - Add MDU
- Unplug the MDU and plug it back in.
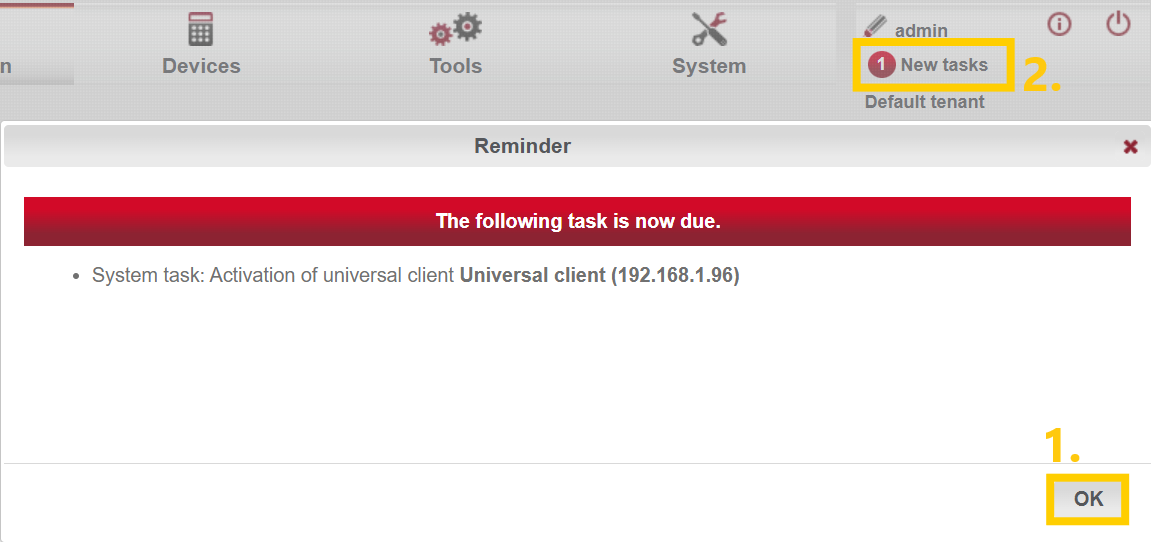
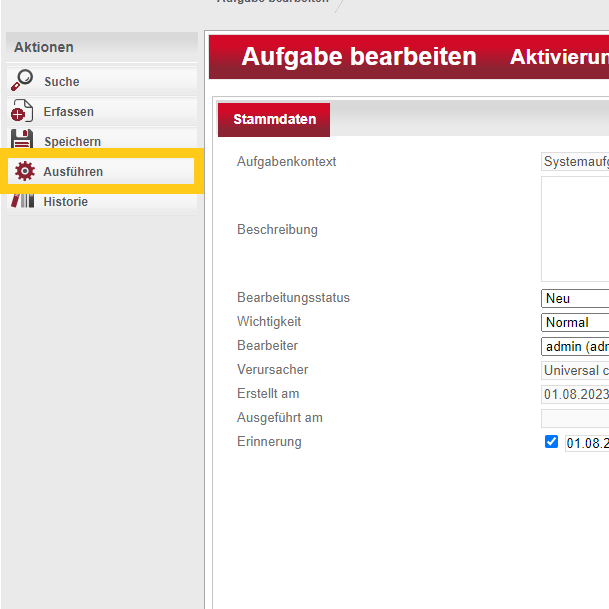
- A window for activating the MDU should appear within approx. one minute.
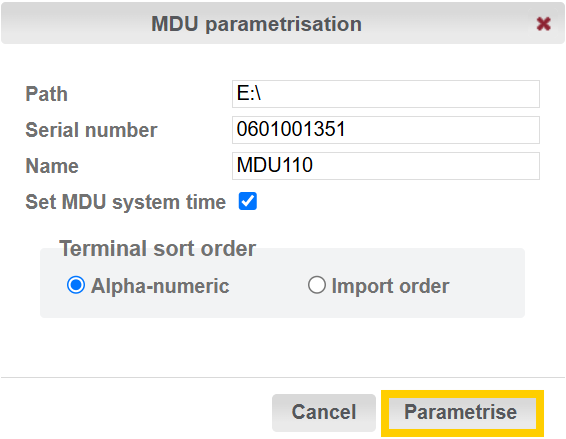
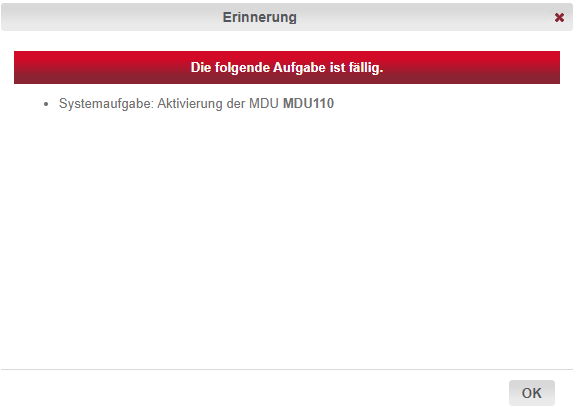
- If the message appears, click on “System task: Activate MDU MDU110”.
- Then select “Execute” in the left-hand actions menu to activate the MDU.
Variant 2 - Adjust drive letter
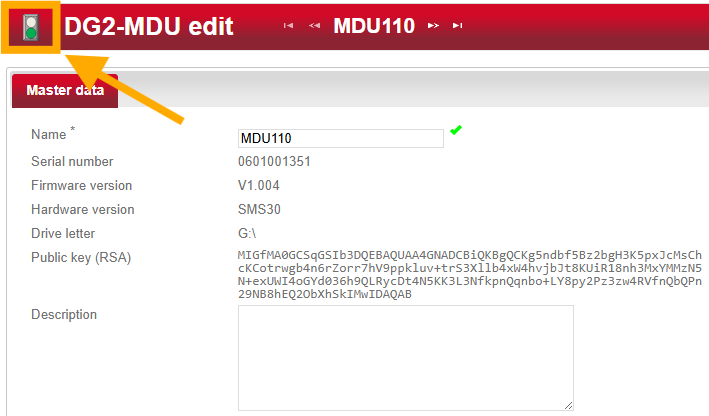
-
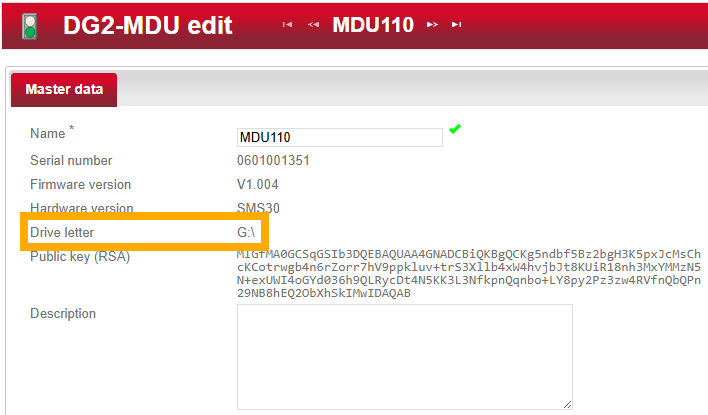
Step 1 - Memorize drive letter
- Open the Dialock 2 web interface and log in with your user.
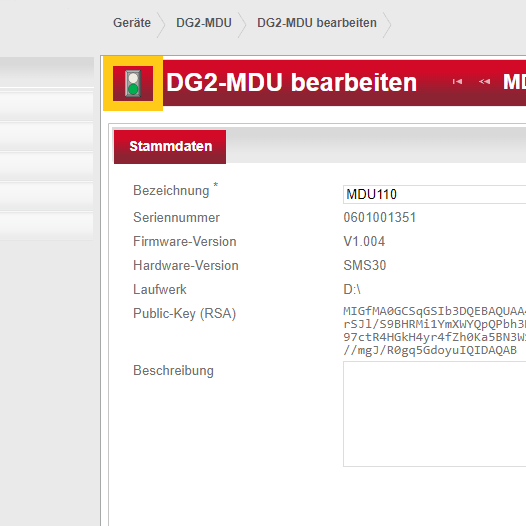
- Navigate to “Devices” > “MDU”.
- Select your MDU from the list.
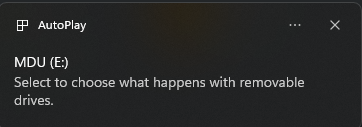
- Make a note of the drive letter that is now displayed.
In the example, the drive letter is “G”.
-
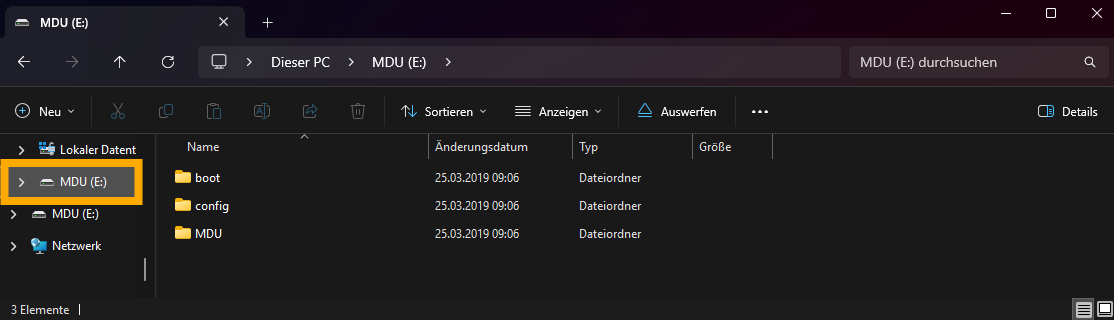
Step 2 - Cross-check
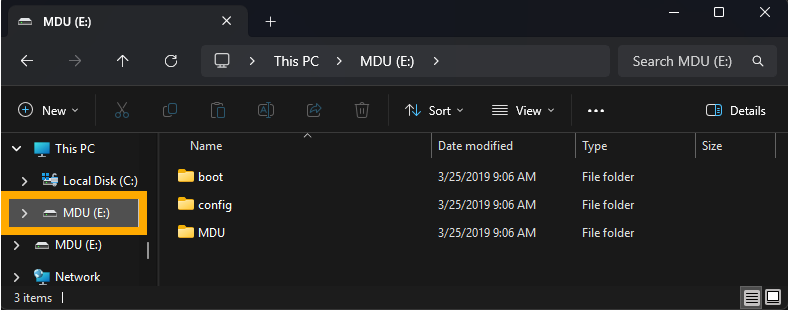
- Plug the MDU into the PC.
- Open the file explorer.
- Search for the connected MDU under the “This PC” section.
- Compare the drive letter with the one previously noted from the DG2. If the two are different, the letter must be adjusted.
In the example, the drive letter is “E”.
-
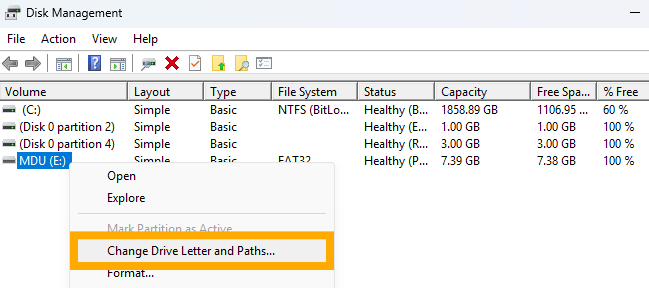
Step 3 - Adjust drive letter
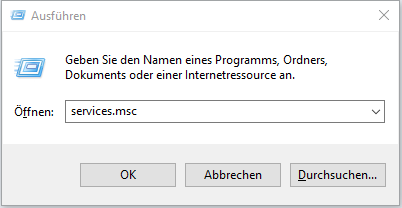
- Press Windows + R and enter “diskmgmt.msc”. The “Disk Management” will now open.
- Right-click on the MDU and select “Change drive letter and path”.
- Click on “Change...” and assign the previously noted drive letter.
In the example, the drive letter “G” should be assigned.
Error messages

Error during generation of mdu parameter
MDU Parametrierungsproblem
Probleme bei der Erkennung der MDU
Probleme bei der Datenübertragung
WICHTIG! Abgesehen vom Bindestrich sollten keine Sonderzeichen (insbesondere / \ .) in Terminalnamen verwendet werden, da es sonst zu folgenden Problemen kommen kann:
- Beim Protokollimport kann das Protokoll keinem Terminal zugewiesen werden.
- Bei der Parametrierung kann die Ordnerstruktur auf der MDU inkorrekt angelegt werden.
Der Menüpunkt "Geräte" > "MDU" fehlt
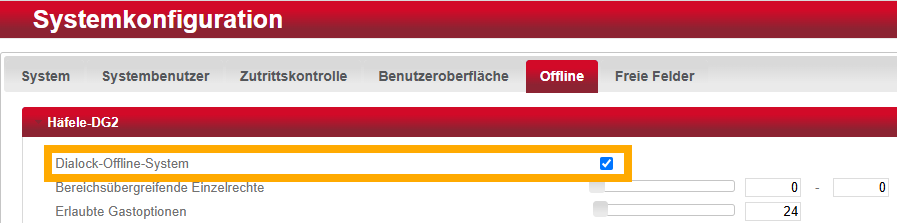
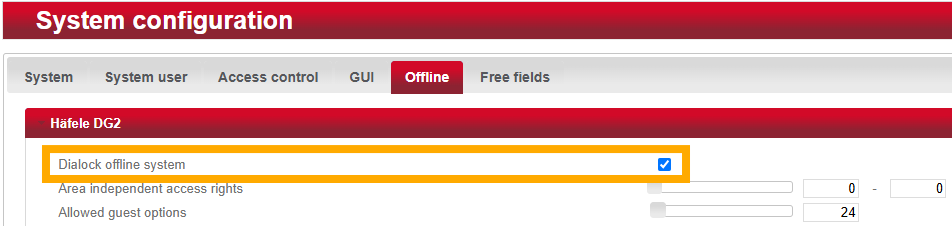
Schritt 1 - Konfiguration anpassen
- Öffnen Sie die Dialock 2 Weboberfläche und melden sich mit Ihrem Benutzer an.
- Navigieren Sie zu "System" > "Systemkonfiguration" > "Offline" > "Häfele-DG2".
- Setzen Sie den Haken bei "Dialock-Offline-System".
Erfolgsmeldung, aber die Daten auf der MDU sind nicht aktuell
Bei der Parametrierung wird nur der Generierungsvorgang durchgeführt - Lösch- und Schreibvorgang werden übersprungen. Der Grund dafür ist, dass unterschiedliche Laufwerksbuchstaben in der DG2 und der MDU verwendet werden.
HINWEIS:Wenn die MDU an mehreren verschiedenen PCs genutzt werden soll, ist Lösungsvariante 2 ist zu bevorzugen, da diese Variante die Laufwerksbuchstaben der DG2 und den beteiligten PCs aneinander angleicht.
Wird die MDU stattdessen nur gelöscht, übernimmt sie den Laufwerksbuchstaben des aktuellen PCs. Beim Anschließen an einen anderen PC kann dies zu einem Konflikt führen, da die Zuordnung nicht mehr stimmt.
Variante 1 - MDU neu anlegen
Variante 2 - Laufwerksbuchstabe anpassen
-
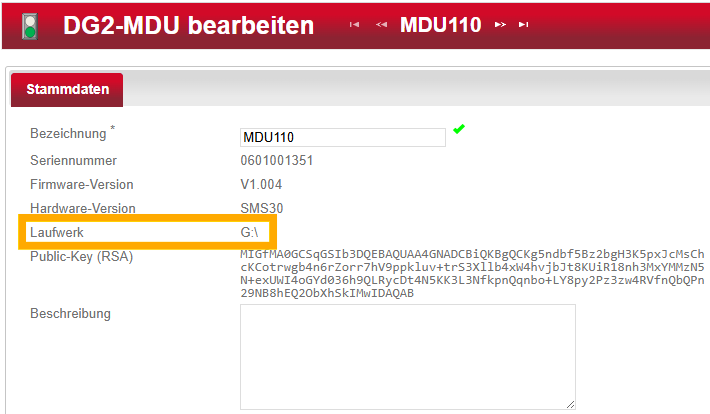
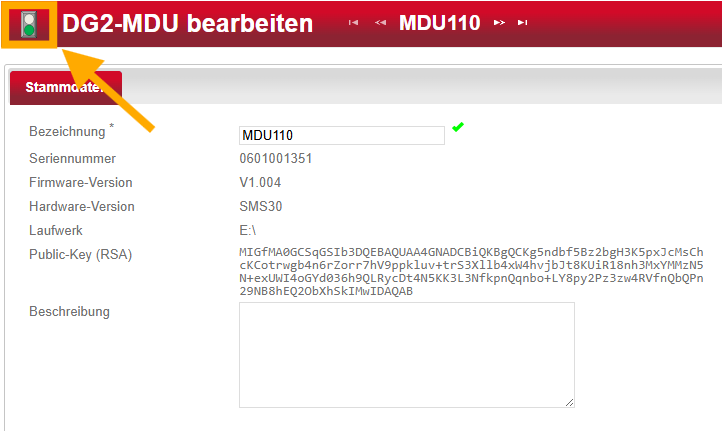
Schritt 1 - Laufwerksbuchstabe merken
- Öffnen Sie die Dialock 2 Weboberfläche und melden Sie sich mit Ihrem Benutzer an.
- Navigieren Sie zu "Geräte" > "MDU".
- Wählen Sie Ihre MDU aus der Liste aus.
- Merken Sie sich den Laufwerksbuchstabe, der nun angezeigt wird.
Im Beispiel ist der Laufwerksbuchstabe "G".
-
Schritt 2 - Gegenprüfen
- Stecken Sie die MDU am PC an.
- Öffnen Sie den Datei-Explorer.
- Suchen Sie die angeschlossene MDU unter dem Abschnitt "Dieser PC".
- Vergleichen Sie den Laufwerksbuchstaben mit dem zuvor gemerkten aus der DG2. Wenn beide unterschiedlich sind, muss der Buchstabe angepasst werden.
Im Beispiel ist der Laufwerksbuchstabe "E".
-
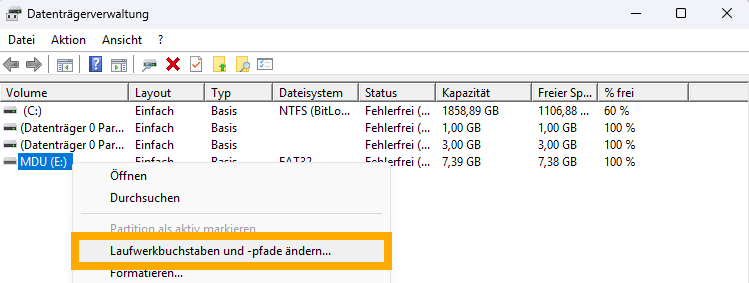
Schritt 3 - Laufwerksbuchstabe anpassen
- Drücken Sie Windows + R und geben Sie "diskmgmt.msc" ein. Nun öffnet sich die "Datenträgerverwaltung".
- Wählen Sie mit einem Rechtsklick auf die MDU "Laufwerksbuchstaben und -pfad ändern" aus.
- Klicken Sie auf "Ändern..." und weisen Sie den zuvor gemerkten Laufwerksbuchstaben zu.
Im Beispiel müsste der Laufwerksbuchstabe "G" zugewiesen werden.
Fehlermeldungen

Error during generation of mdu parameter
How do I read and import terminal logs?
What are terminal logs?
All events that occur at the terminal are documented in the terminal log. This includes, for example, door opening attempts or entries with the MDU (hand-held device). For example, it records when an event took place and which key/device triggered it.
The logs can therefore be interesting e.g. for tracing past accesses.
Terminal logs are retrieved using the MDU and must then be imported into the Dialock 2 web interface for viewing.
IMPORTANT: The internal memory of the terminals is limited. A maximum of 1000 entries are possible. In an emergency, logs should be read out promptly in the case of highly frequented terminals!
How do I read terminal logs?
You need an MDU (handheld device) and a privileged key to read the logs.
- Select the menu item “Audit Trails” under “Terminal” on the MDU.
- Hold the MDU to the reader of the desired terminal.
- MDU now displays “Authorize at terminal”.
- Take the MDU to the side and hold the privileged transponder in front of the sensor (the terminal should beep once and light up white)
- Hold the MDU up to the terminal reader again. The message “Data exchange” appears on the display.
- Wait until the transfer has been completed. The MDU then reports “Exchange done”.
How do I import the logs into the Dialock 2 software?
-
Step 1 - Connect MDU and open the software
- Connect the MDU to the PC. The charging symbol must now be visible on the MDU. (If this is not visible, check the cable again or return to the main menu on the MDU)
- Open the Dialock software in the usual web browser.
-

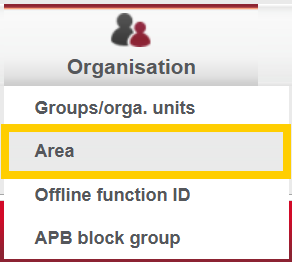
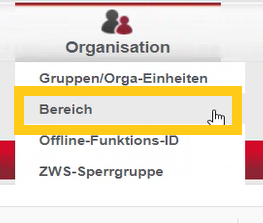
Step 2 - Navigate to Area list
Open “Organization” -> “Area” in the software.
-
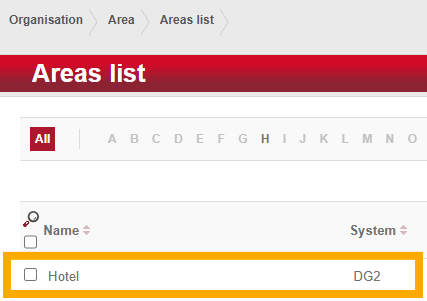
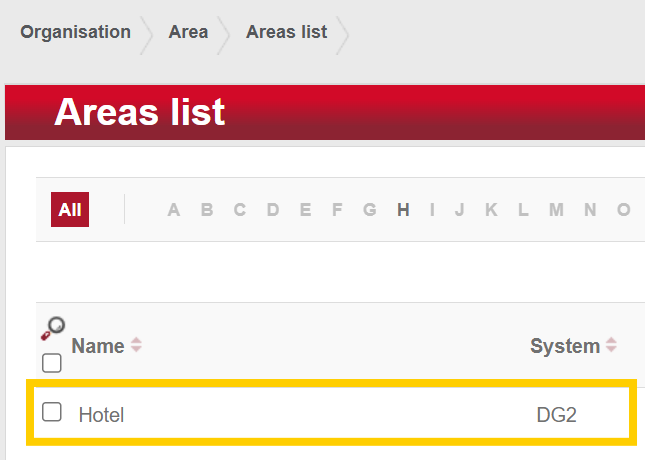
Step 3 - Navigate to Area
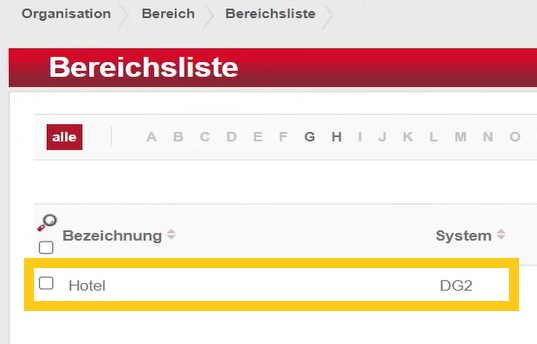
Select the relevant area from the area list (in most cases, only one area is created)
-
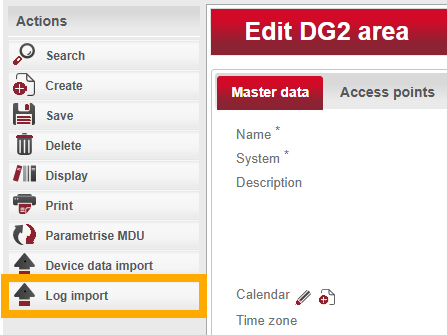
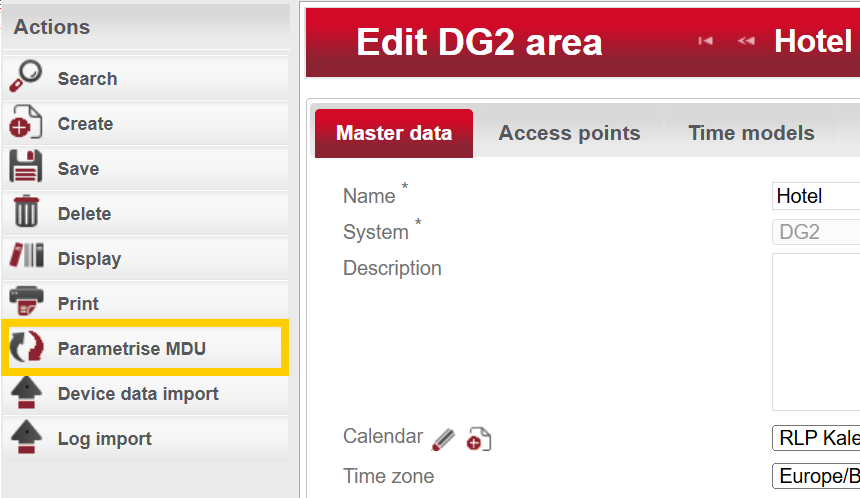
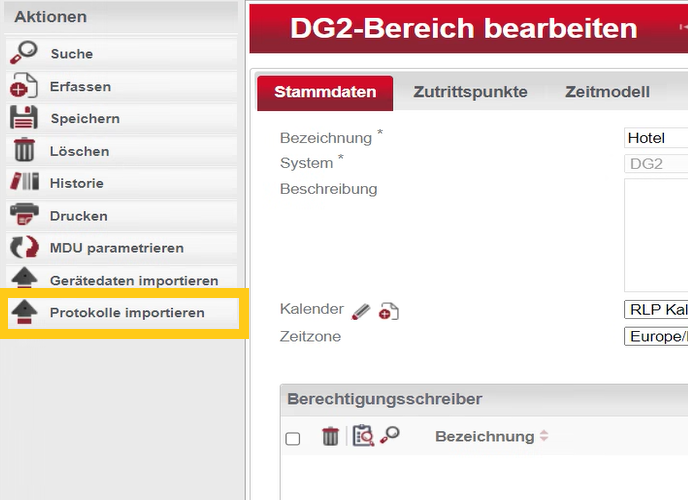
Step 4 - Select option
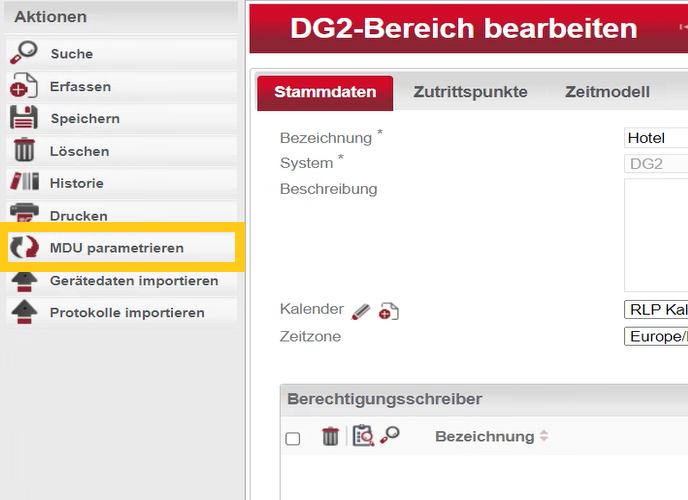
From the Actions menu on the left-hand side of the screen, click the “Log import” option.
-
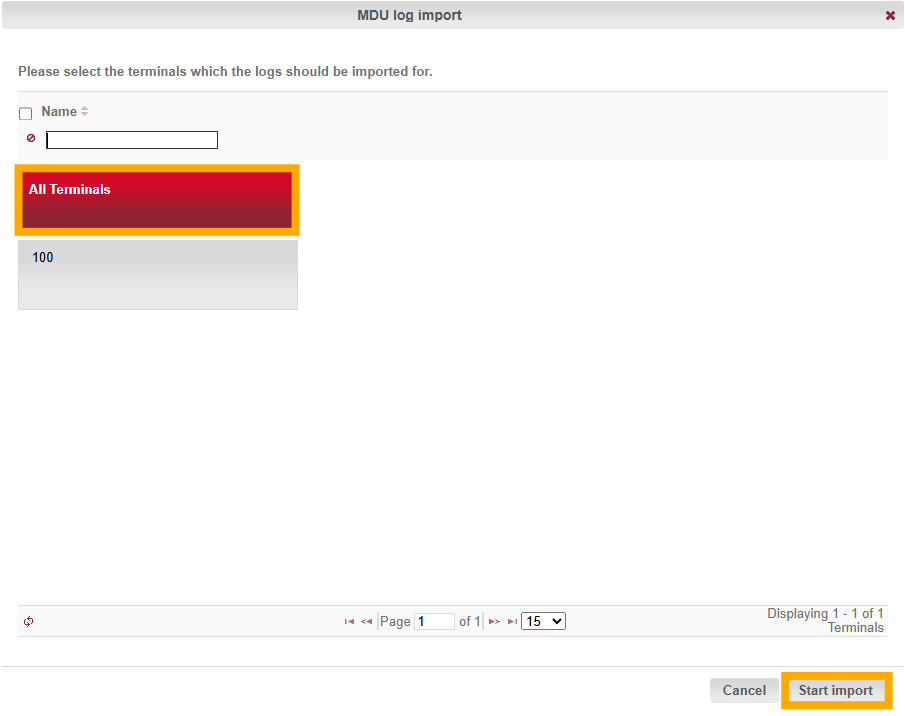
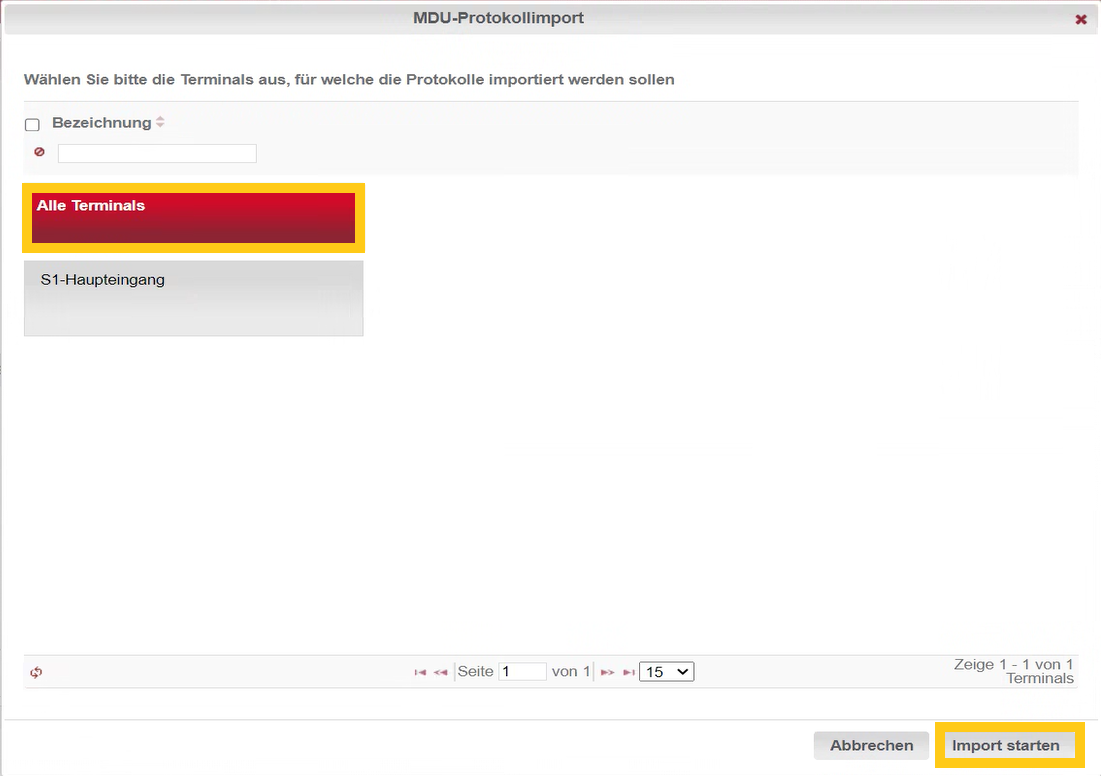
Step 5 - Start import
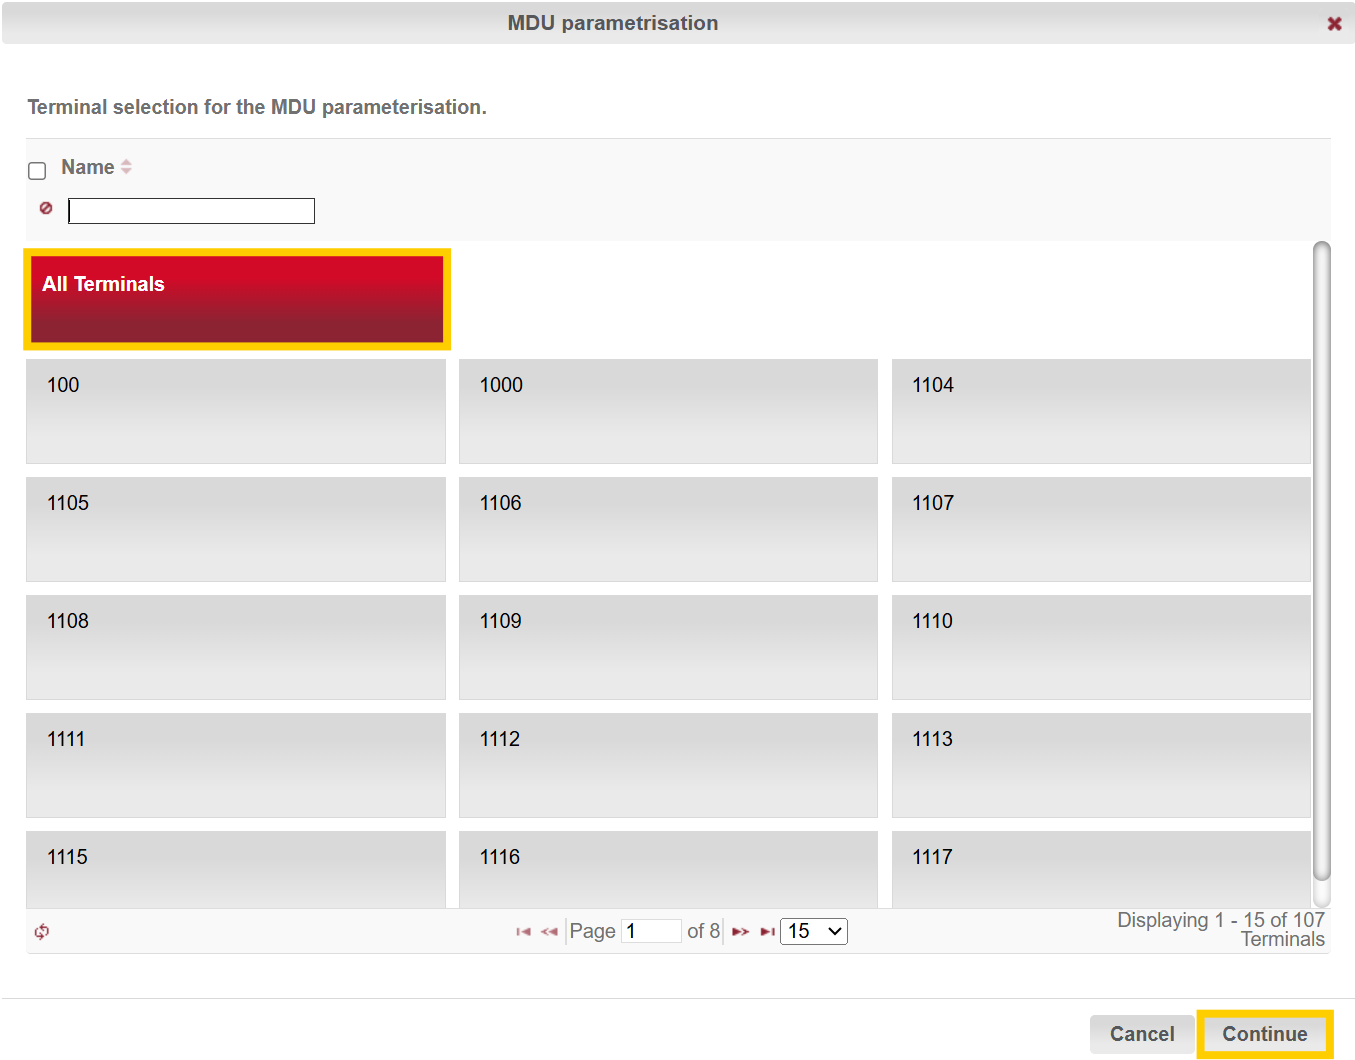
Select “All terminals” from the newly opened window and click on “Start import” to begin the transfer.
-
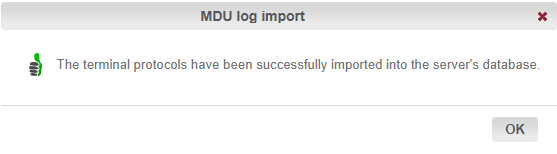
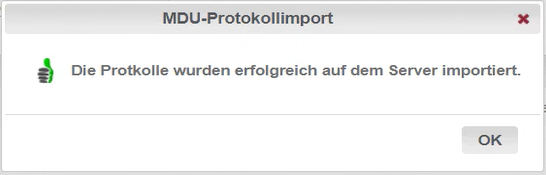
Step 6 - Await import
If the import was successful, you should see the message “Logs were successfully imported to the server”.
Where do I find the terminal logs in the software?
Via terminal list:
-
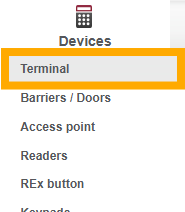
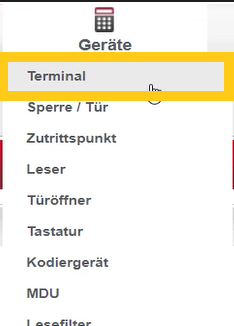
Step 1 - Navigate to terminal list
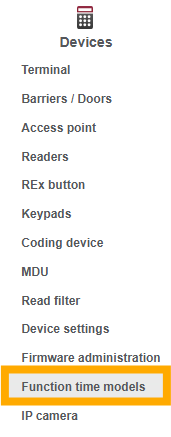
Navigate to “Devices” > “Terminal”.
-
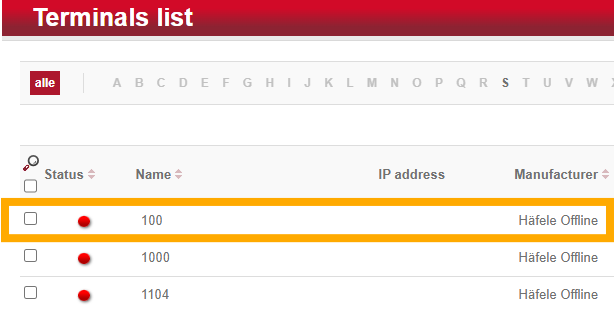
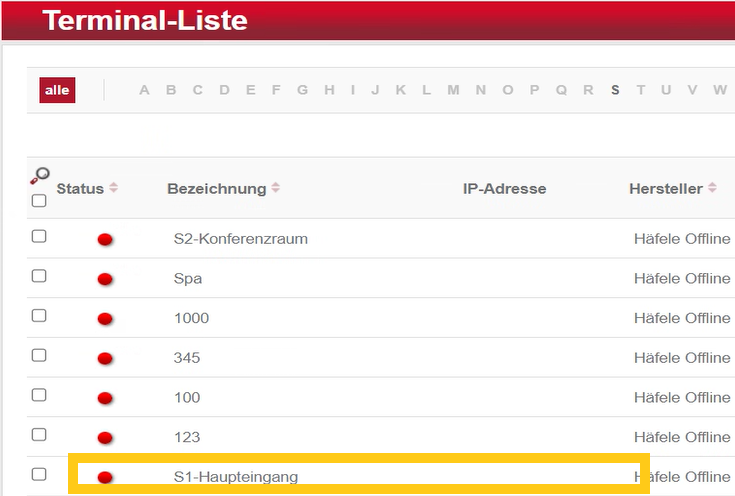
Step 2 - Select Terminal
Select the desired terminal from the terminal list.
-
Step 3 - Navigate to events
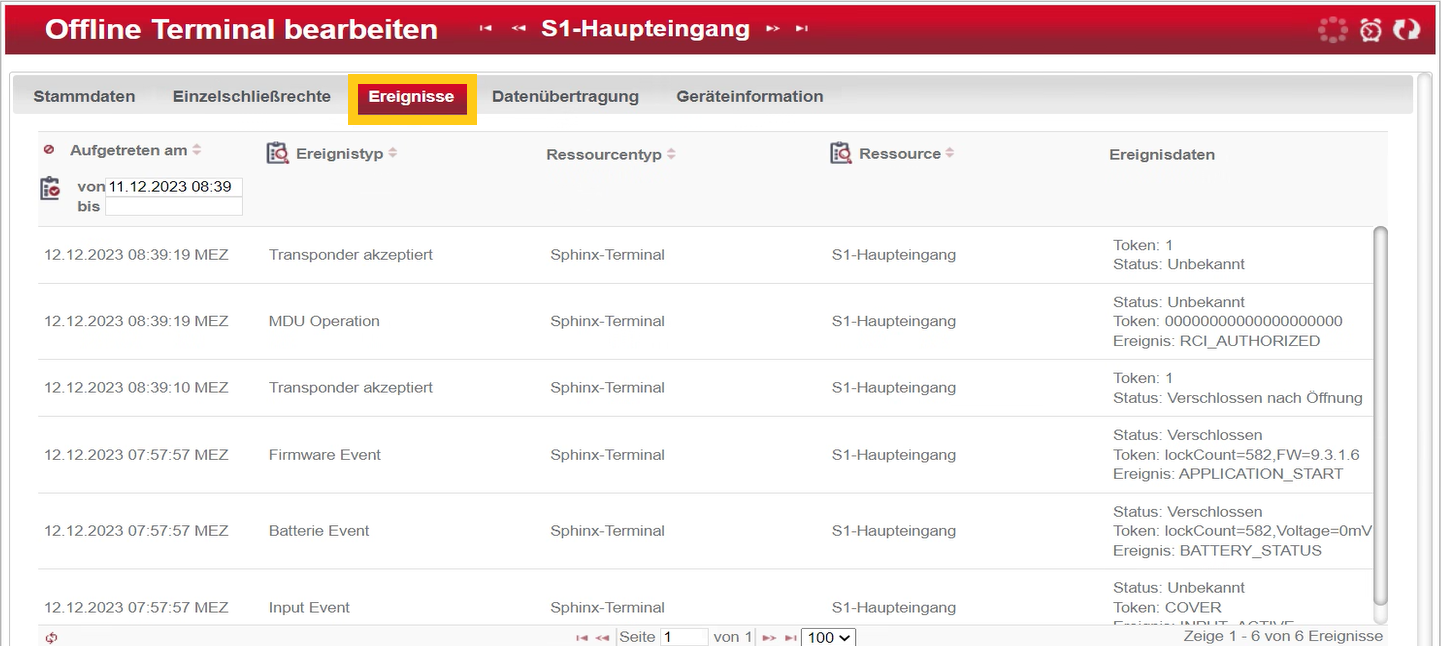
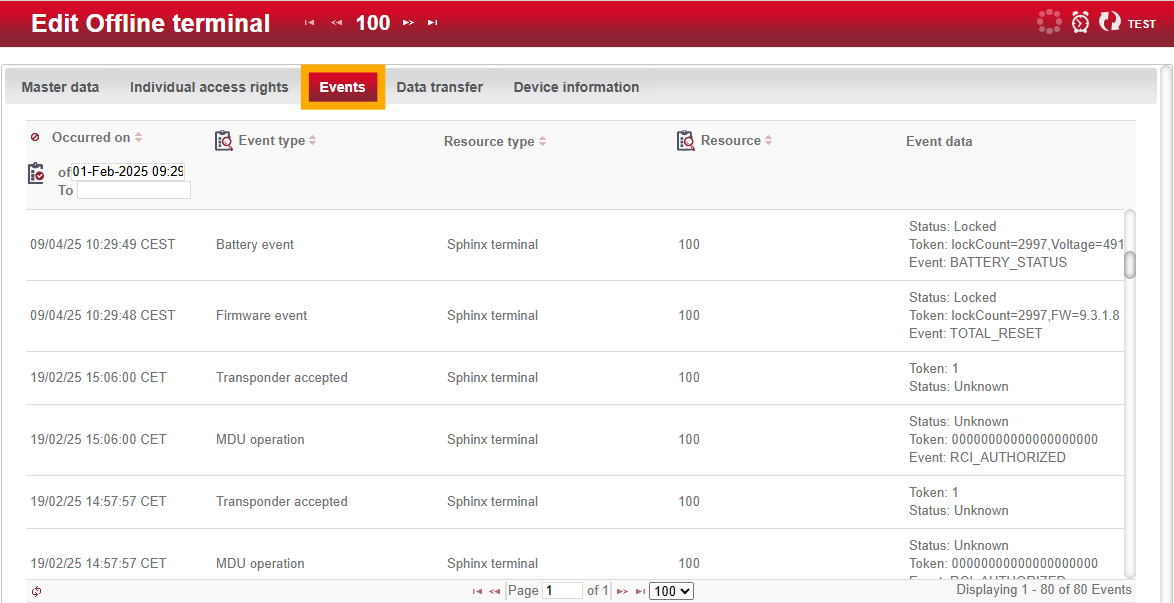
Switch to the “Events” tab within terminal editing. Here you will find the list of imported logs.
-
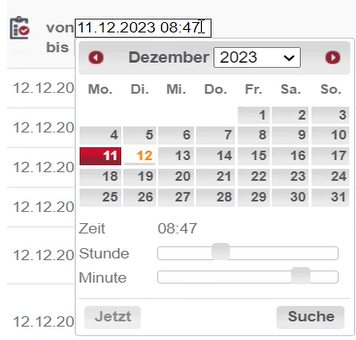
Step 4 - Filter by date
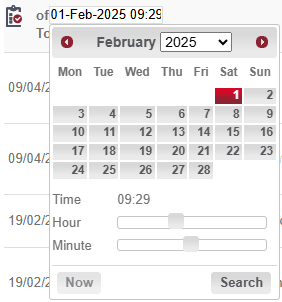
If you are looking for a specific time range, you can filter using the calendar entries for “from” and “to”. Press Search to confirm the entry.
-
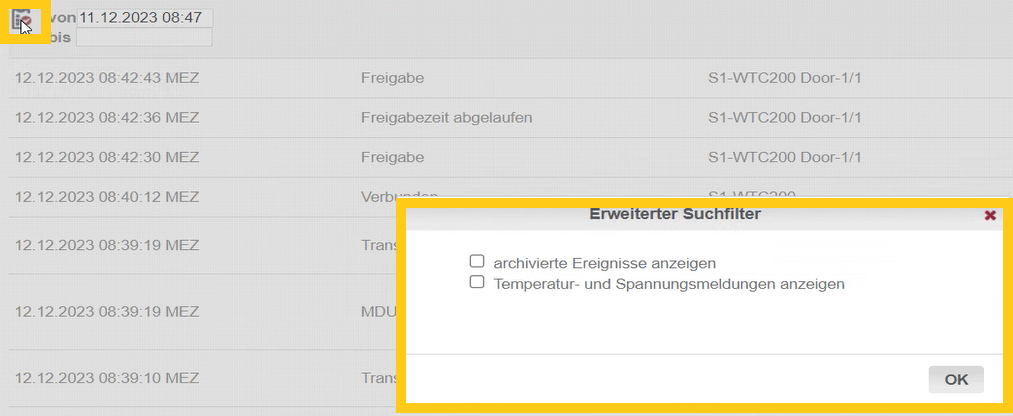
Step 5 - If necessary adjust filter
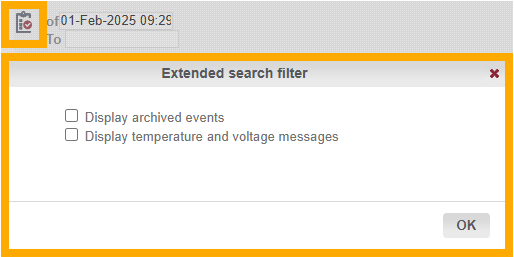
If not all expected events appear, you can activate the advanced search filter via the clipboard symbol in the top left-hand corner. Check the two options shown to display all other entries.
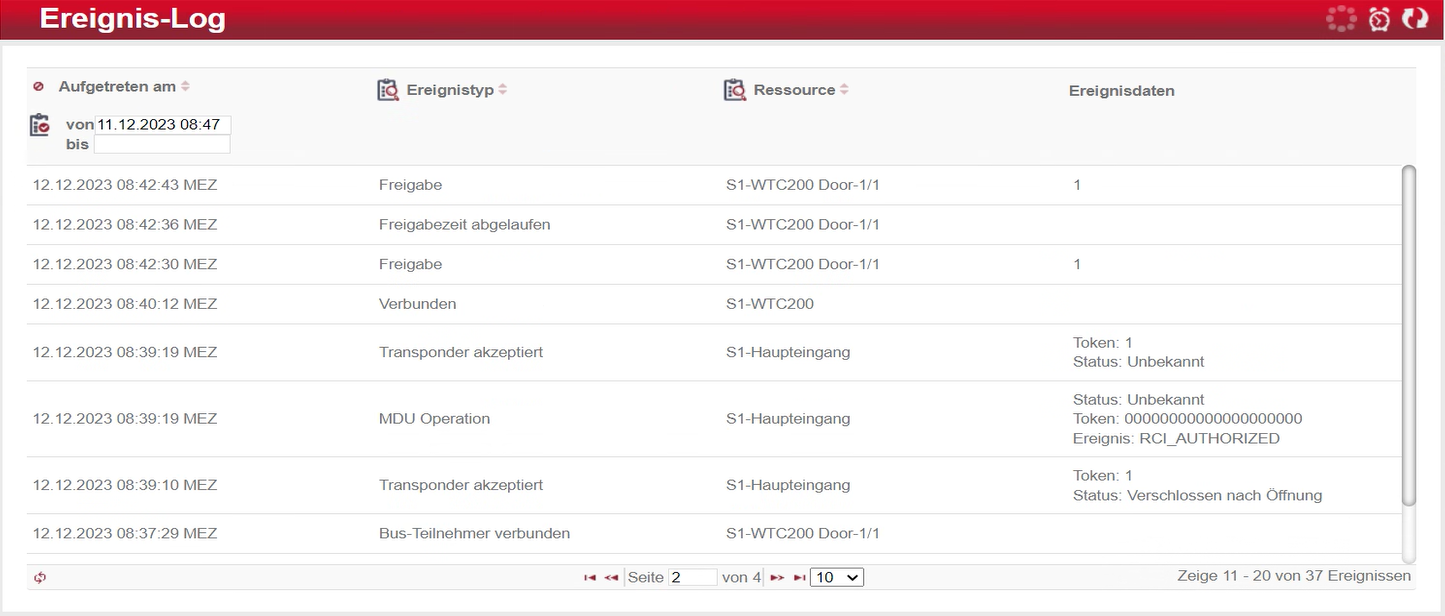
Via Event log:
-
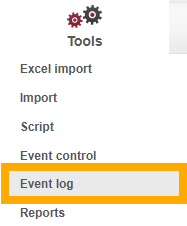
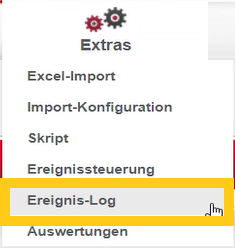
Step 1 - Navigate to Event log
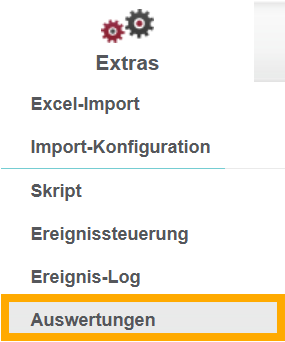
Navigate to “Extras” > “Event log”.
-
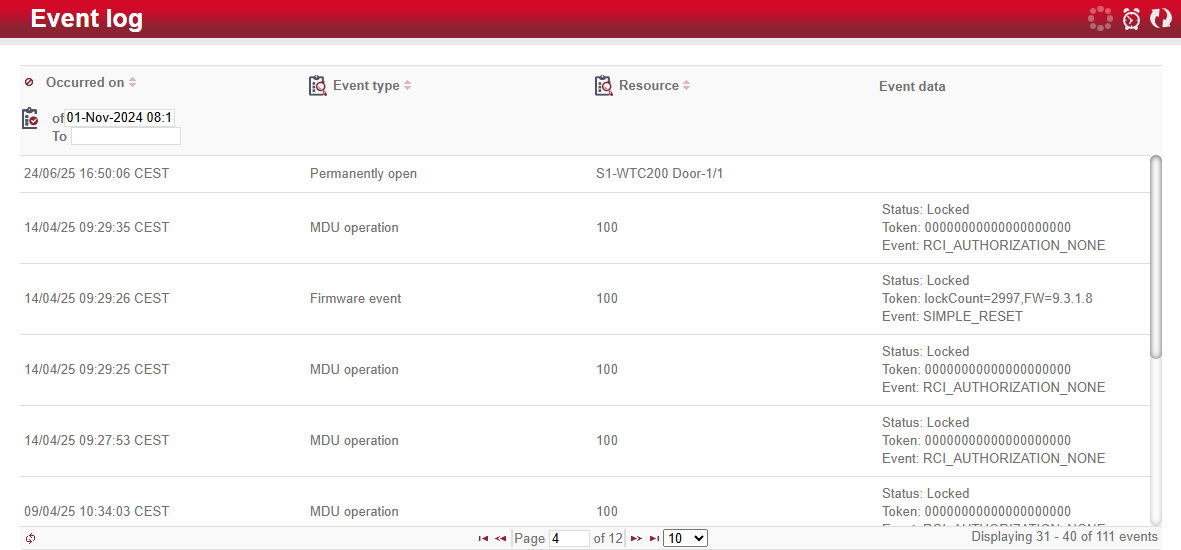
Step 2 - Filter by ressource
Here you will find all terminal protocols. If you are looking for the protocols of a specific terminal, you can filter this using the “Resource” column.
-
Step 3 - Filter by date
If you are looking for a specific time range, you can filter using the calendar entries for “from” and “to”. Press Search to confirm the entry.
-
Step 4 - If necessary adjust filter
If not all expected events appear, you can activate the advanced search filter via the clipboard symbol in the top left-hand corner. Check the two options shown to display all other entries.
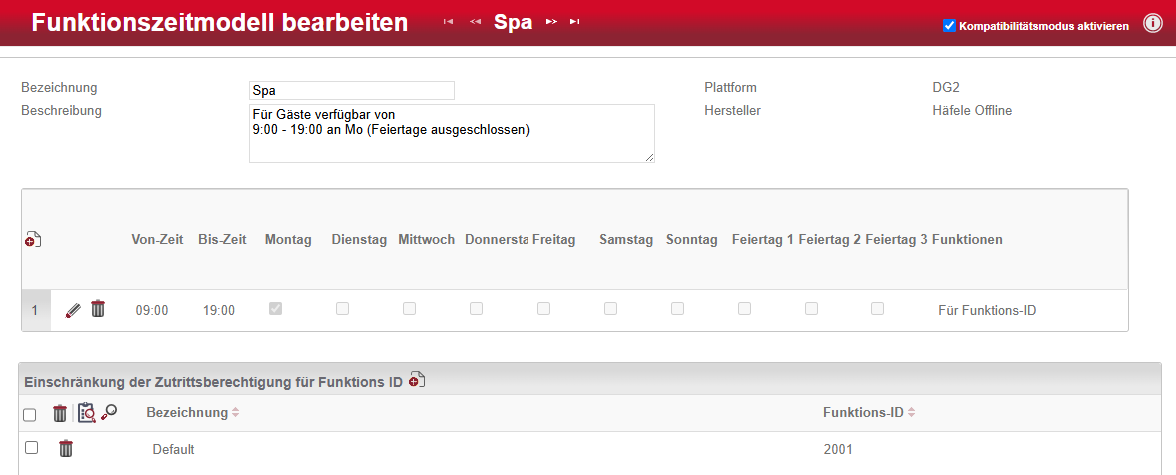
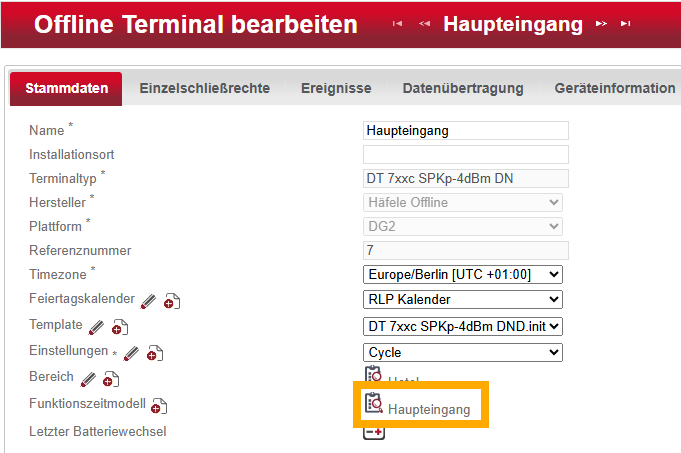
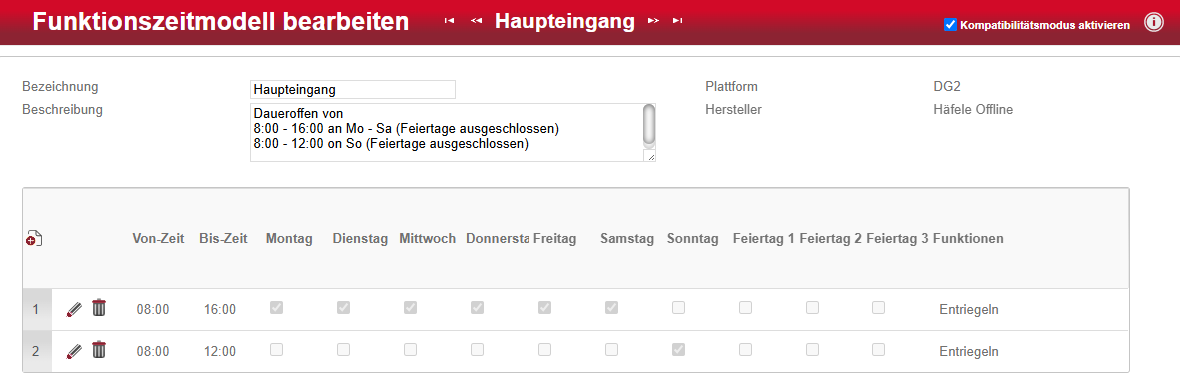
Terminal Template ändern
Vorbereitungen (optional)
Sollten Sie nicht wissen, welches Template benötigt wird, raten wir dazu folgende Informationen vorab zusammen zu tragen.
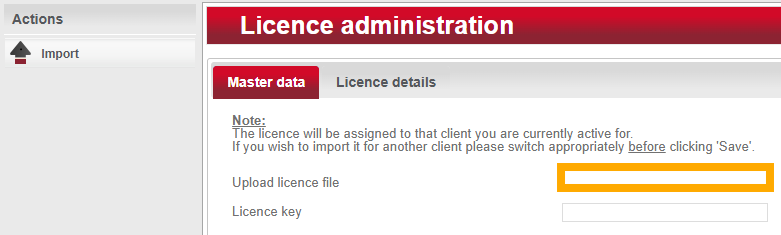
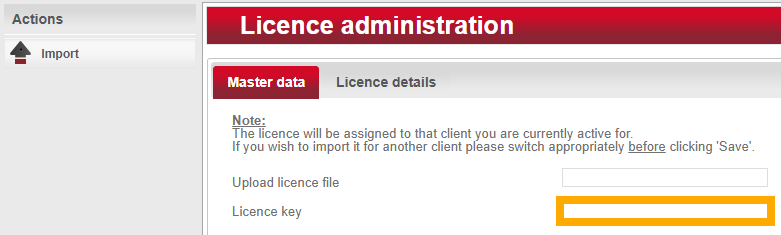
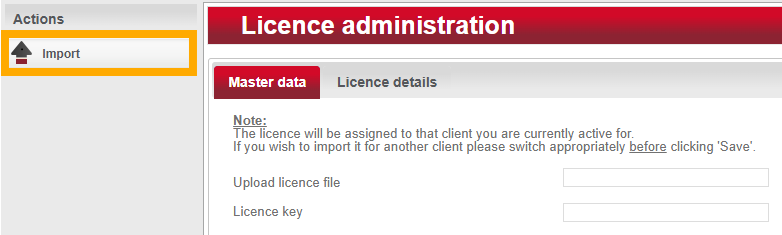
Wie überprüfe ich meine HMS Lizenz?
Wie hinterlege ich ein Template?
Mit oder ohne "c"?
Das Kürzel "c" bezeichnet einen speziellen RFID-Chipsatz, der in einigen Terminals verwendet wird. Beispielsweise gibt es das DT7xx/DT7xxc sowie das DT600/DT600c in beiden Varianten.
Was bedeuten die verschiedenen Kürzel?
Funktionen
Wichtig! Einige der u.g. Funktionen sind nur unter bestimmten Voraussetzungen sinnvoll oder möglich. Bitte prüfen Sie daher, welche Firmware Ihr Terminal besitzt, indem Sie die "Terminal Info" auslesen. Vergewissern Sie sich außerdem welche HMS-Version Sie besitzen und ob eine SPK-Lizenz vorliegt.
| DND |
do not disturb |
Aktiviert den "Bitte-nicht-stören"-Riegel am Innenmodul des Terminals, sofern dieser vorhanden ist. |
| EIA |
encoding in advance |
Unterstützt ab Firmware 9.1.0.0 und HMS Version 1.1.34.8mit einer SPK-Lizenz. Passt die Konfiguration des Terminals so an, dass in der Gegenwart erstellte Keys und für die Zukunft vorprogrammierte Keys sich nicht gegenseitig entwerten. Ermöglicht somit das parallele Kodieren von Gästekeys, die in Gegenwart gültig sind, mit Keys, die für die Zukunft vorprogrammiert werden. |
| SPK |
Smartphone Key |
Unterstützt ab Firmware 9.1.x.x. Aktiviert die Smartphone Key Funktion am Terminal. Zum Öffnen muss das Terminal zunächst durch Vorhalten des Smartphones an den Leser "aufgeweckt" werden.
Für die Freischaltung der Smartphone Key Funktion wird zudem eine HMS mit SPK-Lizenzbenötigt.
Wichtig zu beachten ist hierbei auch die Benennung der Zutrittspunkte! Zimmertüren sollten nur als Zimmernummern erfasst werden, Optionstüren brauchen den Präfix "S[Optionsnummer]-". |
| SPKp |
SPK permanent advertising |
Unterstützt ab Firmware 9.1.x.x. Aktiviert die Smartphone Key Funktion am Terminal. Das Terminal ist dauerhaft empfangsbereit, weshalb es nicht "aufgeweckt" werden muss. |
| FCOL 1 |
free choice of locker 1 |
Alle Keys - auch unprogrammierte - können sich ein offenes Schließfach auswählen, um dieses abzuschließen und nach Gebrauch wieder zu öffnen. Öffnungsberechtigte Keys, können unabhängig vom zurzeit angelernten Key öffnen. |
| FCOL 2 |
free choice of locker 2 |
Nur öffnungsberechtigte Keys können sich ein Schließfach auswählen, um dieses abzuschließen und nach Gebrauch wieder zu öffnen. Privilegierte Keys, können unabhängig vom zurzeit angelernten Key öffnen. |
Zusätze
| -4dBm / -8dBm |
SPK Leistungspegel |
Kommt nur in Verbindung mit SPK/SPKp vor. Das Terminal ist dauerhaft empfangsbereit und sendet mit dem reduzierten Leistungspegel von -4dBm bzw. -8dBm. |
| PB |
push button |
Nur für Wandterminals verfügbar. Aktiviert die Kontakte von Input1, um ein externes Gerät - wie beispielsweise einen Drucktaster - anzuschließen. |
| (Guest) No Gen |
no generation |
Deaktiviert die Generationskontrolle für Gastkeys. Verlorene Gastkeys können dadurch nicht mehr entwertet werden, indem ein Key mit einem neueren Ausstelldatum kodiert wird. Das bedeutet, dass ein älterer, eventuell verlorener Key weiterhin gültig bleibt.
Diese Einstellung ist ausschließlich für besondere Anwendungsfälle gedacht und kann ein Sicherheitsrisiko darstellen. Bitte setzen Sie sich vor der Aktivierung unbedingt mit unserem Support in Verbindung. |
| Sabo(Block) |
Sabotage-Block |
Aktiviert die Option für den Sabotageschutz und Alarm am Terminal. Für die Einrichtung des Sabotageschutzes sind zusätzliche Hardware-Komponenten erforderlich. Kontaktieren Sie deshalb zur Einrichtung unseren Support. |