Zum Hauptinhalt springen

DG2 - Restart Häfele and HMS services

DG2 - How and where do I restart the Häfele and Dialock HMS services?

Occasionally it can happen that keys can no longer be encoded or the web server is no longer accessible. In this case, it may help to restart one or more services. Here you can find out where to find the relevant services and how to (re)start them.

IMPORTANT! The following steps must be carried out on the server.

1. Opening Windows services

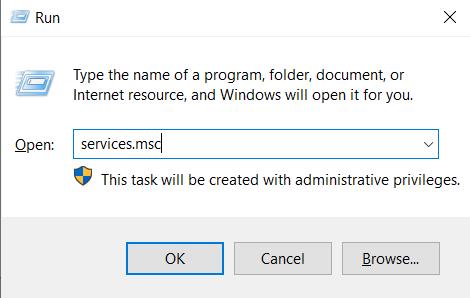
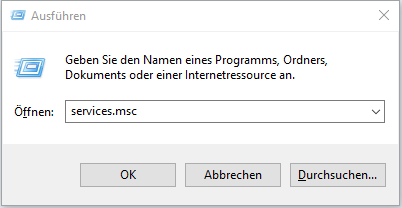
Press Windows + R and enter “services.msc”. The “Services” application will now open. Left-click once in the list and type an “H” on the keyboard to jump to the services with H like “Häfele”.

2. Häfele services

The services shown below should normally all be running. If one or more of these services are not running, start them.
(Exception: The Universal Client can also be located on another PC that is used for operation with the MDU or can be completely omitted with an older software version!)

If all services are running and there is still a problem, for example with the web server or in communication with the HMS or the encoder, restart the respective service.

You can start a service by right-clicking on the respective service and selecting “start” or “restart”, or contact your responsible IT department to start these services.

IMPORTANT! After restarting one or more Häfele services, wait approximately 5 minutes until the services are fully started.

3. Dialock HMS services

If all Häfele services are running (again), restart the Dialock HMS services. The “Administration”, “KeyManagement” and “Service Monitor” services should always be available; all other services shown here are optional and their necessity depends on whether a PMS provider requires one of our interfaces (refer to the protocol type in brackets).

The following sequence should be followed when starting:

  1. Administration
  2. Service Monitor
  3. Key Management (uses XML)

Followed by optional services:

  1. Distributor (obsolet from V1.1.25.x/ uses XML)
  2. FidelioManagement (uses FIAS)
  3. Additional Fidelio (obsolet from V1.1.25.x/ uses FIAS)
  4. Site Agent (uses JSON) / Websocket (uses WebSocket)

4. Function test

Then restart the software you want to work with and test the functionality.


General - I cannot create keys via the KeyWriter

I cannot create keys via the KeyWriter

Problems opening the KeyWriter

  • No connection to the administration service

    Check whether the PC or server on which the Dialock services are installed is switched on.

    If the server is started, restart the Dialock services:

    Restart Services DG1

    Restart Services DG2


  • No connection to the KeyManager service

    The KeyManager service is stopped and must be restarted:

    Restart Services DG1

    Restart Services DG2


  • Forgotten login credentials

    If you have forgotten your login user or password, first inquire internally whether someone else might have access.

    If nobody knows the credentials, please contact our support.


Problems with coding

  • Error 4096

    This error is a timeout. No key was recognized on the encoder within a certain time window.

    Please check the following:

    • Has a key been placed on the encoder?
    • Has the correct encoder been selected (encoder ID)?

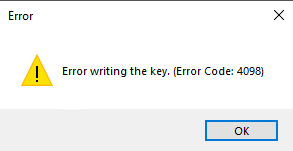
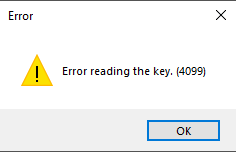
  • Error 4098 / Error 4099

    These errors are a write error and a read error. Although the key is recognized, it cannot be read or written correctly.

    Software-related causes:

    It can happen that the services do not communicate correctly with each other. First wait 15 minutes and then try again. The services will often have reconnected correctly during this time.

    If waiting does not help, restart the services:

    Restart Services DG1

    Restart Services DG2

    Sources of interference on the hardware side:

    • Is the encoder on a laptop or tower PC?
    • Is the encoder placed on a metal surface?
    • Are there other RFID devices such as EC card readers in the immediate vicinity?
    • Are there other keys in the immediate vicinity (under the encoder, possibly in a drawer)?
    • For Axess printers: has a card slipped out of place?

    Does the error only occur with newly delivered keys?

    If available, compare the last section of the print on the new keys with the existing ones.
    If the existing keys end with “/MD” and the new ones with “/MC”, they are not compatible


  • Error 4103

    This is a hardware initialization error. Put simply, the software cannot establish a connection to the encoder.

    Click here for the detailed solution:

    Error 4103 DG1

    Error 4103 DG2


  • Error 8194 (Axess Devices)

    This error signals a timeout when using Axess encoders.

    Check the following:

    • Is an Axess printer being used? > Is the card stack empty?
    • Was a key placed on the encoder?

  • Other error codes

    Please take a screenshot of your error message and contact our support.


Allgemein - Inbetriebnahme von Terminals im Stand Alone (ohne Software)

Allgemein - Inbetriebnahme von Terminals im Stand Alone (ohne Software)

Terminals können entweder im Stand Alone oder in Verbindung mit der Dialock Software verwendet werden.
Im Folgenden Artikel erfahren Sie, wie die Inbetriebnahme ohne Software erfolgt.

Was Sie benötigen:

  1. Programmierkarte (grün)
  2. Löschkarte (rot)
  3. Userkeys (Karten oder Chips)

Programmier- und Löschkey anlernen

  1. je nach Fall:
    1. Neues Terminal: Batterien einlegen.
    2. Bestands-Terminal: Total-Reset durchführen.
  2. Terminal blinkt weiß/grün/blaues (Verlangt Programmierkey) > Programmierkey an Terminal halten.
  3. Terminal blinkt rot (Verlangt Löschkey) > Löschkey an Terminal halten

Anschließend können Userkeys wie gewohnt eingelernt werden.

Userkeys anlernen

  1. Programmierkey vorhalten.
  2. Signalton ertönt. LED blinkt für 5 Sek. weiß.
  3. Innerhalb von 5 Sek. Benutzerkey vorhalten.
  4. Signalton ertönt. LED leuchtet weiß auf.
    Schließrecht zugewiesen.
  5. Bei mehreren Keys Schritt 3 & 4 wiederholen

Privilegierte Keys anlernen

  1. Programmierkey vorhalten.
  2. Signalton ertönt. LED blinkt 5x/Sek. weiß.
  3. Programmierkey erneut vorhalten.
  4. Signalton ertönt. LED blinkt 2x/Sek. weiß.
  5. Innerhalb von 5 Sek. Benutzerkey vorhalten.
  6. Signalton ertönt. LED leuchtet weiß auf.
    Schließrecht zugewiesen
  7. Bei mehreren Keys Schritt 5 & 6 wiederholen

Toggle-Keys anlernen

Wenn ein Key mit Toggle-Berechtigung länger ans Terminal gehalten wird, bleibt die Türe dauerhaft auf, bis der Key erneut länger heran gehalten wird.

  1. Programmierkey vorhalten.
  2. Signalton ertönt. LED blinkt 5x/Sek. weiß.
  3. Programmierkey erneut vorhalten.
  4. Signalton ertönt. LED blinkt 2x/Sek. weiß.
  5. Programmierkey erneut vorhalten.
  6. Signalton ertönt. LED blinkt 1x/Sek. weiß.
  7. Innerhalb von 5 Sek. Benutzerkey vorhalten.
  8. Signalton ertönt. LED leuchtet weiß auf. Schließrecht zugewiesen
  9. Bei mehreren Keys Schritt 7 & 8 wiederholen

Einzelne Keys löschen

  1. Löschkey vorhalten.
  2. Signalton ertönt. LED blinkt für max. 5 Sek. rot.
  3. Innerhalb von 5 Sek. Benutzerkey vorhalten.
  4. Signalton ertönt. LED leuchtet rot auf.
    Schließrecht entzogen.

Alle Keys löschen

  1. Löschkey vorhalten.
  2. Signalton ertönt. LED blinkt für max. 5 Sek. rot.
  3. Innerhalb von 5 Sek. Programmierkey vorhalten.
  4. Signalton ertönt. LED leuchtet rot auf. Schließrechte aller Keys entzogen.

Allgemein - HMS Fehlermeldungen

HMS Fehlermeldungen

Hier erfahren Sie, wie Sie mit den gängigsten HMS-Fehlermeldungen umgehen können.

  • Fehler 4096 (Timeout-Fehler)

    Bei diesem Fehler handelt es sich um einen Timeout. Innerhalb eines bestimmten Zeitfensters wurde kein Key auf dem Encoder erkannt.

    Bitte prüfen Sie Folgendes:

    • Wurde ein Key auf den Encoder aufgelegt?
    • Wurde der korrekte Encoder ausgewählt (Encoder ID)?
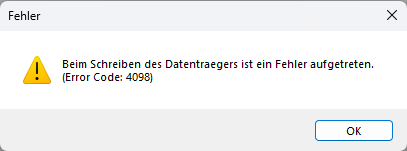
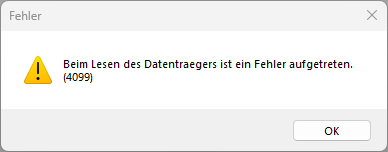
  • Fehler 4098 / Fehler 4099 (Schreib- und Lesefehler)

    Bei diesen Fehlern handelt es sich je um einen Schreib- und einen Lesefehler. Der aufgelegte Key wird dabei zwar erkannt, aber er kann nicht richtig gelesen oder geschrieben werden.

    Softwareseitige Ursachen:

    Es kann vorkommen, dass die Dienste nicht korrekt mit einander kommunizieren. Warten Sie zunächst 15 Minuten ab und versuchen es dann erneut. Oft haben sich die Dienste in dieser Zeit wieder richtig verbunden.

    Sollte das nicht helfen, starten Sie die Dienste einmal neu:

    Dienste starten DG1

    Dienste starten DG2

    Hardwareseitige Störquellen:

    • Steht der Encoder auf einem Laptop oder Tower PC?
    • Steht der Encoder auf einer metallenen Oberfläche
    • Befinden sich andere RFID Geräte wie bspw. EC-Kartenleser in unmittelbarer Nähe?
    • Sind weitere Key in unmittelbarer Nähe (unter dem Encoder ggf. in einer Schublade)?
    • Bei Axess Printer: ist eine Karte daneben gerutscht?

    Tritt der Fehler nur bei neu gelieferten Keys auf?

    Vergleichen Sie, sofern vorhanden, den hintersten Abschnitt des Aufdrucks der Keys mit den vorhandenen.
    Sollten die vorhandenen Key mit "/MD" enden und die neu gelieferten mit "/MC", sind diese nicht kompatibel

  • Fehler 4103 (Hardwarefehler)

    Hierbei handelt es sich um einen Hardwareinitialisierungsfehler. Vereinfacht gesagt, kann die Software keine Verbindung zum Encoder aufbauen.

    Hier geht's zum ausführlichen Lösungsweg:

    Fehler 4103 DG1

    Fehler 4103 DG2

  • Fehler 8194 (Axess Devices - Timeout-Fehler)

    Dieser Fehler signalisiert einen Timeout bei der Verwendung von Axess Encodern.

    Prüfen Sie Folgendes:

    • Wird ein Axess Drucker verwendet? > Ist der Kartenstapel leer?
    • War ein Key auf den Encoder aufgelegt?
  • Andere Fehlernummern

    Bitte machen Sie einen Screenshot von Ihrer Fehlermeldung und kontaktieren Sie unseren Support.


Allgemein - HMS Lizenz

Wie überprüfe ich meine HMS Lizenz?

Wo finde ich die HMS Lizenzinformationen?

  • Schritt 1

    Öffnen Sie die Anwendung "Administration". Klicken Sie hier im Menü auf "Lizenzinformationen".

  • Schritt 2

    Im geöffneten Fenster finden Sie die aktuellen Lizenzinformationen.

Wann sollte ich die Lizenzinformationen prüfen?

Die Lizenzinformationen sind in folgenden Situationen relevant:

  • Systemerweiterung durch weitere Encoder
  • Gewünschter Umstieg auf die Verwendung von Smartphone Keys (SPK)

Allgemein - Ich kann keine Keys über den KeyWriter erstellen

Ich kann keine Keys über den KeyWriter erstellen

Probleme beim Öffnen des KeyWriters

  • Keine Verbindung zum Administrationsdienst

    Prüfen Sie, ob der PC oder Server, auf dem die Dialock Dienste installiert sind, eingeschaltet ist.

    Sollte der Sever gestartet sein, starten Sie die Dialock Dienste neu:

    Dienste starten DG1

    Dienste starten DG2


  • Keine Verbindung zum KeyManagerdienst

    Der KeyManagerdienst ist gestoppt und muss neu gestartet werden:

    Dienste starten DG1

    Dienste starten DG2


  • Login vergessen

    Sollten Sie Ihren Login User oder Passwort vergessen haben, fragen Sie zunächst intern nach, ob jemand anderes den Zugang haben könnte.

    Sollte niemand den Zugang kennen, kontaktieren Sie bitte unseren Support.


Probleme beim Kodieren

  • Fehler 4096

    Bei diesem Fehler handelt es sich um einen Timeout. Innerhalb eines bestimmten Zeitfensters wurde kein Key auf dem Encoder erkannt.

    Bitte prüfen Sie Folgendes:

    • Wurde ein Key auf den Encoder aufgelegt?
    • Wurde der korrekte Encoder ausgewählt (Encoder ID)?

  • Fehler 4098 / Fehler 4099

    Bei diesen Fehlern handelt es sich je um einen Schreib- und einen Lesefehler. Der aufgelegte Key wird dabei zwar erkannt, aber er kann nicht richtig gelesen oder geschrieben werden.

    Softwareseitige Ursachen:

    Es kann vorkommen, dass die Dienste nicht korrekt mit einander kommunizieren. Warten Sie zunächst 15 Minuten ab und versuchen es dann erneut. Oft haben sich die Dienste in dieser Zeit wieder richtig verbunden.

    Sollte das nicht helfen, starten Sie die Dienste einmal neu:

    Dienste starten DG1

    Dienste starten DG2

    Hardwareseitige Störquellen:

    • Steht der Encoder auf einem Laptop oder Tower PC?
    • Steht der Encoder auf einer metallenen Oberfläche?
    • Befinden sich andere RFID Geräte wie bspw. EC-Kartenleser in unmittelbarer Nähe?
    • Sind weitere Keys in unmittelbarer Nähe (unter dem Encoder ggf. in einer Schublade)?
    • Bei Axess Printern: ist eine Karte daneben gerutscht?

    Tritt der Fehler nur bei neu gelieferten Keys auf?

    Vergleichen Sie, sofern vorhanden, den hintersten Abschnitt des Aufdrucks der neu gelieferten Keys mit dem Aufdruck der vorhandenen.
    Sollten die vorhandenen Keys mit "/MD" enden und die neu gelieferten mit "/MC", sind diese nicht kompatibel.


  • Fehler 4103

    Hierbei handelt es sich um einen Hardwareinitialisierungsfehler. Vereinfacht gesagt, kann die Software keine Verbindung zum Encoder aufbauen.

    Hier geht's zum ausführlichen Lösungsweg:

    Fehler 4103 DG1

    Fehler 4103 DG2


  • Fehler 8194 (Axess Devices)

    Dieser Fehler signalisiert einen Timeout bei der Verwendung von Axess Encodern.

    Prüfen Sie Folgendes:

    • Wird ein Axess Drucker verwendet? > Ist der Kartenstapel leer?
    • War ein Key auf den Encoder aufgelegt?

  • Andere Fehlernummern

    Bitte machen Sie einen Screenshot von Ihrer Fehlermeldung und kontaktieren Sie unseren Support.


Allgemein - Ich kann keine Keys über mein PMS erstellen

Ich kann keine Keys über mein PMS erstellen

Grenzen Sie den Fehler weiter ein

Wenn Sie eine der folgenden Fragen mit "ja" beantworten würden, befolgen Sie bitte den entsprechenden Lösungsweg:

  • Lässt sich der Key ausstellen, wird aber an der Türe abgewiesen?

    In diesem Fall kann es entweder sein, dass der Key mit falschen Daten erstellt wurde oder dass die Einstellungen des Terminals nicht korrekt sind.

    Falsche Keydaten:

    • Lesen Sie den Key mithilfe des KeyWriters aus und überprüfen Sie, ob die ausgelesenen Werte korrekt sind.
    • Sollten die Werte falsch sein, stellen Sie den Key über Ihr PMS erneut aus. Sind die Werte weiterhin falsch, kontaktieren Sie bitte zunächst Ihren PMS-Anbieter.

    Falsche Terminaldaten:

  • Funktioniert die Key Erstellung noch über den KeyWriter?

    1. Starten Sie Ihr PMS falls möglich neu und testen Sie die Key Erstellung erneut.
    2. Überprüfen Sie, ob der entsprechende Schnittstellen-Dienst der Dialock HMS ausgeführt wird und starten Sie diesen bei Bedarf neu. 
      Hier geht's zur Dienstübersicht für PMS-Schnittstellen
  • Wird eine Fehlermeldung beim Erstellen des Key ausgegeben?

    Vergleichen Sie, ob die Fehlerbeschreibung sich mit einer der gängigen HMS-Fehlermeldungen deckt und befolgen Sie den entsprechenden Lösungsweg.
    Hier geht's zu den HMS Fehlermeldungen.


Allgemein - Key verloren

Wie gehe ich mit verloren gegangenen Transpondern um?

Man sollte als erstes einen Ersatzschlüssel für den verlorenen Transponder kodieren. (Achtung! Bei Personalkeys auf korrekte Personal- und Transponderkennung, bei Gastkey auf die korrekte Raumnummer achten!)

Gehen Sie dazu in die ensprechende Software:

  • Bei Personalkeys
    • DG1: Personnel Software
    • DG2: Dialock 2 Weboberfläche
  • Bei Gastkeys
    • DG1: Hotel/Clinic oder KeyWriter
    • DG2: KeyWriter

Nachdem der neue Ersatztransponder erstellt wurde, muss man diesen einmal an jede berechtigte Tür halten. Dies überschreibt an jeder Tür den verlorenen Transponder und macht diesen ungültig. Wenn Sie sich unsicher sind, sollten Sie den Transponder an jede Türe halten.

Nun haben Sie prinzipiell den verloren Transponder ungültig gemacht und besitzen eine exakte Kopie des verlorenen Transponders.

Diesen können Sie nun entweder der Person wieder aushändigen oder erneut mit anderen Daten kodieren.

Der verlorene Transponder hatte Generalschließrecht. Muss ich den neuen Ersatzkey wirklich jedem Terminal präsentieren?

Leider ja. Denn da es sich in den meisten Fällen um Offline-Türen handelt, erfahren diese nicht automatisch, wenn in der Software ein neuer Key ausgestellt wird. Jedes Terminal muss daher aktiv erfahren, sobald ein Key mit neuem Austelldatum bzw. neuerer Generation existiert.

Ich kenne die Transponderkennung/-nummer des verlorenen Transponders nicht. Wie mache ich diesen ungültig?

Da Transponder durch das Präsentieren einer aktuelleren Kopie am Terminal erst dort ungültig werden, gibt es leider in diesem Fall keine Möglichkeit, den Transponder ungültig zu machen. Wir empfehlen Ihnen in diesem Fall, die Personalliste einmal genauer zu prüfen und diese ggf. mit den übrigen im Umlauf befindlichen Keys abzugleichen.


Allgemein - PMS Schnittstellen

PMS Schnittstellen

WARNUNG! Falls Sie mehrere PMS parallel verwenden, wird empfohlen unseren Support zu Rate zu ziehen, bevor Sie Änderungen an einer Konfiguration vornehmen.

Öffnen Sie die Anwendung "Administration".
Die Administration ist immer auf dem Server und wahlweise auch auf weiteren PCs installiert.

Öffnen Sie nun die Dienstekonfiguration und setzen Sie den Haken bei "Gruppen anzeigen". Dadurch werden alle in Ihrem System installierten Dialock HMS Dienste nach Ihrer Funktionsweise bzw. der Art Ihrer Kommunikation gruppiert.

HINWEIS: Welche Kommunikationsvariante Sie verwenden, können Sie bei Ihrem PMS Anbieter erfragen.

Mögliche Kommunikationsvarianten sind:

Zuständiger Dialock HMS Dienst Kommunikationsvariante PMS Beispiele
KeyManagement, Distributor XML

ibelsa, Shiji,...

(Additional-)FidelioManagement FIAS

MEWS, Opera, Protel,...

SiteAgent JSON / Websocket

Code2Order, Hotelbird, Like Magic,...

Ich verwende...

  • XML

    HINWEIS: Bei dieser Variante agiert die Dialock HMS als Server - das PMS verbindet sich also zur Dialock HMS.

    Falls Sie noch einen Distributor installiert haben, doppelklicken Sie auf den Distributor Dienst, um die Konfiguration anzuzeigen (Bild B). Andernfalls doppelklicken Sie auf den KeyManagement Dienst (Bild A).

    Teilen Sie dem PMS den nun angezeigten Horch Port sowie den DNS Namen in der Titelzeile mit, damit sich das PMS zu uns verbinden kann. 
    WICHTIG! Der Horch Port muss auch in der Firewall freigegeben werden, damit das PMS die Verbindung aufbauen kann.


    Im Beispiel sind die Angaben für den KeyManager (Bild A):

    • WIN-OLU6QNS60NE (DNS)
    • 10815 (Horch Port)

  • FIAS

    HINWEIS: Bei dieser Variante agiert die Dialock HMS als Client - die Dialock HMS verbindet sich also zum PMS.

    Doppelklicken Sie auf den FidelioManagement Dienst, um die Konfiguration anzuzeigen. 

    Nun können Sie den Fidelio Hostname und den Fidelio Port wahlweise prüfen bzw. anpassen. Beide Angaben erhalten Sie von Ihrem PMS.
    WICHTIG! Der Fidelio Port muss auch in der Firewall freigegeben werden, damit der FidelioManagement Dienst die Verbindung zum PMS aufbauen kann.

    Falls Sie Änderungen vorgenommen haben, bestätigen Sie diese mit "Ok" und starten Sie anschließend den FidelioManagement Dienst neu:

    Dienste starten DG1

    Dienste starten DG2


  • JSON / Websocket

    HINWEIS: Bei dieser Variante agiert die Dialock HMS als Client - die Dialock HMS verbindet sich also zum PMS.

    Doppelklicken Sie auf den SiteAgent Dienst, um die Konfiguration anzuzeigen. 

    Nun können Sie die Socket Url, die Site Id sowie den Site Token prüfen bzw. anpassen. Alle drei Angaben erhalten Sie von Ihrem PMS.
    WARNUNG! Die Site Id sowie der Site Token sind kundenspezifische Angaben. Geben Sie diese nicht an Dritte weiter!
    Falls Sie Änderungen vorgenommen haben, bestätigen Sie diese mit "Ok" und starten Sie anschließend den SiteAgent Dienst neu:

    Dienste starten DG2


  • Spezialfall Apaleo

    HINWEIS: Bei dieser Variante agiert die Dialock HMS als Server - das PMS verbindet sich also zur Dialock HMS.

    WICHTIG! Die folgenden Schritte müssen vom Server aus durchgeführt werden.

    Für das PMS Apaleo gibt es einen eigenen Dialock HMS Dienst mit einer ausgelagerten Konfigurationsdatei - die "config.json". Diese finden Sie bei einer Standardinstallation unter:
    C:\Program Files (x86)\Dialock\HMS\1.1\WebsocketAdapter

    Damit die Verbindung korrekt aufgebaut werden kann, muss bei der WebsocketAdapter_Ip die IP-Adresse des Servers eingetragen werden. DNS-Namen oder "localhost" sind nicht als Angaben erlaubt!
    Alle weiteren Angaben bleiben im Normalfall unverändert. Die KeyManager_Ip sowie den KeyManager_Port können Sie in der Konfiguration des KeyManagers gegenprüfen, indem Sie auf den Eintrag des KeyManagers in der Dienstekonfiguration der "Administration" doppelklicken.
    WICHTIG! Der WebsocketAdapter_Port muss auch in der Firewall freigegeben werden, damit das PMS die Verbindung aufbauen kann.

    Falls Sie Änderungen in der config.json vorgenommen haben, speichern Sie diese und starten Sie anschließend den WebsocketAdapter Dienst neu:

    Dienste starten DG2


Zusätzliche Informationen für das PMS

  • Optionen / Access Points

    Klicken Sie auf "Globale Einstellungen" und wählen Sie den Reiter Optionen.

    Teilen Sie dem PMS die Values sowie die Descriptions aller Optionen mit, die als DefaultState nicht auf Disabled stehen.


    Im Beispiel sind die relevanten Optionen:

    • 1 (Haupteingang)
    • 2 (Fahrradkeller)
    • 3 (Tiefgarage)
    • 4 (Spa)

    HINWEIS:
    IsDefaultActive (nicht in allen Versionen vorhanden) bedeutet, dass die Option immer mit dazu gebucht wird, unabhängig davon, ob das PMS die Option mit anfragt.
    Der DefaultState ist für das PMS irrelevant. Er gibt an, ob die Option im KeyWriter standardmäßig angehakt, oder komplett deaktiviert ist.


  • Kodierer IDs

    WARNUNG! Falls Sie das DG1 System in Kombination mit Netzwerkkodierern verwenden, wird empfohlen unseren Support zu Rate zu ziehen, bevor Sie die Kodierer IDs an das PMS übermitteln.

    Falls Sie noch einen Distributor installiert haben, doppelklicken Sie auf den Distributor Dienst, um die Konfiguration anzuzeigen (Bild B). Andernfalls doppelklicken Sie auf den KeyManagement Dienst und wechseln Sie zum Reiter "Kodierer Einstellung" (Bild A).

    Teilen Sie dem PMS die nun angezeigten (Literal-)Ids und wenn vorhanden auch die Descriptions mit, damit das PMS weiß, an welchen Kodierer die jeweilligen Key-Anfragen gesendet werden sollen. 


    Im Beispiel ist der relevante Encoder:

    • 1 (Id / LiteralID)

    HINWEIS:
    Wenn im KeyManagement für den Encoder eine Adresse angegeben ist, handelt es sich um einen sogenannten Netzwerkkodierer. Bei Netzwerkkodierern wird die Adresse (im Beispiel 192.168.1.101) zumeist auch auf dem Display des Kodierers angezeigt, was die Zuordnung erleichtert.


Allgemein - Software Version prüfen

Allgemein - Welche Software Version verwende ich?

DG1

  • Schritt 1

    Melden Sie sich jeweils in Ihrem Software Modul (Personnel, Service, Hotel/Clinic.) an und klicken Sie in der oberen Menüzeile auf das "?". Wählen Sie dort "Info" aus, um die Version anzuzeigen.

  • Schritt 2a - Personnel

    Die Version wird nun im geöffneten Fenster angezeigt.

  • Schritt 2b - Service

    Die Version wird nun im geöffneten Fenster angezeigt.

  • Schritt 2c - Hotel/Clinic

    Die Version wird nun im geöffneten Fenster angezeigt.

DG2

  • Schritt 1

    Melden Sie sich in der Dialock 2 Weboberfläche an.

  • Schritt 2

    Klicken Sie rechts oben auf das "i"-Symbol, um die Systeminformationen zu öffnen. In der Übersicht finden Sie die Versionsnummer entsprechend in der Zeile "Version".

HMS

  • Schritt 1

    Öffnen Sie wahlweise die Anwendung "Administration" oder "KeyWriter". Klicken Sie hier im oberen Menü auf "Hilfe" und wählen Sie dort "Über..." aus.

  • Schritt 2

    Im nun geöffneten Infofenster wird die Version angezeigt.


DG1 - Generation error

DG1 - Generation error

What are generations for?
When a transponder is written to, it always receives a generation or issue date. This ensures that only the most recent transponder is accepted.

The generation error can occur with both guest transponders and staff transponders. The error can have several causes, for example, if you create a replacement card instead of a duplicate and then hold this replacement card in front of the room door. Generation errors can also occur when databases are used in parallel. In this case, you must manually enter the generations into one of the databases and set up a common, shared database for all PCs used.
NOTE: We strongly recommend contacting our support team for database customisation!

The error code is indicated in the DG1 by 3 beeps (error 3 for guest cards) or 5 beeps, a pause, 5 beeps (error 10 for staff cards).

Solution for guest transponders

Guest generations can have a value between 0 and 63. By default, the last 32 guest generations are blocked downwards. For example, if a newly created guest card has generation 32 and is accepted at the terminal, the terminal also increases its known generation to 32 and blocks all similar guest keys with generations from 0 to 31. (For a generation of 0, 32-63 are blocked.)
If a generation error is thrown in the above example, the key used has a generation in the blocked range from 0 to 31.

To fix the problem with guest cards, the guest generation must be increased manually. This can be done in two ways:

Solution for guest transponders - Method 1

To increase generations at the terminal, proceed as follows (MDU/handheld device required):

1. Hold the configuration transponder (Beam05) in front of your terminal (it will start flashing).
2. Now hold a privileged transponder (e.g. house technician) in front of the terminal (continuous light / communication mode).
3. From the main menu of the MDU (handheld device), select ‘Technician’ (third menu item).
4. Select ‘Guest generation’ and hold the MDU in front of the terminal.
5. The display shows the current guest generation.
6. Enter a number that is 20 higher than the number displayed (if the number is greater than 63, continue counting from 0. For example, if the current generation is 53 -> generation 9).
7. Check whether communication mode is still active and transfer the new generation by pressing the green tick.
8. Exit communication mode by pressing the upper red cross on the MDU and check whether the guest transponder is now accepted.
9. If it is not accepted, repeat the process and increase the generation again.

Solution for guest transponders - Method 2

To increase the generation of the guest card, perform a new check-in with the same parameters as before. This will increase the generation by 1. If the guest card still does not work, perform as many new check-ins (max. 32) with the same card until you are no longer in the locked area.
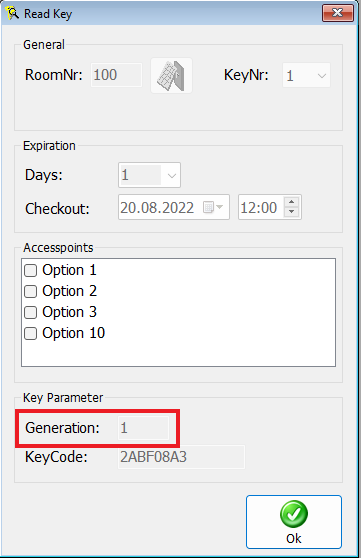
If you have read the generation at the terminal and noted it down, it is worth reading the generation of the guest card in the KeyWriter or in the hotel software. To do this, click on ‘Read key’ in the software. This allows you to see the current generation of the card and perform a check-in as often as necessary until the generation on the card is one higher than the generation stored in the terminal.

Solution for staff transponders

To increase the generation of staff transponders, use the Personnel Software to create a replacement key for the corresponding transponder ID (key no.). This increases the generation of the staff transponder by one.
It is often sufficient to perform this process once. However, if error 10 continues to be displayed, create a replacement key until the transponder is accepted again.


DG2 - Functional time model

How do I configure a function time model?

What is a function time model?

The function time model is an optional setting that can be assigned to a terminal.
The setting allows the terminal to have a different functionality to the standard one within a specified time window.

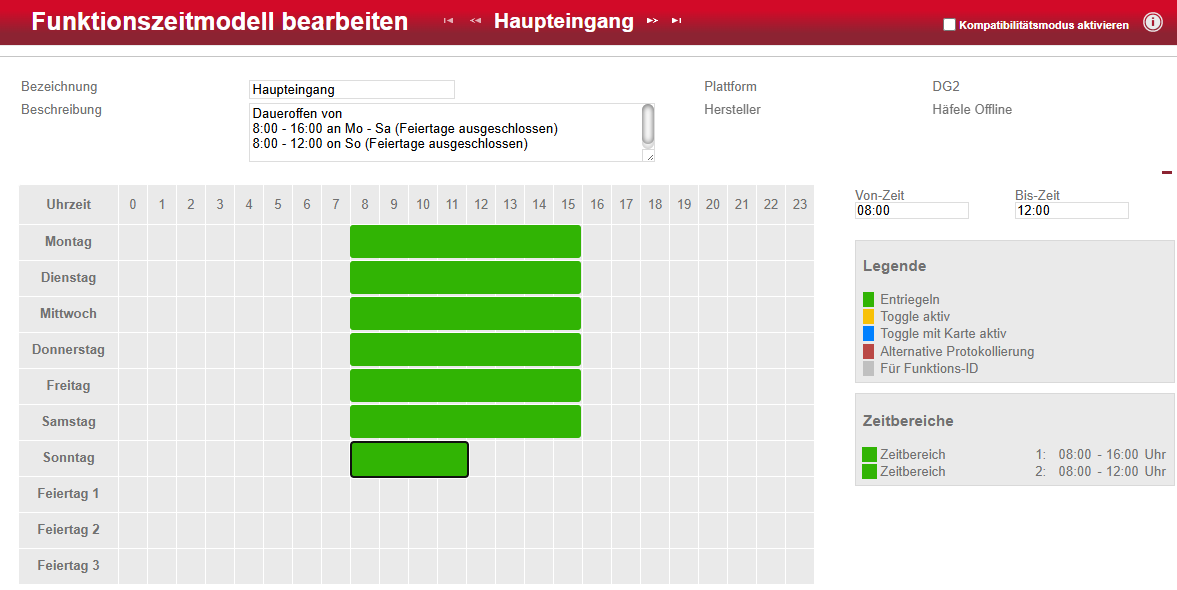
Example main entrance: During the day the main entrance is permanently open, at night it can only be opened by authorized keys.

How do I create a functional time model?

  • Step 1 - Navigation

    1. Log in to the Dialock 2 software.
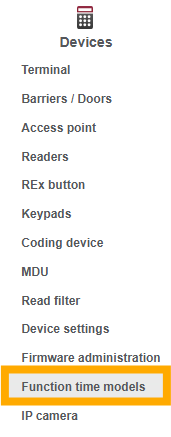
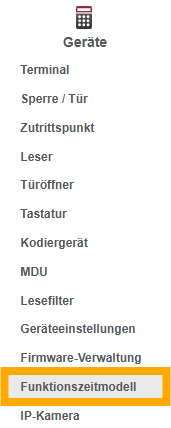
    2. Navigate to “Devices” > “Function time models”.
  • Step 2 - Create

    1. Click on “Create” in the left-hand actions menu.
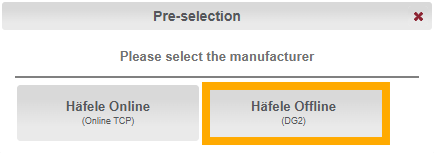
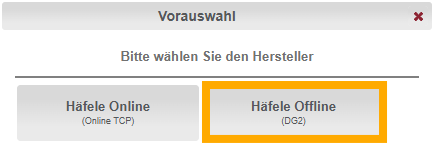
    2. Select “Häfele Offline” as the manufacturer.
    3. Give the function time model a suitable name and save.
  • Step 3 - Select function

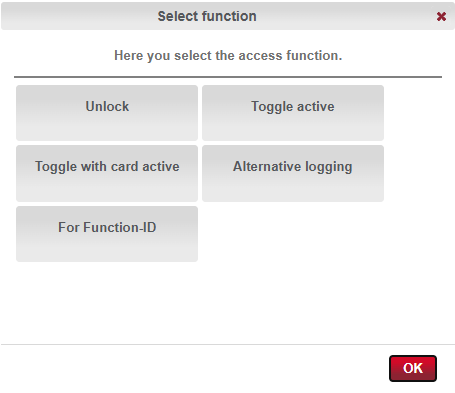
    1. Double-click in the time matrix for the desired day.
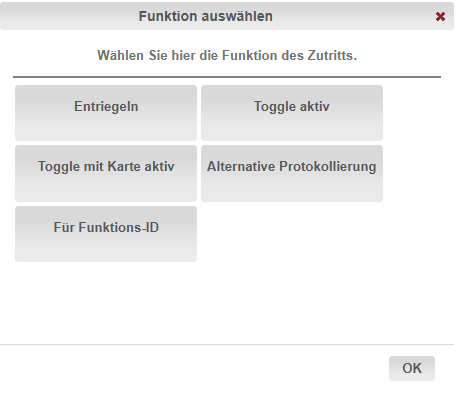
    2. Select one or more functions that should apply during the time window.
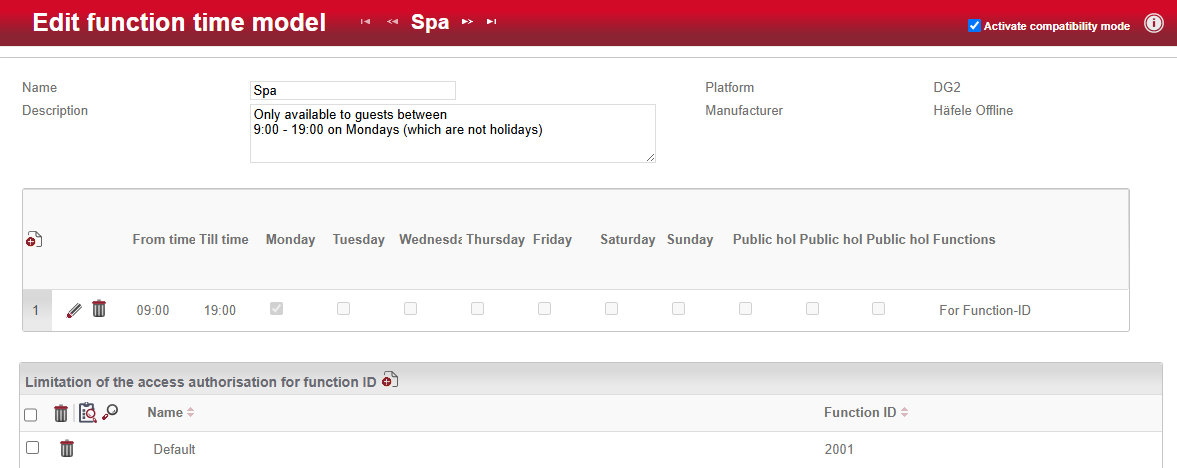
      If you only want to restrict the guests, but not the staff, select the “For Function-ID” function.
    3. Confirm the selection with OK.
  • Step 4 - Adjust time window

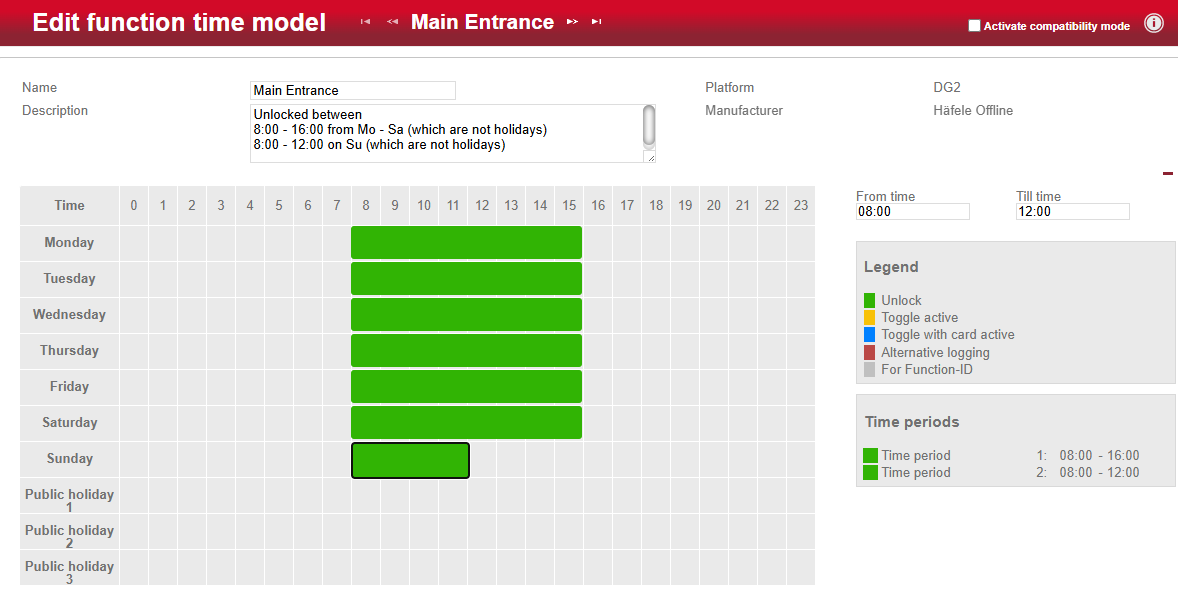
    1. Make sure that the compatibility mode (top right corner) is deactivated.
    2. Click on the time window.
      1. Drag the borders to the left / right to adjust the time.
      2. Drag the borders up / down to copy the time window to other days.
    3. Save the settings.
  • (Step 5 - Select function ID)

    These steps are only necessary if you have selected “For Function-ID” as the function!

    1. Activate the compatibility mode (top right-hand corner).
    2. In the " Limitation of the access authorisation for function ID" section:
      1. Click on the "Clipboard with magnifying glass" icon.
      2. Select the desired function ID.
        If you want to restrict guest access for a certain period of time, select the default function ID 2001.
    3. Save the settings.
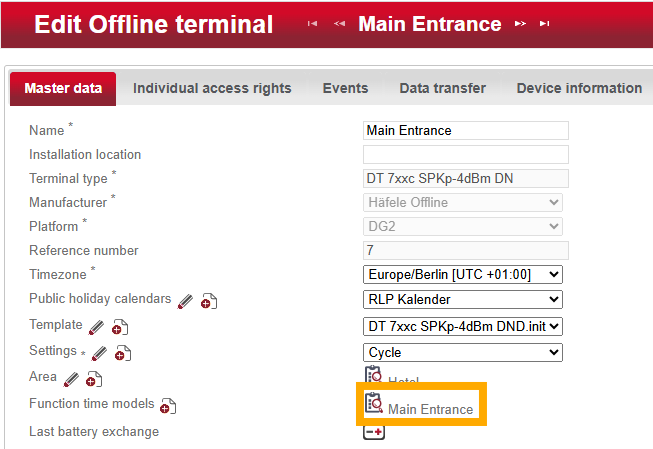
  • Step 6 - Set time model

    1. Navigate to "Devices" > "Terminal".
    2. Select the desired terminal from the list.
    3. Under Master data you will also find the item "Function time models".
    4. Click on the "Clipboard with magnifying glass" icon and select the desired time model from the list.
    5. Save the change via the left-hand actions menu.
  • Step 7 - Transferring the changes

How do I modify a functional time model?

  • Step 1 - Select model

    1. Log in to the Dialock 2 software.
    2. Navigate to “Devices” > “Terminal”.
    3. Select the desired terminal from the list.
    4. Under Master data you will also find the item “Function time models”. Memorize the name of the function time model.
  • Step 2 - Navigation

    1. Navigate to “Devices” > “Function time models”.
    2. Select the desired function time model which you memorized from the list.
  • Step 3a - Adjust time window

    1. If you want to adjust a time window, make sure that the compatibility mode (top right corner) is deactivated.
    2. For the desired time window:
      1. Drag the edges to the left / right to adjust the time.
      2. Right-click to adjust the function.
    3. Save the changes via the left-hand actions menu.
  • Step 3b - Delete time window

    1. If you want to delete a time window, activate the compatibility mode in the “Edit function time model” window.
    2. The time windows are now listed in a table.
    3. Click on the trash can symbol in the desired line to delete the time window.
  • Step 4 - Transferring the changes

What do the different functions mean?

Unlock

Automatic opening at the start time (from time) and automatic closing at the end time (till time) of the time range.

Toggle active

When a valid key is presented, the status of the access point changes from “closed” to “open” or vice versa and remains in this
status.

Toggle with card active

If a valid key is presented briefly, the terminal opens and closes again after a few seconds.

If a valid key is presented for a longer period, the status of the access point changes from “closed” to “open” or vice versa and remains in this
status.

Toggle active + Unlock

The combination of the “Toggle active” and ‘Unlock’ functions corresponds to the “Toggle active” function. In addition, an open door/lock is automatically closed at the end of the time range to ensure that for example an office door is closed at the end of working hours.

For Function-ID

Access for persons with the corresponding function ID is only possible within the time window.
The default function ID 2001 is automatically stored on every guest key and can therefore be used to restrict guest access.

Alternative logging

Activate this function if no logging or similar is to take place at a specific door/lock, e.g. in accordance with the works council.
The underlying alternative logging is defined individually by a trained technician.


DG2 - Access by code

How do I make an Access via Code?

The access by code is required if a privileged transponder is no longer accepted at the door.

  1. Select “Terminal”>“Access via Code” in the MDU and approach the terminal.
  2. You will now receive a code, which you can give to our support team by phone or email.
  3. The support team will generate a confirmation code and send it to you.
  4. Enter this confirmation code in the menu field in which your code is also displayed.
  5. Confirm the entry with Enter and approach the terminal again.
  6. You will hear two beeps to start and end the data transfer and you will return to the higher-level menu.

Now use the “Terminal” > “Factory setting” option to completely reset the terminal and then use the “Terminal Sync” option to reprogram the terminal. No privileged key is required for this due to access by code.

The terminal should then be operable again as usual.


DG2 - Authentication error 1000

What is the Authentication error #1000?

The authentication error #1000 is displayed if an action with the MDU was not authorized.

What are possible causes?

  • The MDU action was not confirmed within a certain time window using a privileged key on the terminal.
  • The key used for authorization is not authorised to operate the MDU.
  • The key used for authorization does not have locking authorisation for the door or is no longer valid.
  • The configuration of the terminal is faulty so that valid keys are no longer recognized.
  • The terminal's reader is malfunctioning and can no longer read keys.

How can I fix the error?

Ensure correct handling with the MDU

Make sure that you follow the correct sequence of steps when executing MDU actions. Almost all actions with the MDU require authorization using a privileged key (dual control principle). This is to prevent unauthorized persons from manipulating the terminals using the MDU.

Follow these steps:

  1. Select the desired action on the MDU and approach the terminal.
  2. The terminal starts to flash and expects authorization - “Authorize at terminal” appears on the MDU
  3. Remove the MDU from the terminal
  4. Hold the privileged key against the terminal - The LED should flash positive (white, green or blue) and beep once.
  5. Remove the key from the terminal
  6. Hold the MDU against the terminal again - Data transfer now continues.
  7. (Depending on the action selected) - Wait until the transfer is complete or for further prompts on the MDU.

Check the authorizations of the key

The privileged key must fulfill the following criteria:

  1. It always requires locking authorization for the access point in question. (it makes sense to select keys with general locking authorization as privileged keys)
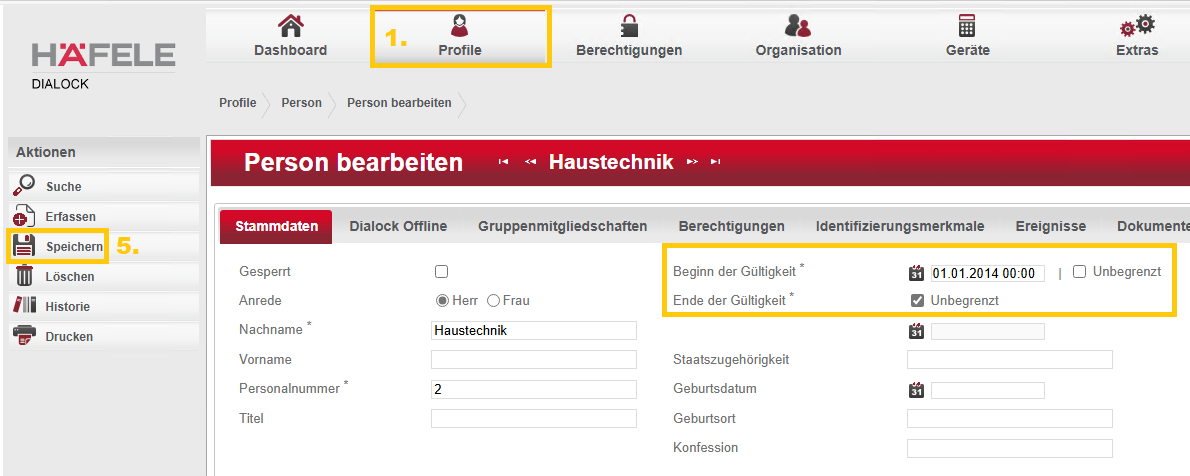
  2. The key must be valid (check the start and end of validity - ideally unlimited)
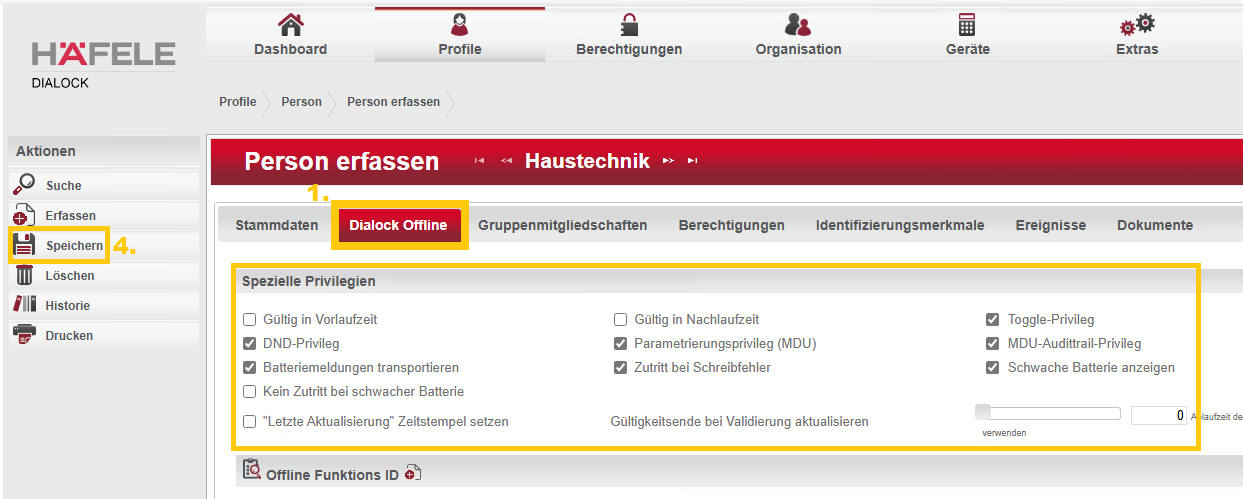
  3. The key requires the two special privileges “Parameterization privilege (MDU)” and “MDU audit trail privilege”

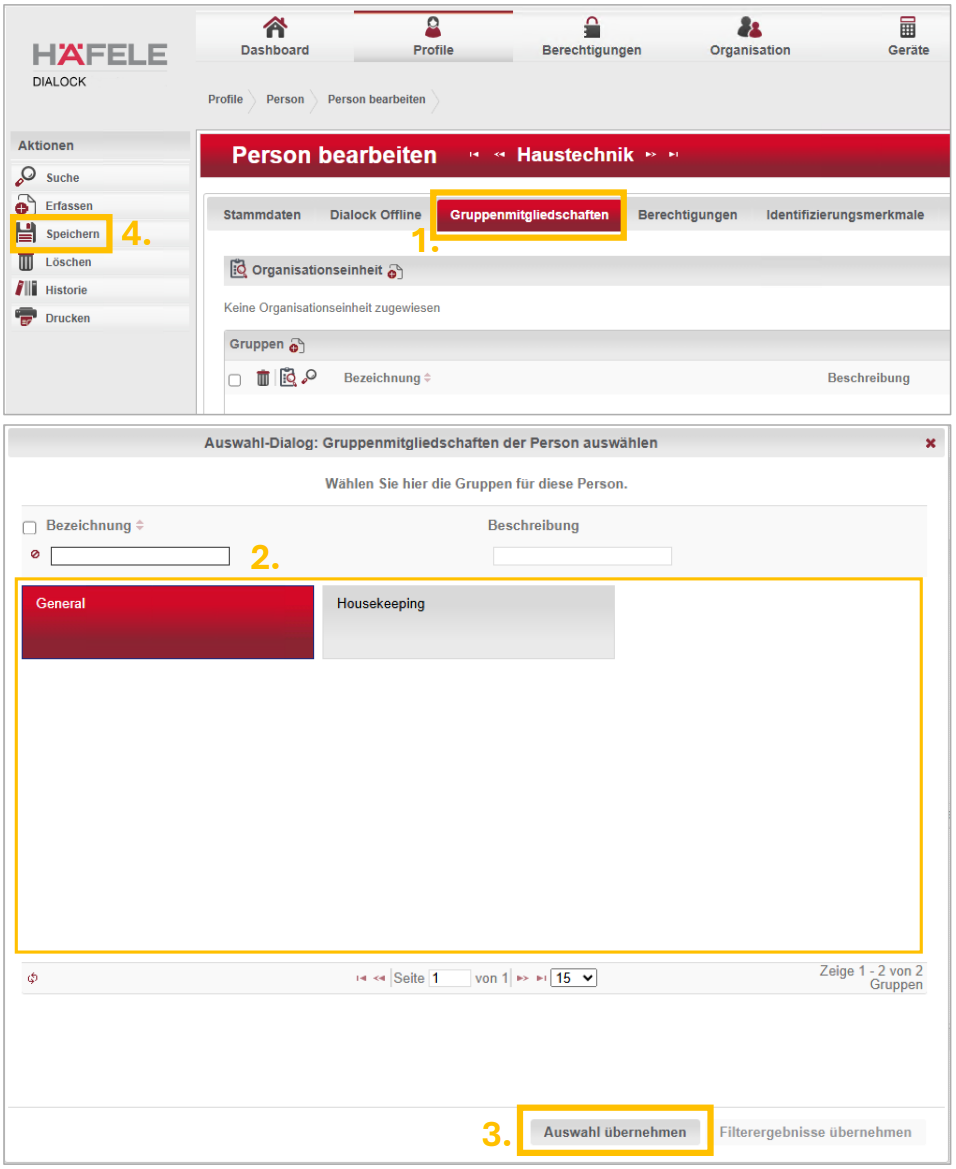
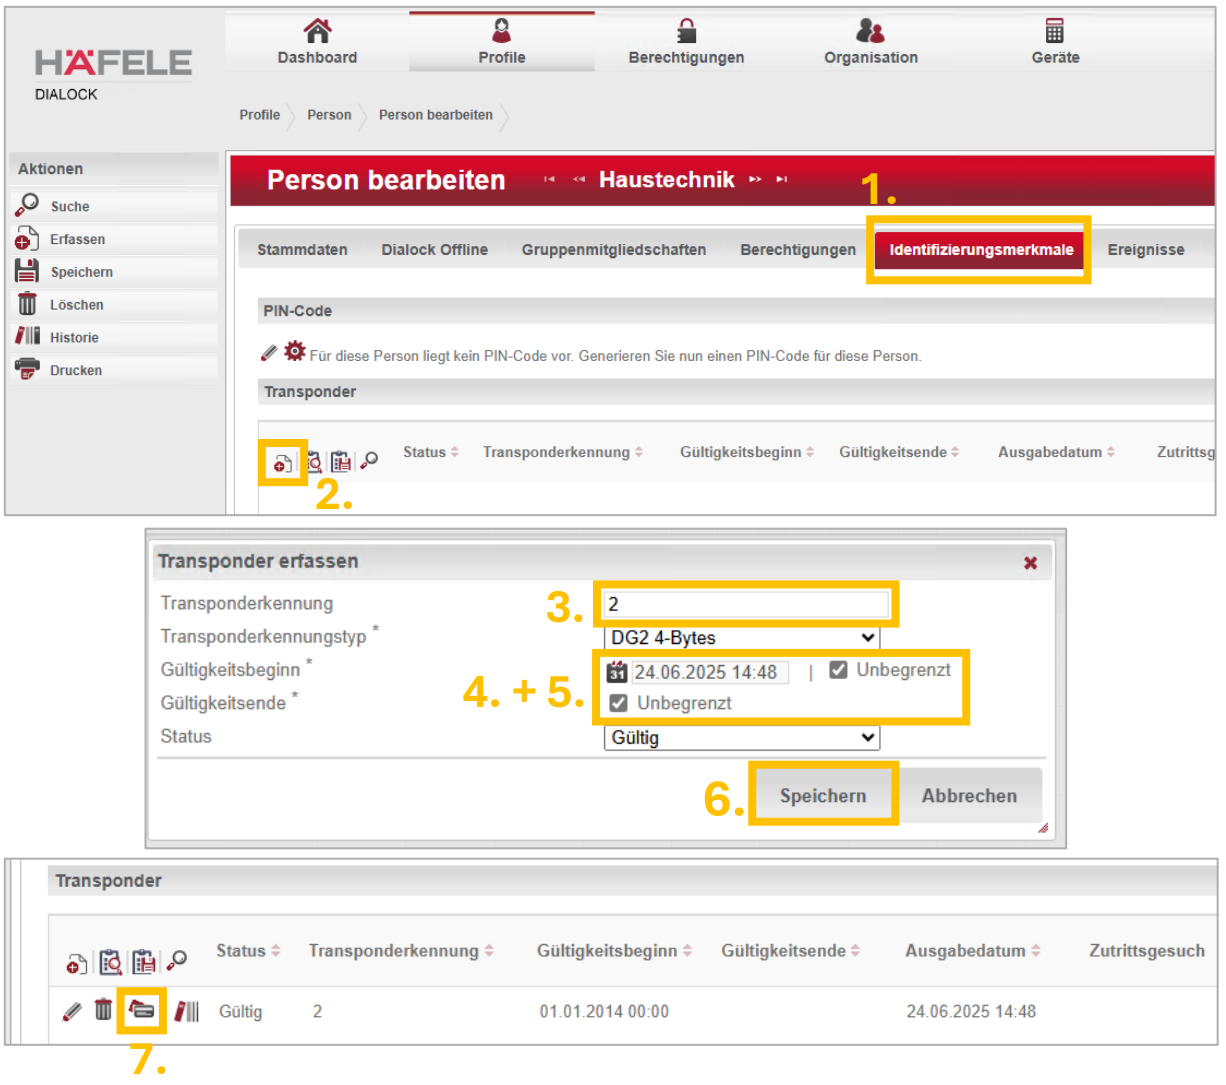
You can check these properties in the DG2 software under “Profiles” > “ Persons”. Select the relevant person from the list. If one or more of the criteria are not met, change the relevant settings and save them. Then issue the key again. It should now be accepted as a privileged key.

Check terminal for faulty configuration

Use the MDU to read the terminal info and check whether the name of the terminal and the time are correct. If they are inaccurate, this could be the cause of authorization error #1000.

A reset of the terminal or access via code usually helps here. The terminal can then be reprogrammed.

Check terminal assembly

If all other causes have been ruled out, the installation of the terminal should be checked.

A terminal component could be damaged or not connected correctly. Therefore, check that everything is well connected and that no external damage is visible.

If the error persists after checking the installation, the reader or logic module may be defective and should be replaced.


DG2 - Autorisierungsfehler 1000

Was ist der Autorisierungsfehler #1000?

Der Autorisierungsfehler #1000 wird auf der MDU angezeigt, wenn eine Handlung mit der MDU nicht berechtigt wurde.

Was sind mögliche Ursachen?

  • Die MDU-Aktion wurde nicht innerhalb eines bestimmten Zeitfensters mit einem privilegierten Key am Terminal bestätigt.
  • Der für die Autorisierung verwendete Key ist nicht für die Bedienung der MDU berechtigt.
  • Der für die Autorisierung verwendete Key hat keine Schließberechtigung für die Tür oder ist nicht mehr gültig.
  • Die Konfiguration des Terminals ist fehlerhaft, sodass gültige Keys nicht mehr erkannt werden.
  • Der Leser des Terminals ist beeinträchtigt und kann keine Keys mehr lesen.

Wie kann ich den Fehler beheben?

Korrekte Handhabung mit der MDU beachten

Achten Sie darauf, dass Sie die korrekte Schrittreihenfolge beim Ausführen von MDU-Aktionen einhalten. Fast alle Aktionen mit der MDU erfordern eine Autorisierung durch einen privilegierten Key (4-Augen-Prinzip). Dadurch soll vermieden werden, dass Unbefugte mithilfe der MDU die Terminals manipulieren.

Halten Sie diese Schritte ein:

  1. Wählen Sie die gewünschte Aktion auf der MDU aus und nähern Sie die MDU dem Terminal an.
  2. Das Terminal beginnt zu blinken und erwartet die Autorisierung - Auf der MDU erscheint "Autorisieren am Terminal"
  3. Entfernen Sie die MDU vom Terminal
  4. Halten Sie den privilegierten Key an das Terminal - Dieses blinkt einmal positiv (weiß, grün oder blau) und piepst einmal auf.
  5. Entfernen Sie den Key vom Terminal
  6. Halten Sie erneut die MDU ans Terminal - Die Datenübertragung fährt nun fort.
  7. (Je nach ausgewählter Aktion) - Warten Sie bis die Übertragung beendet ist oder auf weitere Aufforderungen auf der MDU.

Berechtigungen des Keys überprüfen

Der privilegierte Key muss folgende Kriterien erfüllen:

  1. Er benötigt eine Schließberechtigung für den betroffenen Zutrittspunkt. (sinnvoll ist es Keys mit Generalschließrecht als privilegierte Keys zu wählen)
  2. Der Key muss gültig sein (Start und Ende der Gültigkeit beachten - idealerweise unbegrenzt)
  3. Der Key benötigt die beiden speziellen Privilegien "Parametrierungs Privileg (MDU)" und "MDU-Audittrail-Privileg"

Diese Eigenschaften können Sie in der DG2 Software unter "Profile" > "Personen" prüfen. Suchen Sie dazu aus der Liste die entsprechende Person heraus. Sollten eines oder mehrere der Kriterien nicht erfüllt sein, ändern Sie die entsprechenden Einstellungen und speichern Sie diese ab. Stellen Sie dann den Key erneut aus. Nun sollte dieser als privilegierter Key akzeptiert werden.

Terminal auf fehlerhafte Konfiguration prüfen

Lesen Sie mithilfe der MDU die Terminal Info aus und überprüfen Sie, ob der Name des Terminals sowie die Uhrzeit korrekt sind. Sollten diese abweichen, könnte das die Ursache für den Autorisierungsfehler #1000 sein.

Hier hilft meistens ein Reset des Terminals oder ein Zugriff per Code. Im Anschluss kann das Terminal dann neu programmiert werden.

Terminal Montage prüfen

Sofern alle anderen Ursachen ausgeschlossen wurden, sollte die Montage des Terminals überprüft werden.

Eine Terminalkomponente könnte beschädigt oder nicht richtig angeschlossen sein. Prüfen Sie daher, ob alles korrekt verbunden ist und keine äußerlichen Schäden zu erkennen sind. 

Sollte der Fehler auch nach Überprüfung der Montage bestehen bleiben, ist möglicherweise der Leser oder das Logikmodul defekt und sollte ausgetauscht werden.


DG2 - Change terminal template

Change terminal template

Preparations (optional)

If you do not know which template is required, we advise you to gather the following information in advance.

Hardware information

Read the following information from the terminal info:

  • Terminal type
  • Firmware version

How do I read the terminal info?

Software Informationen

Check which HMS version you use and whether you have an SPK license.

Which software version am I using?

How do I check my HMS license?

How do I assign a template?

  1. Log in to the Dialock 2 software.
  2. Navigate to “Devices” > “Terminal”.
  3. Select the desired terminal from the list.
  4. Under Master data you will find the item “Template”.
  5. Select the appropriate template from the drop-down menu.
  6. Save the change via the left-hand actions menu.
  7. Transfer the changed data to the MDU.
  8. Program the terminal.

With or without “c”?

The abbreviation “c” refers to a special RFID chipset that is used in some terminals. For example, the DT7xx/DT7xxc and the DT600/DT600c are available in both variants.

What do the various abbreviations mean?

Functions

Important!Some of those functions listed below are only useful or feasible under certain conditions. Therefore, please check which firmware your terminal has by reading out the “Terminal Info”. Also check which HMS version you use and whether you have an SPK license.

DND do not disturb

Activates the “Do not disturb” bar on the inner module of the terminal, if available.

EIA encoding in advance

Supported from firmware 9.1.0.0 and HMS version 1.1.34.8 with an SPK license. Adjusts the configuration of the terminal so that keys created in the present and keys pre-programmed for the future do not invalidate each other. Enables the parallel coding of guest keys that are valid in the present with keys that are pre-programmed for the future.

SPK Smartphone Key

Supported from firmware 9.1.x.x. Activates the smartphone key function on the terminal. To open, the terminal must first be “woken up” by holding the smartphone in front of the reader.
An HMS with SPK license is also required to activate the smartphone key function.

It is also important to point out the naming of the access points! Room doors should only be recorded as room numbers, option doors require the prefix “S[option number]-”.

SPKp SPK permanent advertising

Supported from firmware 9.1.x.x. Activates the smartphone key function on the terminal. The terminal is permanently ready to receive, which is why it does not need to be “woken up”.

FCOL 1 free choice of locker 1

All keys - even unprogrammed ones - can select an open locker to lock it and open it again after use. Keys authorized to open can open independently of the currently programmed key.

FCOL 2 free choice of locker 2

Only keys with opening authorization can select a locker to lock it and open it again after use. Privileged keys can open independently of the key currently assigned.

Additions

-4dBm / -8dBm SPK Power level

Only occurs in combination with SPK/SPKp. The terminal is permanently ready to receive and transmits at the reduced power level of -4dBm or -8dBm.

PB push button

Only available for wall terminals. Activates the contacts of Input1 to connect an external device - such as a pushbutton.

(Guest) No Gen no generation

Deactivates the generation control for guest keys. Lost guest keys can no longer be invalidated by encoding a key with a newer issue date. This means that an older, possibly lost key remains valid.
This setting is only intended for special applications and may pose a security risk. Please contact our support team before activating it.

Sabo(Block) Sabotage-Block

Activates the option for tamper protection and alarm on the terminal. Additional hardware components are required to set up tamper protection. Please contact our support team to set this up.


DG2 - Check transponder definition

How do I check the transponder definition?

Warning

Do not change the transponder definition on your own!
This should only be done by trained specialist technicians.

Incorrect configuration can considerably restrict functionality!

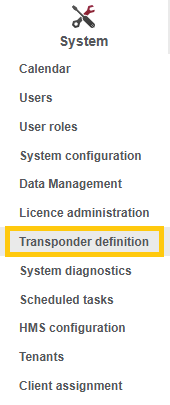
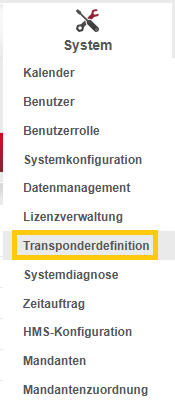
  • Step 1 - Navigate to transponder definition

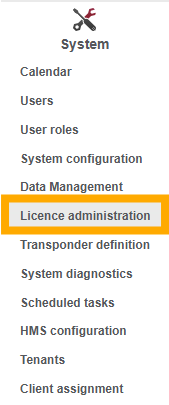
    1. Log into the Dialock 2 web interface.
    2. Navigate to "System" > "Transponder definition".
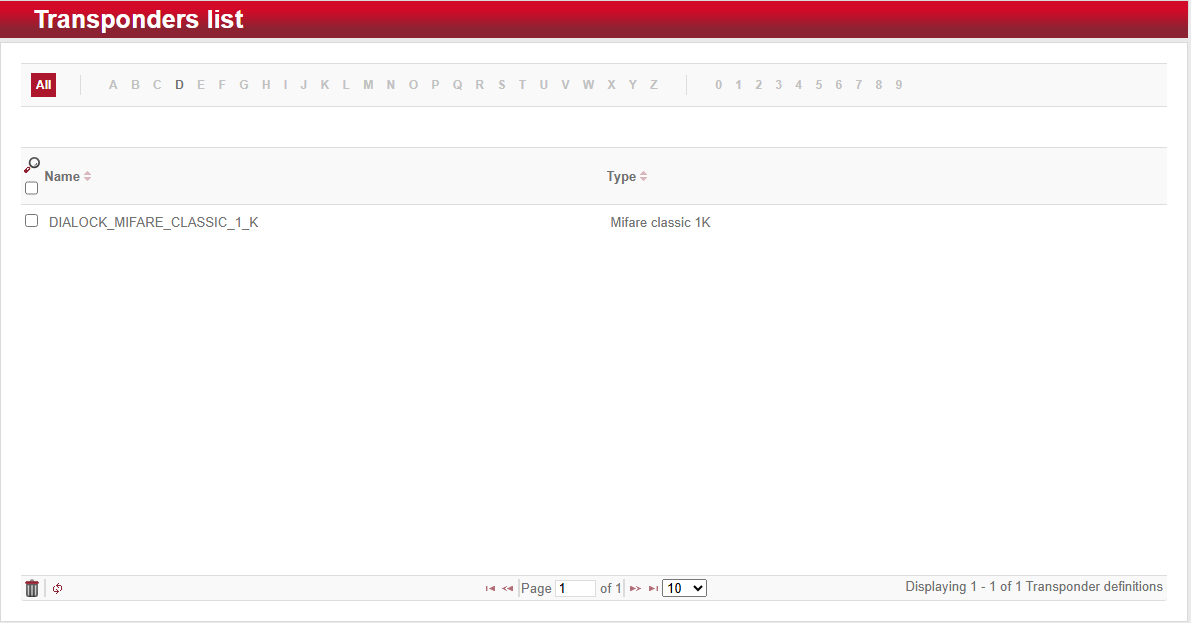
  • Step 2 - Check transponder definition

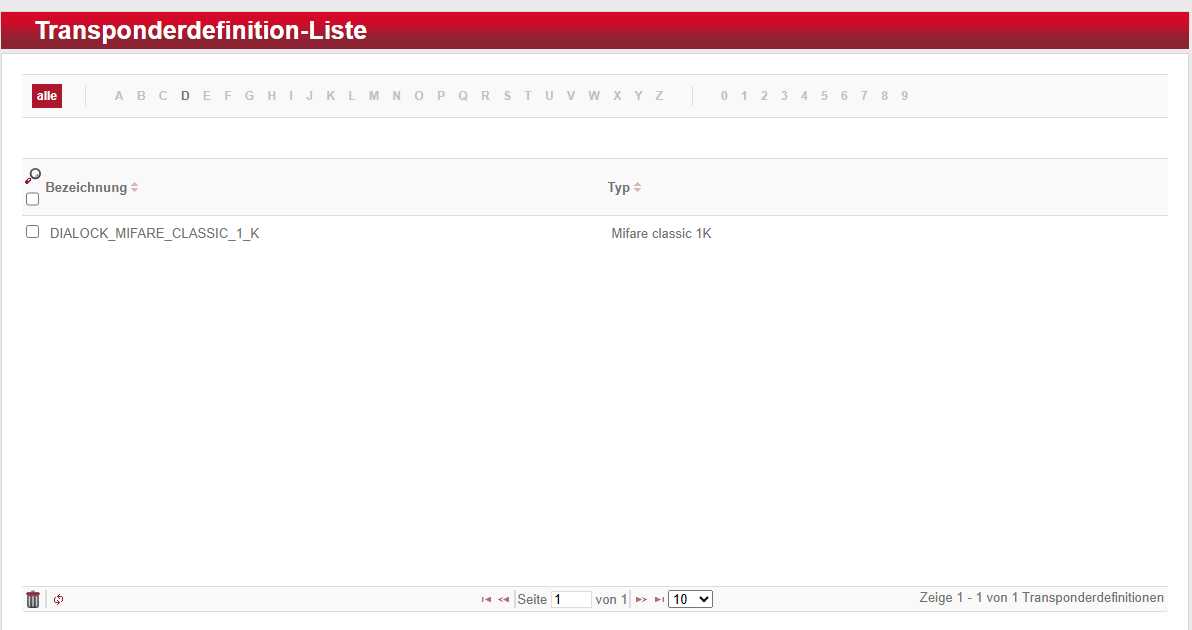
    1. Check the transponder definition in the list overview. (Usually there should only be one list element.)
    2. (If requested) Share a screenshot of the transponder definition with our support team.

DG2 - Create hardware report

How do I create the hardware report?

What is the purpose of the hardware report?

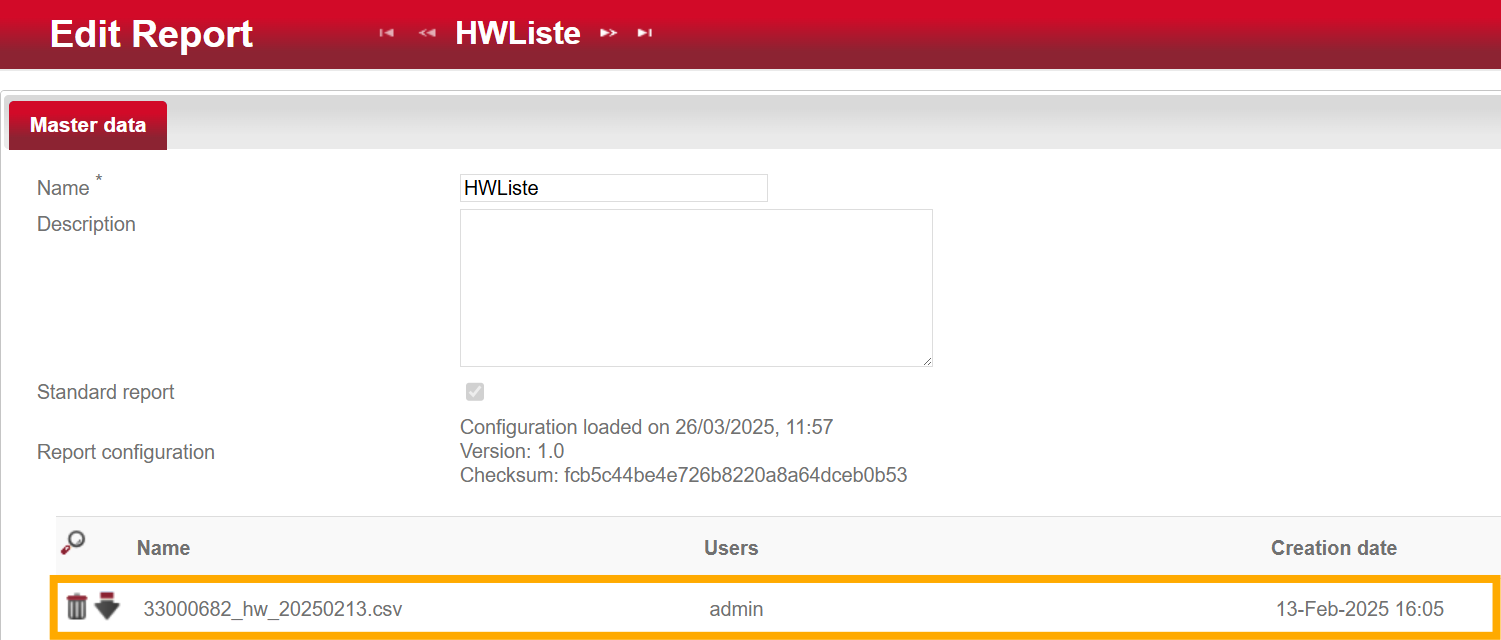
The hardware report contains all the basic information about how the terminals are set up in the system. This information includes the name, type and template of the terminal. For this reason, the hardware report can be used as a rudimentary backup of the terminals in order to reconstruct the terminal data in an emergency.

IMPORTANT! The hardware report does not contain any information on access authorizations for groups or the exact settings of the terminal. Therefore, the hardware report cannot be used independently to fully restore the system.

Generating the hardware report

  • Step 1 - Open the reports

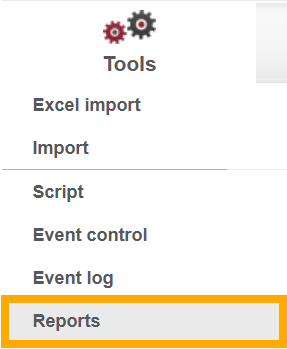
    Navigate via the menu to “Tools” > “Reports”.

  • Step 2 - Select report

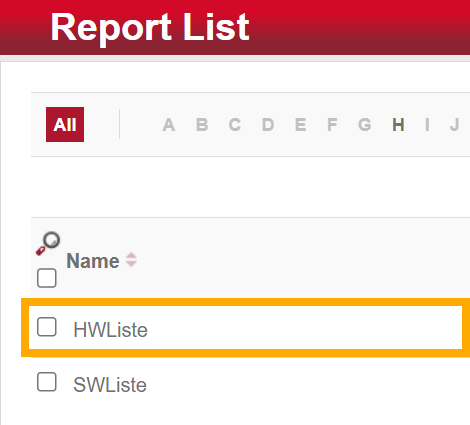
    Click on the “HWListe” (hardware list) entry in the report list.

  • Step 3 - Execute report

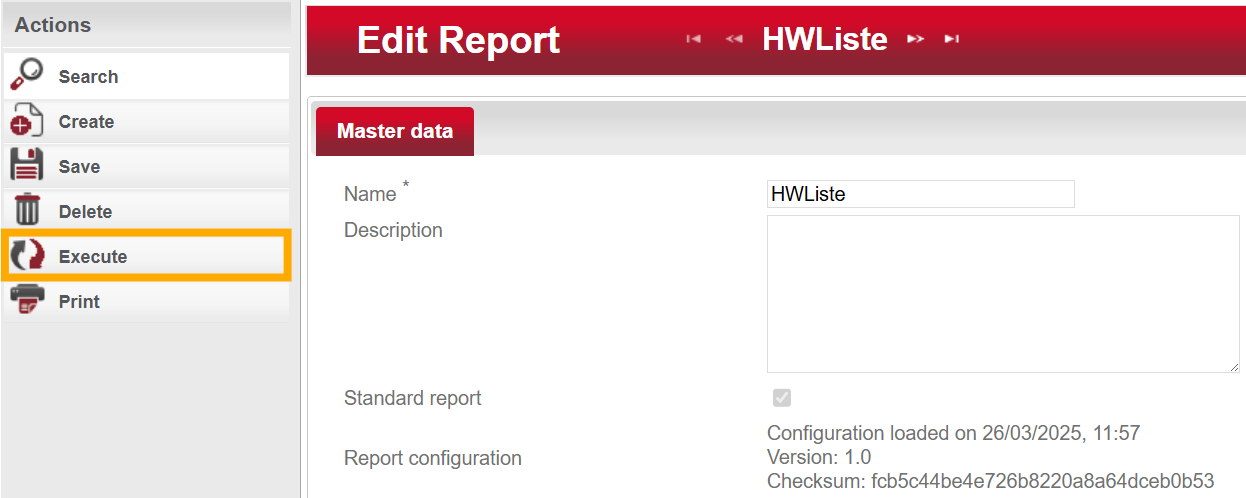
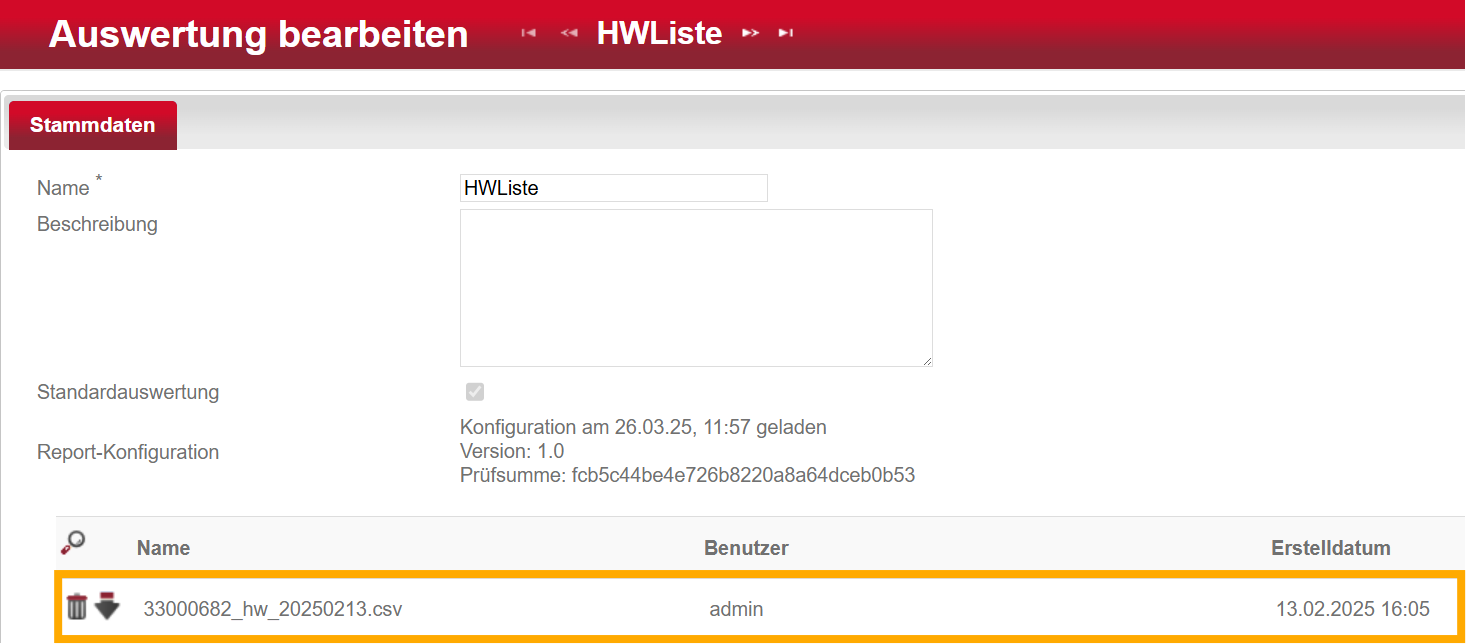
    Click on “Execute” in the left-hand actions menu. The parameters of the report should now open.

  • Step 4 - Report parameters

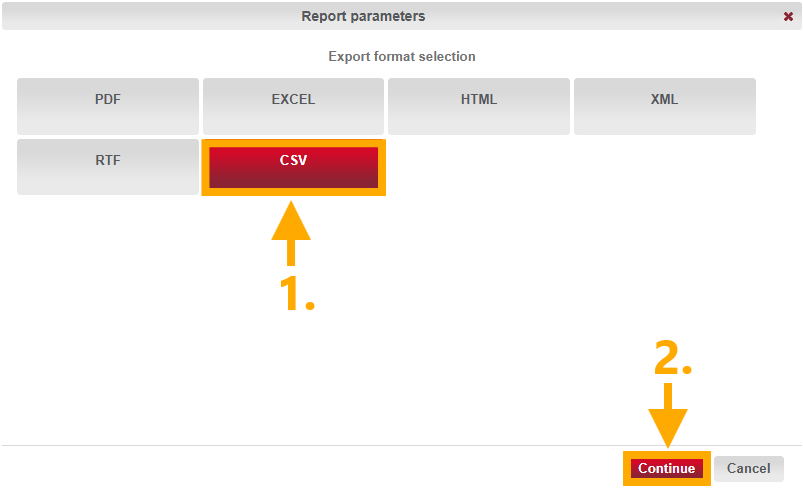
    Select “CSV” and click “Continue” to start generating the hardware list.
    NOTE: Depending on the size of the system, it may take a few minutes until the report has been created.

  • Step 5 - Download

    When the report has been successfully created, you can click on the latest entry in the report list to download the hardware report.


DG2 - Fallback system

How do I activate the Fallback System?

What is the purpose of the Fallback System?

If it should happen that no more keys can be created using the Dialock software, keys can also be created using the MDU with the help of the fallback system.

For this, you will need:

  • the MDU
  • an MDU-authorized personnel transponder (privileged transponder)
  • guest transponder (for handing out to guests later)

Activation of the Fallback System:

  1. Select "Terminal" > "Fallback System" > "On" on the MDU
  2. Hold the MDU up to the door's reading sensor
  3. The MDU now displays “Authorize at terminal”
  4. Put the MDU to the side and present the privileged transponder to the sensor (the terminal should beep once and light up white)
  5. Hold the MDU in front of the terminal one more time, afterwards you should see “Transfer completed”.
  6. The terminal will now flash white. While the terminal is in this state you can hold any number of keys in front of the reader to provide them with access rights.

These programmed transponders can now be used on the door in addition to the transponders that are already working and are valid until the Fallback System is deactivated on the terminals again.

Deactivation of the Fallback System:

The Fallback System can be deactivated again using the MDU or by presenting a valid guest key that was created using the software.

Afterwards, all keys that have been created via the Fallback System will no longer be valid.

Deactivation by MDU:

  1. Select "Terminal" > "Fallback System" > "Off" on the MDU
  2. Hold the MDU up to the door's reading sensor
  3. The MDU now displays “Authorize at terminal”
  4. Put the MDU to the side and present the privileged transponder to the sensor (the terminal should beep once and light up white)
  5. Hold the MDU in front of the terminal one more time, afterwards you should see “Transfer completed”.

DG2 - Funktionszeitmodell

Wie konfiguriere ich ein Funktionszeitmodell?

Was ist ein Funktionszeitmodell?

Das Funktionszeitmodell ist eine optionale Einstellung, die einem Terminal zugewiesen werden kann.
Die Einstellung erlaubt, dass das Terminal innerhalb eines angegebenen Zeitfensters eine andere Funktion hat als regulär.

Beispiel Haupteingang: Tagsüber ist der Haupteingang dauerhaft auf, nachts kann er nur durch berechtigte Keys geöffnet werden.

Wie lege ich ein Funktionszeitmodell an?

  • Schritt 1 - Navigation

    1. Melden Sie sich in der Dialock 2 Software an.
    2. Navigieren Sie zu "Geräte" > "Funktionszeitmodell".
  • Schritt 2 - Erfassen

    1. Klicken Sie im linken Aktionen-Menü auf "Erfassen".
    2. Wählen Sie als Hersteller "Häfele Offline" aus.
    3. Benennen Sie das Funktionszeitmodell passend und speichern Sie.
  • Schritt 3 - Funktion auswählen

    1. Klicken Sie mit einem Doppelklick in die Zeitmatrix für den gewünschten Tag.
    2. Wählen Sie eine oder mehrere Funktionen aus, die während des Zeitfensters gelten sollen.
      Falls Sie nur die Gäste, nicht aber das Personal zeitlich einschränken möchten, wählen Sie die Funktion "Für Funktions-ID".
    3. Bestätigen Sie die Auswahl mit OK.
  • Schritt 4 - Zeitfenster anpassen

    1. Stellen Sie sicher, dass der Kompatibilitätsmodus (obere rechte Ecke) deaktiviert ist.
    2. Klicken Sie das Zeitfenster an.
      1. Ziehen Sie die Ränder nach links / rechts, um die Uhrzeit anzupassen.
      2. Ziehen Sie die Ränder nach oben / unten, um das Zeitfenster auf weitere Tage zu kopieren.
    3. Speichern Sie die Einstellungen ab.
  • (Schritt 5 - Funktions-ID hinterlegen)

    Diese Schritte sind nur notwendig, falls Sie als Funktion "Für Funktions-ID" ausgewählt haben!

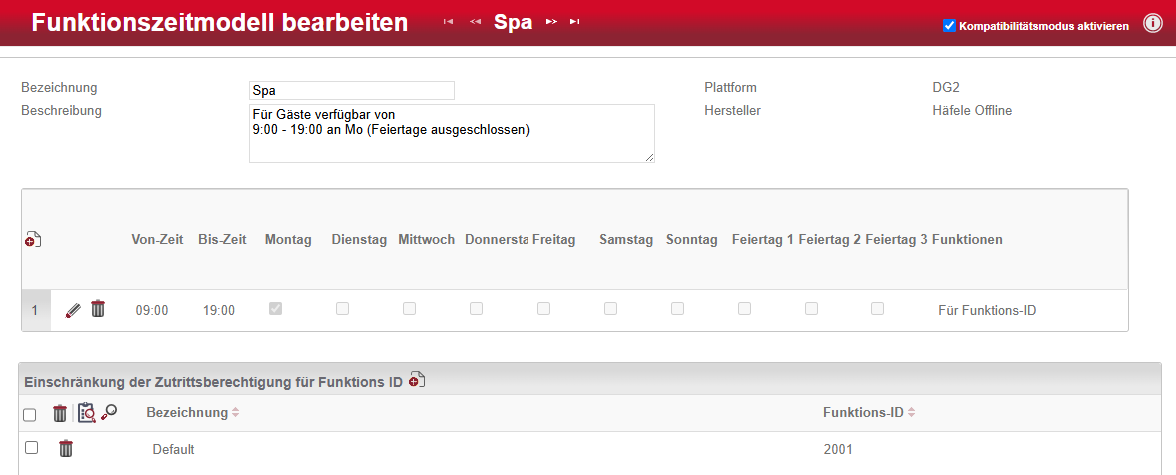
    1. Aktivieren Sie den Kompatibilitätsmodus (obere rechte Ecke).
    2. Im Abschnitt "Einschränkung der Zutrittsberechtigung für Funktions ID":
      1. Klicken Sie auf das Symbol "Klemmbrett mit Lupe".
      2. Wählen Sie die gewünschte Funktions-ID aus.
        Falls Sie den Zutritt der Gäste zeitlich beschränken wollen, wählen Sie die Default Funktions-ID 2001.
    3. Speichern Sie die Einstellungen ab.
  • Schritt 6 - Zeitmodell hinterlegen

    1. Navigieren Sie zu "Geräte" > "Terminals".
    2. Wählen Sie das gewünschte Terminal aus der Liste aus.
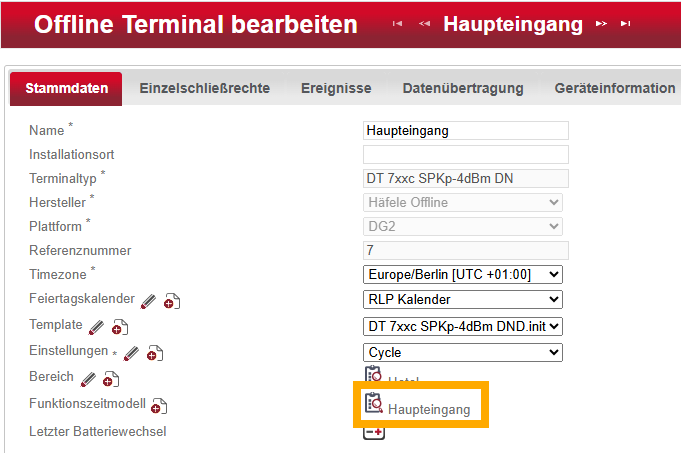
    3. Unter Stammdaten finden Sie auch hier den Punkt "Funktionszeitmodell".
    4. Klicken Sie auf das Symbol "Klemmbrett mit Lupe" und wählen das gewünschte Zeitmodell aus der Auflistung aus.
    5. Speichern Sie die Änderung über das linke Aktionen-Menü.
  • Schritt 7 - Übertragung der Änderungen

Wie ändere ich ein Funktionszeitmodell?

  • Schritt 1 - Modell auswählen

    1. Melden Sie sich in der Dialock 2 Software an.
    2. Navigieren Sie zu "Geräte" > "Terminals".
    3. Wählen Sie das gewünschte Terminal aus der Liste aus.
    4. Unter Stammdaten finden Sie auch hier den Punkt "Funktionszeitmodell". Merken Sie sich den Namen des Funktionszeitmodells.
  • Schritt 2 - Navigation

    1. Navigieren Sie zu "Geräte" > "Funktionszeitmodell".
    2. Wählen Sie das gewünschte Funktionszeitmodell, dessen Namen Sie sich gemerkt haben, aus der Liste aus.
  • Schritt 3a - Zeitfenster anpassen

    1. Falls Sie ein Zeitfenster anpassen möchten, stellen Sie sicher, dass der Kompatibilitätsmodus (obere rechte Ecke) deaktiviert ist.
    2. Beim gewünschten Zeitfenster:
      1. Ziehen Sie die Ränder nach links / rechts, um die Uhrzeit anzupassen.
      2. Klicken Sie mit einem Rechtsklick, um die Funktion anzupassen.
    3. Speichern Sie die Änderungen über das linke Aktionen-Menü ab.
  • Schritt 3b - Zeitfenster löschen

    1. Falls Sie ein Zeitfenster löschen möchten, aktivieren Sie im Fenster "Funktionszeitmodell bearbeiten" den Kompatibilitätsmodus.
    2. Nun werden die Zeitfenster tabellarisch aufgelistet.
    3. Drücken Sie in der gewünschten Zeile auf das Mülleimersymbol, um das Zeitfenster zu löschen.
  • Schritt 4 - Übertragung der Änderungen

Was bedeuten die verschiedenen Funktionen?

Entriegeln

Automatisches Öffnen am Startzeitpunkt (Von-Zeit) und automatisches Schließen am Endzeitpunkt (Bis-Zeit) des Zeitbereichs.

Toggle aktiv

Beim Präsentieren eines gültigen Keys wechselt der Zustand des Zutrittspunkts von „geschlossen“ nach „offen“ oder umgekehrt und verbleibt in diesem Zustand.

Toggle mit Karte aktiv

Bei kurzen Präsentieren des Keys öffnet das Terminal und schließt nach wenigen Sekunden wieder.

Bei längerem Präsentieren des Keys wechselt der Zustand des Zutrittspunkts von „geschlossen“ nach „offen“ oder umgekehrt und verbleibt in diesem
Zustand.

Toggle aktiv + Entriegeln

Die Kombination der Funktionen „Toggle aktiv“ und „Entriegeln“ entspricht der Funktionsweise bei „Toggle aktiv“. Zusätzlich wird eine offene Tür/Sperre am Endzeitpunkt des Zeitbereichs automatisch geschlossen, um sicherzustellen, dass z. B. eine Bürotür am Ende der Arbeitszeit geschlossen ist.

Für Funktions-ID

Zutritt für Personen mit der entsprechenden Funktions-ID ist nur innerhalb des Zeitfensters möglich.
Die Default Funktions-ID 2001 ist automatisch auf jedem Gastkey hinterlegt und kann deshalb zur zeitlichen Zutrittsbeschränkung von Gästen verwendet werden.

Alternative Protokollierung

Aktivieren Sie diese Funktion, wenn an einer bestimmten Tür/Sperre z. B. gemäß Betriebsrat keine Protokollierung o. ä. stattfinden soll. Die dahinterstehende alternative Protokollierung wird individuell durch einen geschulten Techniker festgelegt.


DG2 - Generationsfehler (Fehler 1.1)

DG2 - Generationsfehler (Fehler 1.1)

Wozu sind Generationen da?
Ein Transponder erhält beim Beschreiben immer eine Generation oder ein Austelldatum. So ist sichergestellt, dass immer nur der aktuellste Transponder akzeptiert wird.

In der DG2 äußert sich der Generationsfehler mit 1x langem Piepen und 1x kurzem Piepen (Fehler 1.1).

Der Fehler besagt, dass es mindestens einen weiteren Key mit einem neueren Ausstelldatum gibt.

Ursachen bei Gastkeys

Bei Gastkeys tritt der Fehler häufig bei Buchungen auf, bei denen mehr als ein Key ausgestellt werden. Wird jeder der benötigten Keys als ein neuer Check-in oder Ersatzkey erstellt, statt als Duplikats des ersten Keys, funktioniert dann nur der zuletzt ausgestellte Key.

Um den Fehler zu beheben, reicht es aus, die Gastkeys neu und korrekt auszustellen.

Ursachen bei Personalkeys

Bei Personalkeys kann dies in der Regel nur vorkommen, wenn zwei Keys mit derselben Transponderkennung ausgestellt worden sind.

Es sollte daher darauf geachtet werden, dass immer nur ein Key pro Transponderkennung ausgestellt wird.


DG2 - Häfele und HMS Dienste neustarten

DG2 - Wie und wo starte ich die Häfele und Dialock HMS Dienste neu?

Hin und wieder kann es vorkommen, dass etwa Karten nicht mehr kodiert werden können oder der Webserver nicht mehr erreichbar ist. In dem Fall kann es dann helfen einen oder mehrere Dienste neu zu starten. Hier erfahren Sie, wo Sie die relevanten Dienste finden und diese (neu-)starten können.

WICHTIG! Die folgenden Schritte müssen vom Server aus durchgeführt werden. 

1. Windows Dienste aufrufen

Drücken Sie Windows + R und geben Sie "services.msc" ein. Nun öffnet sich die "Dienste" Anwendung. Klicken Sie einmal mit Linksklick in die Auflistung und tippen Sie ein "H" auf der Tastatur, um zu den Diensten mit H wie "Häfele" zu springen.

2. Häfele Dienste

Die hier unterhalb dargestellten Dienste sollten im Normalfall alle ausgeführt werden. Sollten einer oder mehrere dieser Dienste nicht ausgeführt werden, so starten Sie diese/n.
 (Ausnahme: Der Universal Client kann sich auch auf einem anderen PC befinden, der zur Bedienung mit der MDU verwendet wird oder bei einer älteren Software Version komplett wegfallen!)

Sollten alle Dienste ausgeführt werden und trotzdem ein Problem, beispielsweise mit dem Webserver oder in der Kommunikation zur HMS oder zum Encoder, bestehen, so starten Sie den jeweiligen Dienst neu.

Einen Dienst starten Sie, indem Sie auf dem jeweiligen Dienst mit einem Rechtsklick "starten" oder "neustarten" auswählen, oder wenden Sie sich an Ihre zuständige IT, um diese Dienste zu starten.

WICHTIG!Warten Sie nach dem Neustart eines oder mehrerer Häfele Dienste ungefähr 5 Minuten, bis die Dienste vollständig gestartet sind.

3. Dialock HMS Dienste

Sollten alle Häfele Dienste (wieder) ausgeführt werden, starten Sie nun die Dialock HMS Dienste neu. Immer vorhanden sein sollten die Dienste "Administration", "KeyManagement" und "Service Monitor", alle weiteren hier gezeigten Dienste sind optional und ihre Notwendigkeit hängt davon ab, ob ein PMS-Anbieter eine unserer Schnittstellen benötigt (Hierzu ggf. den Protokolltyp in den Klammern beachten).

Beim Starten sollte folgende Reihenfolge beachtet werden:

  1. Administration
  2. Service Monitor
  3. Key Management (verwendet XML)

Anschließend optionale Dienste:

  1. Distributor (ab V1.1.25.x obsolet/ verwendet XML)
  2. FidelioManagement (verwendet FIAS)
  3. Additional Fidelio (ab V1.1.25.x obsolet/ verwendet FIAS)
  4. Site Agent (verwendet JSON) / Websocket (verwendet WebSocket)

4. Funktionstest

Starten Sie anschließend Ihre Software neu, mit der Sie arbeiten möchten, und testen Sie die Funktion.


DG2 - Hardwareliste erstellen

Wie erstelle ich die Hardwareliste?

Wozu benötigt man die Hardwareliste?

Die Hardwareliste beinhaltet alle grundlegenden Informationen darüber, wie die Terminals im System eingerichtet sind. Zu diesen Informationen gehören unter anderem Name, Typ und Template des Terminals. Aus diesem Grund kann die Hardwareliste als rudimentäres Backup der Terminals verwendet werden, um im Notfall die Terminaldaten zu rekonstruieren.

WICHTIG! Die Hardwareliste beinhaltet keine Informationen zu Zutrittsberechtigungen für Gruppen oder den exakten Einstellungen des Terminals. Aus diesem Grund kann die Hardwareliste nicht eigenständig zur vollständigen Wiederherstellung des Systems verwendet werden.

Hardwareliste erstellen

  • Schritt 1 - Auswertungen öffnen

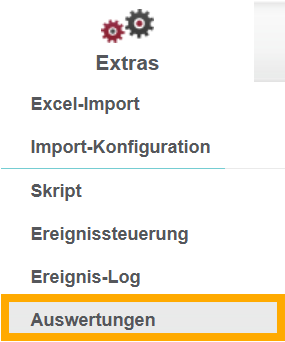
    Navigieren Sie zum Menü "Extras" > "Auswertungen".

  • Schritt 2 - Auswertung wählen

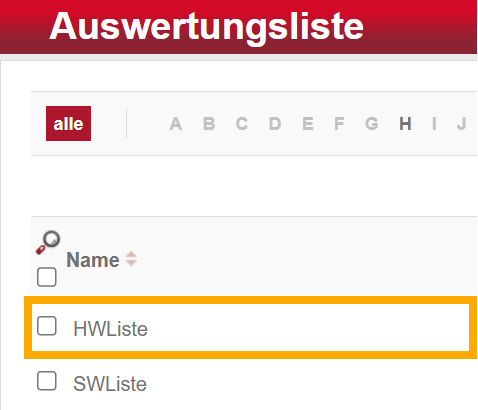
    Klicken Sie in der Auswertungsliste auf den Eintrag "HWListe" (Hardwareliste).

  • Schritt 3 - Auswertung ausführen

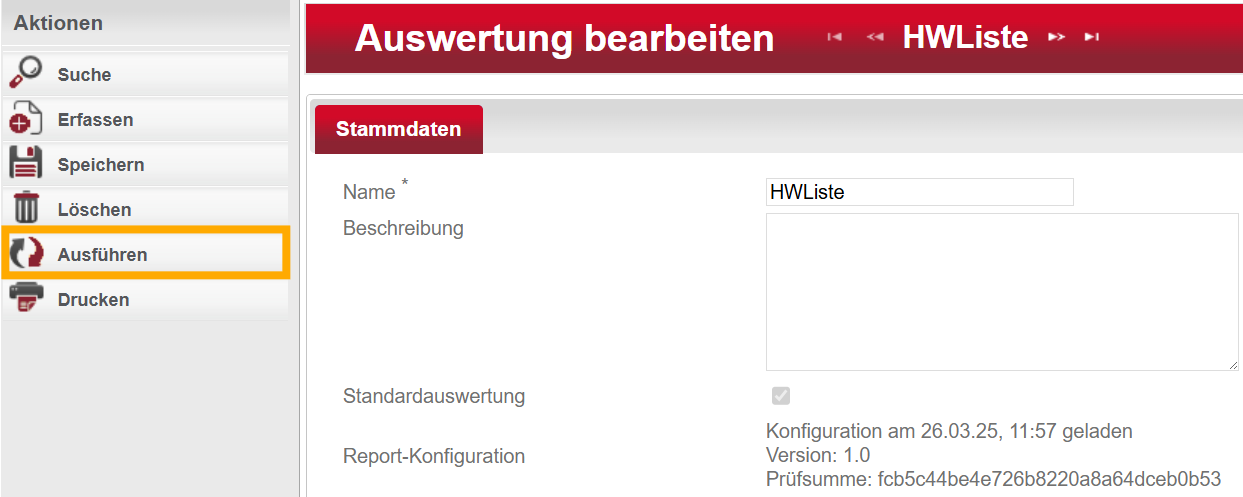
    Klicken Sie im linken Aktionen-Menü auf "Ausführen". Es sollten sich nun die Parameter der Auswertung öffnen.

  • Schritt 4 - Auswertungs-Parameter

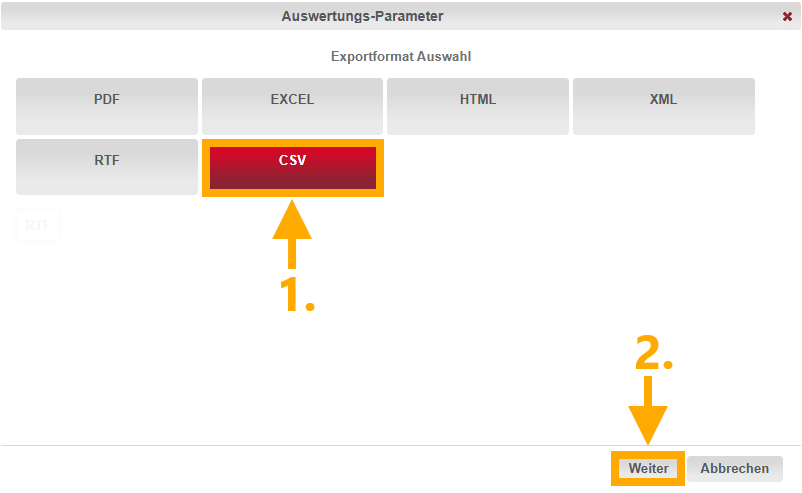
    Wählen Sie "CSV" aus und klicken Sie auf "Weiter", um die Erstellung der Hardwareliste zu starten.
    HINWEIS: Je nach Größe des Systems kann die Generierung der Hardwareliste einige Minuten in Anspruch nehmen.

  • Schritt 5 - Download

    Sobald die Auswertung erfolgreich erstellt wurde, können Sie auf den neusten Eintrag in der Auswertungsliste klicken, um die soeben generierte Hardwareliste herunter zu laden.


DG2 - KeyWriter - Error 4098 / Error 4099

DG2 - Error 4098 / Error 4099

  • Error 4098 is a write error. It can occur if cards are not written correctly by the encoding station or if the encoding station does not recognize the transponder pattern.

  • Error 4099 is a read error. It can occur if cards are not read correctly by the encoding station or if the encoding station does not recognize the transponder pattern.

Solution (summary)

  • Make sure that the card is correctly positioned on the encoding station.
  • Check whether the error occurs with several cards. If only one card is affected, the card may also be defective.
  • Ensure that the encoding station is not placed on metal or in the immediate vicinity of other RFID-enabled devices (e.g. EC card readers).
  • Restart the HMS services (and Haefele Dialock 2.0 services if necessary).

Solution (detailed)

1. Make sure that the card is correctly positioned on the coding station.

Sometimes the error occurs if the card is removed from the encoding station too quickly while the encoding process is still running or if the card is not positioned correctly. Therefore, make sure that the card lies flat on the encoding station during the whole encoding process.

2. Check whether the error only occurs with individual cards.

If the error only occurs with one card, test the encoding with other cards and set the non-functioning card aside for the time being. Test the card again in step 4. If the error continues to occur, the card may be defective.

If several or even all cards are affected, a simultaneous defect in the cards cannot be ruled out, but is unlikely.
In case it is not a newly delivered batch of cards, first put the affected cards to one side and test the card coding again in step 4.
Should it be a newly delivered batch, it is possible that the transponder standards of the delivered cards do not match the standard stored in the software. If available, compare the trailing section of the imprint on the newly delivered keys with the imprint on the existing ones.
When the endings are different, they are not compatible.

3. Rule out external interference factors.

Encoding stations write to transponders using RFID technology - a wireless transmission method. These signals can easily be influenced by external factors. Therefore, make sure that the encoding station is not placed on metal or any other conductive material and ensure that sufficient distance is maintained from other RFID-enabled devices. These include, for example, EC card readers.

4. Check whether the Häfele and Dialock HMS services are running

IMPORTANT! The following steps must be carried out from the server!

  1. Open the Windows services and search for the “Häfele” services.
  2. Check whether the services are generally running and, if necessary, start any that are not running.
  3. Restart the “Communication Server” and wait approximately 5 minutes until it has fully started.
  4. Search for the “Dialock HMS” services.
  5. At the very least, start the “Administration”, “Key Management” and “Service Monitor” services in this order one after the other.
  6. (Optional when using a PMS:) Start the other HMS services that are required for communication with the PMS. Please refer to the detailed instructions for the start sequence.

Finally, restart the software you are using to encode the cards and test the key creation with the cards previously set aside.

To the detailed instructions on how to restart the services


DG2 - KeyWriter - Error 4103

DG2 - Error 4103

Error 4103 is a hardware initialization error and occurs when communication between the encoding station and the software is disrupted. It is an error that can occur in all versions of the HMS.

Solutions (summary)

  • Restart the encoding station (reconnect the power and network cable) and wait approx. 5 minutes until the encoding station has started completely.
  • Make sure that the IP address of the encoding station is not being used by another device (e.g. a PC or network telephone).
  • Check whether the Haefele Dialock 2.0 services are running on the server and restart them if necessary.
  • If there have been any changes to the network, the server's firewall must be checked. Port 8443 must be opened for the coding station.

Solution (detailed)

To check where the error occurs, you can follow these steps:

1. Restart the coding station

Disconnect the power and network cable from the encoding station and reconnect the encoding station after a few seconds. Wait approx. 5 minutes until the encoding station is online again. If necessary, also check the LED on the socket of the RJ45 plug. These should both light up.
In most cases, restarting the encoding station already rectifies the communication error and cards can be coded again.

2. Check whether the encoding station is accessible in the network

Press Windows + R and type “cmd”. Now type “ping ” in the Windows command prompt followed by a space and the encoding stations IP address. You can usually find the IP address on the display of the encoding station.

If you receive a response from the encoding station, it should look similar to the one shown above. In this case, the encoding station is basically reachable. If the encoding station cannot be reached, you will receive the message “Timeout” or “No response” in the prompt. In this case check the network connection by testing various cables and slots on the router.
If the connection is still not possible, it could be that the encoding station has a defective socket.

3. Try to access the web interface of the coding station

To do this, enter the IP address of the coding station in the search bar of your Internet browser.

IMPORTANT! The encoding station only has to be accessible from the server. Depending on the network structure, client PCs may be located in a different network and will not receive a response from the ping of the encoding station. In this case the web interface also cannot be accessed.
You should therefore carry out this step from the server.

It can also happen that you are taken to a different page when you call up the IP address in the browser. In this case, the encoding station is blocked by another device and a free IP address must be assigned for one of the two devices. If the address of the encoding station needs to be changed, we recommend contacting our support team.

However, if the encoding station is accessible, its operating system will work. In such cases, the problem usually does not lie with the coding station.

4. Check whether the Haefele Dialock 2.0 and Dialock HMS services are running on the server

Press Windows + R and enter “services.msc”. The “Services” application will now open. Left-click once in the list and type an “H” on the keyboard to jump to the services with H like “Häfele”.

The Universal Client is optional and does not have to be installed on the server.
If the remaining services are not running, restart them by right-clicking on the respective service and selecting “start” or “restart”, otherwise contact your responsible IT department to start these services. Then wait about 5 minutes until the services are fully started.

When the Häfele services are running again, restart the Dialock HMS services. The “Administration”, “KeyManagement” and “Service Monitor” services should always be available; all other services shown here are optional and their necessity depends on whether a PMS provider requires one of our interfaces.

The following sequence should be followed when starting:

  1. Administration
  2. Service Monitor
  3. Key Management

Followed by optional services:

  1. Distributor (obsolet from V1.1.25.x)
  2. FidelioManagement
  3. Additional Fidelio (obsolet from V1.1.25.x)
  4. Site Agent / Websocket


Then restart the software you are using to encode the cards and test the key creation.