MDU issues at parametrising
Issues with detecting the MDU
NOTE: To be detected, an MDU must always be connected via cable to the PC on which the Universal Client service for data transfer is installed.
- Open the Dialock 2 web interface and log in with your user.
- Navigate to “Devices” > “MDU”.
- If available, select your MDU from the list.
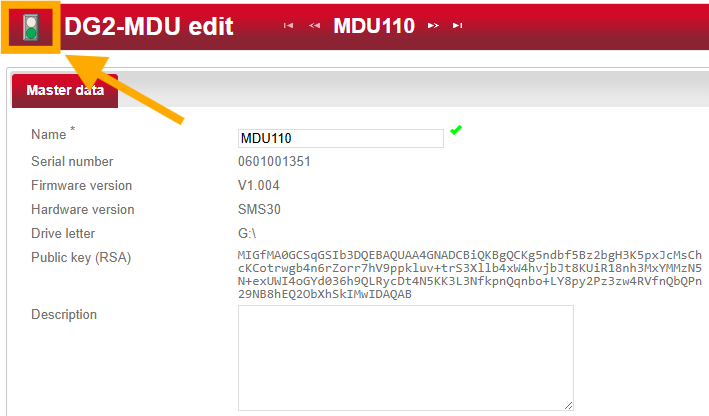
- You will now see a traffic light at the top left that shows the connection status of the MDU.
Keep an eye on the traffic light in the DG2 regularly during the following steps. As soon as it turns green, the data transfer can be tested.
- Check the installed version of the DG2 software.
- If the version is 6.1 or older, the DG2 software should be updated! Please contact our support team to carry out the update.
- If you still have an Internet Explorer or alternatively an Edge with Internet Explorer mode, open the DG2 web interface in Internet Explorer (mode) and carry out the data transfer again.
- Connect the MDU to the PC. If the MDU is already connected, disconnect the MDU briefly and then reconnect it.
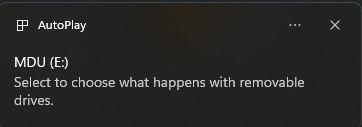
- Check whether a message appears in the bottom right-hand corner of the screen stating that there is a problem with the drive.
- If it appears, click on the message and repair the drive.
- Check to see if a large charging icon is displayed on the MDU that takes up the entire screen.
- If the charging symbol is not displayed, check whether the cable is plugged in correctly or has a loose connection. If possible, also test other slots on the PC.
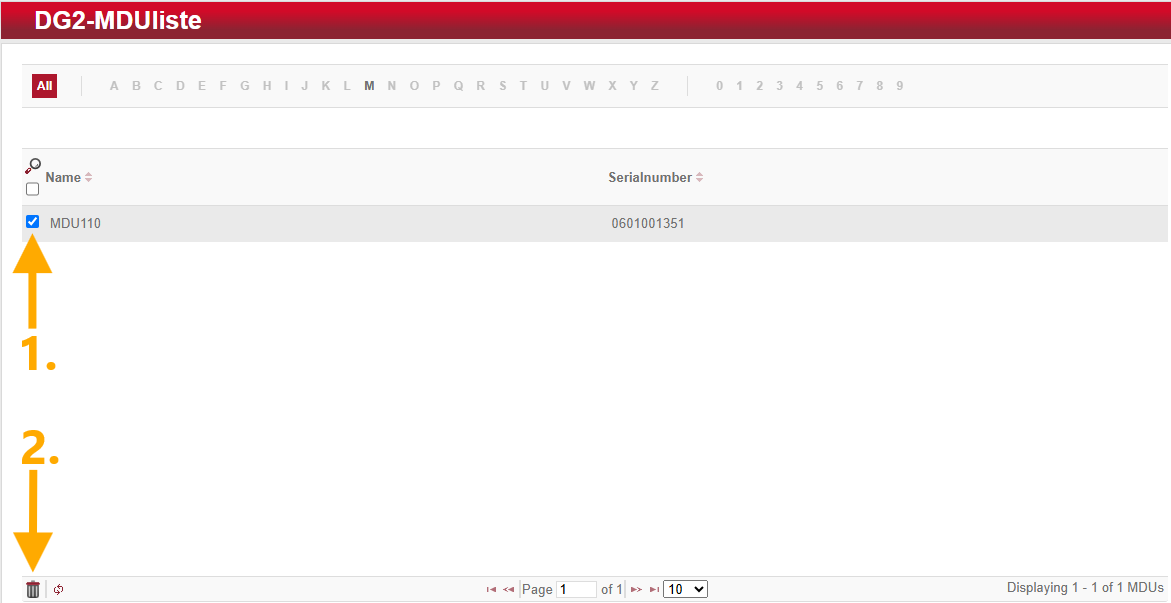
- Navigate to “Devices” > “MDU”.
- If available, check the box next to your MDU (1. in illus.).
- Delete the MDU using the dustbin symbol (2nd in illus.) and confirm all dialog windows.
- Unplug the MDU and plug it back in.
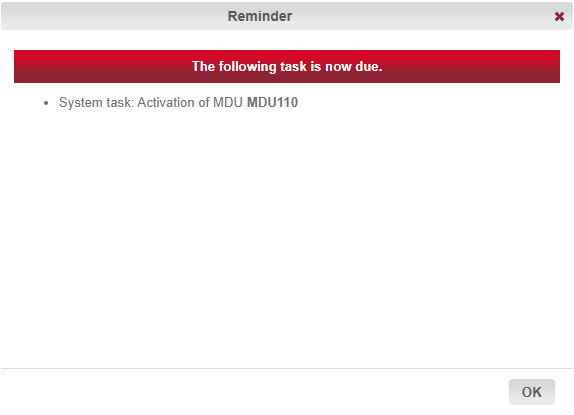
- A window for activating the MDU should appear within approx. one minute.
- If the message appears, click on “System task: Activate MDU MDU110”.
- Then select “Execute” in the left-hand actions menu to activate the MDU.
- Reinstall the Universal Client service.
- A window for activating the MDU should now appear within approx. one minute.
- If the message appears, click on “System task: Activate MDU MDU110”.
- Then select “Execute” in the left-hand actions menu to activate the MDU.
- Unplug the MDU from the PC.
- Start the MDU.
- Navigate to "MDU settings" > "Security".
- Press Enter to regenerate the security key.
- A window for activating the MDU should now appear within approx. one minute.
- If the message appears, click on "System task: Activate MDU MDU110".
- Then select "Execute" in the left actions menu to activate the MDU.
- If none of the above steps have helped, please contact our support team, as there may be a serious problem with the folder structure of the MDU.
Issues with data transmission
IMPORTANT! Apart from the hyphen, no special characters (especially / \ .) should be used in terminal names, otherwise the following problems may occur:
- The protocol cannot be assigned to a terminal during protocol import.
- The folder structure on the MDU may be created incorrectly during parameterization.
The menu item “Devices” > “MDU” is missing
- Open the Dialock 2 web interface and log in with your user.
- Navigate to “System” > “System configuration” > ‘Offline’ > “Häfele-DG2”.
- Check the “Dialock offline system” box.

Success message, but the data on the MDU is not up to date
Only the generation process is carried out during parameterization - the delete and write processes are skipped. The reason for this is that different drive letters are used in the DG2 and the MDU.
NOTE: If the MDU is to be used on several different PCs, solution variant 2 is to be preferred, as this variant aligns the drive letters of the DG2 and the PCs involved.
If the MDU is only deleted instead, it adopts the drive letter of the current PC. When connecting to another PC, this can lead to a conflict as the assignment is no longer correct.
Variant 1 - Reapply MDU
- Navigate to “Devices” > “MDU”.
- Check the box next to your MDU (1. in illus.).
- Delete the MDU using the dustbin symbol (2nd in illus.) and confirm all dialog windows.

- Unplug the MDU and plug it back in.
- A window for activating the MDU should appear within approx. one minute.
- If the message appears, click on “System task: Activate MDU MDU110”.
- Then select “Execute” in the left-hand actions menu to activate the MDU.

Variant 2 - Adjust drive letter
- Open the Dialock 2 web interface and log in with your user.
- Navigate to “Devices” > “MDU”.
- Select your MDU from the list.
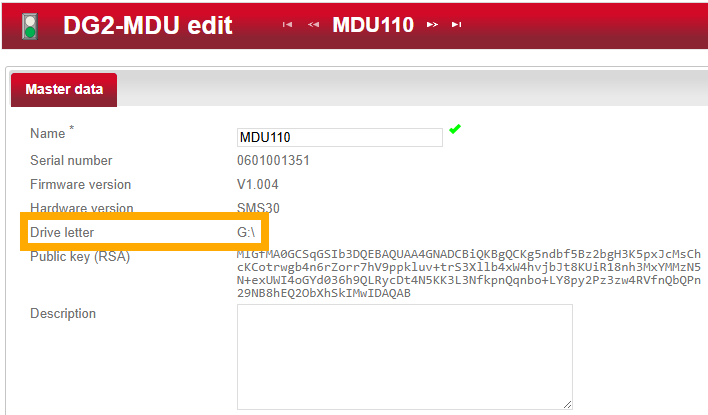
- Make a note of the drive letter that is now displayed.
In the example, the drive letter is “G”.
- Plug the MDU into the PC.
- Open the file explorer.
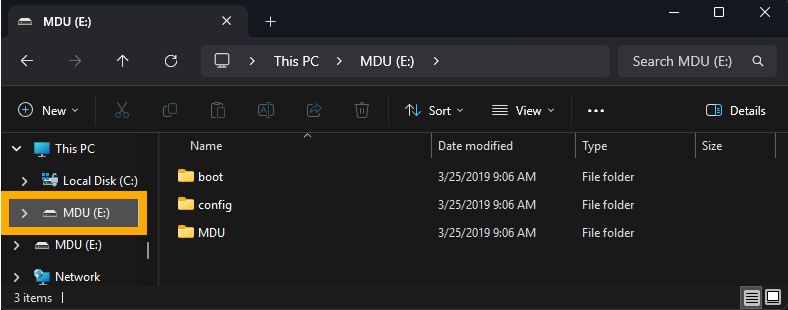
- Search for the connected MDU under the “This PC” section.
- Compare the drive letter with the one previously noted from the DG2. If the two are different, the letter must be adjusted.
In the example, the drive letter is “E”.
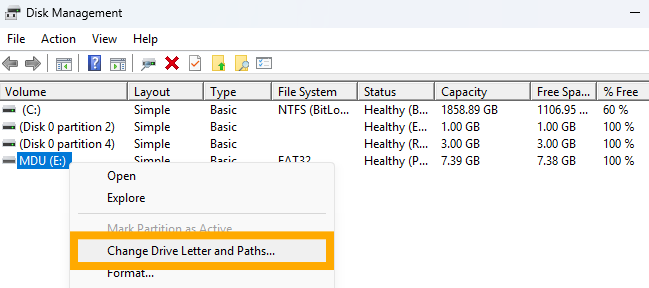
- Press Windows + R and enter “diskmgmt.msc”. The “Disk Management” will now open.
- Right-click on the MDU and select “Change drive letter and path”.
- Click on “Change...” and assign the previously noted drive letter.
In the example, the drive letter “G” should be assigned.
Error messages
Error during generation of mdu parameter

- Open the Dialock 2 web interface and log in with your user.
- Only transfer a single terminal to the MDU with as simple a name as possible without special characters (e.g. “100” or “main entrance”).
- If the transfer of the single terminal works, but the transfer of several terminals fails, at least one of the terminals has a special character in its name.
- Navigate to “Devices” > “Terminals”.
- Search the list for terminals that have a special character in their name.
NOTE: Hyphens are permitted and even mandatory for Smartphonekey option doors (e.g. “S1 main entrance”). - For each terminal found with special characters:
- Click on the terminal and switch to the “Master data” tab.
- Change the name of the terminal and save the changes via the left-hand actions menu.
- Transfer the changed data to your MDU.
- Now reprogram the terminal with the changed data.
Other error messages
Please take a screenshot of your error message and contact our support.